
These homemade fortune cookies are only four ingredients and taste like the ones served at restaurants. I share step by step photos so you can make your own. They are fun to customize with your own messages and dip them in chocolate for gifts, favors, a party, wedding or bridal shower, and more.

Chinese New Year is coming up and I thought I’d make some fun and festive fortune cookies for the occasion. I’ve made fortune cookies before, but this time I really took the time to test several methods, recipes, etc. These fortune cookies are just four ingredients and a few minutes of prep.
That being said, it does take a few tries to get the hang of it and you do have to be pretty precise, so I took some step-by-step photos that will hopefully guide you along.
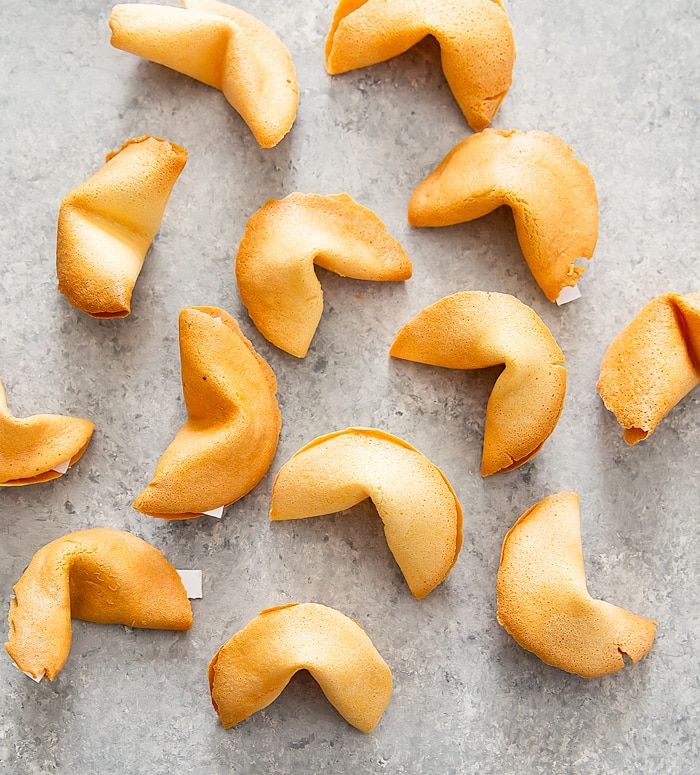
They are a bit thinner than some other fortune cookies I’ve had, but they are very light and crisp and I’m thrilled with how they turned out.
Ingredients
- Large egg white
- Vanilla extract or almond extract
- All-purpose flour
- Granulated sugar

How to Make Homemade Fortune Cookies
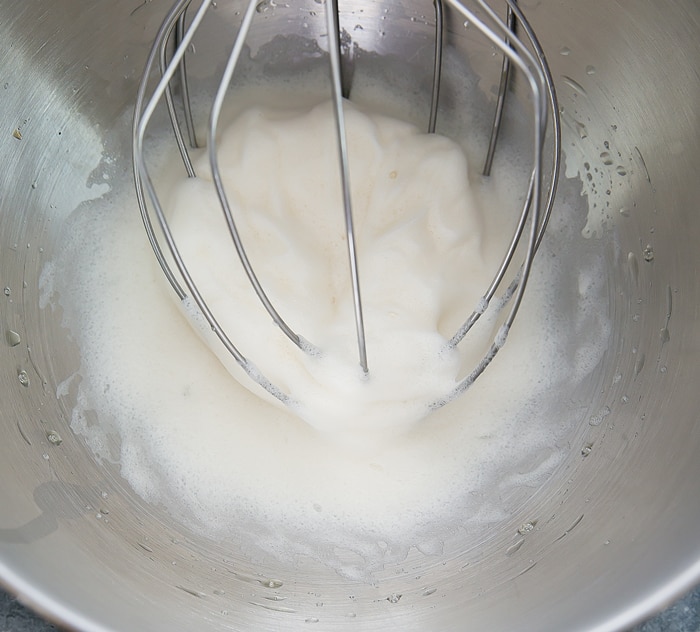
Step 1: Beat the egg whites and vanilla in a large bowl with a hand mixer just until they increase in volume and become foamy. You don’t want stiff peaks to form and it should only take 30 to 40 seconds to achieve the right consistency.
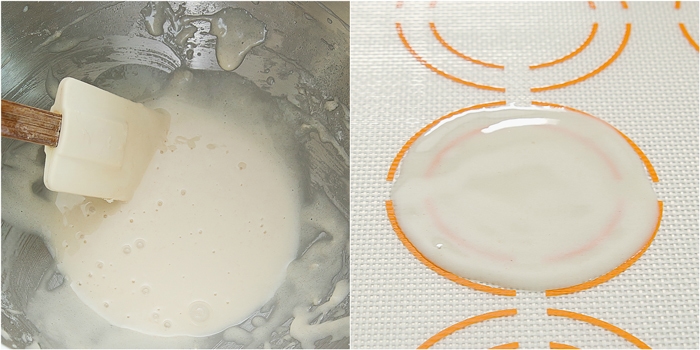
Step 2: Add the sifted flour and sugar to the egg whites. You mix them for about one minute just until they’ve combined and you have a thin batter.
Step 3: Spoon the batter into a thin 3-inch circle on a baking sheet. I recommend using a silicone baking mat (Silpat) that has guides printed on them to make this very easy.
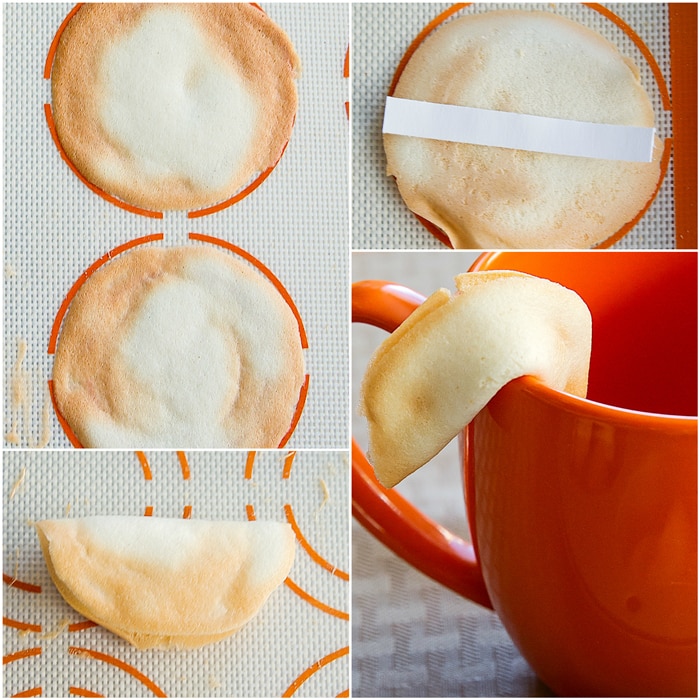
Step 4: Working in small batches bake the cookies for about five minutes at 400°F or until the edges start to turn a golden brown. You need to work in small batches so that when the cookies come out the oven you can quickly shape them into a fortune cookie shape (with your paper fortune strips tucked inside, if using). If the cookies cool it will be difficult to shape them.
The recipe card at the end of the post has even more details for making these fortune cookies, including how to shape them quickly once they come out of the oven.
How to Keep Them Crispy
One thing I’ve struggled with when making fortune cookies is how to keep them crisp. They are super crisp the first few hours after baking, but they soften slightly due to exposure to moisture in the air. Even sealing them didn’t solve the problem.
And then I figured out a solution. After making them, stick them back in the oven and let them dry out further. This not only keeps them super crispy, but also evenly browns the cookies so that they don’t look as pale and appear more like the color of the ones sold at restaurants.
Once they are completely cooled, store them in an airtight container or Ziploc bag. The will keep well for up to three days at room temperature.
Decorating Tips
You don’t have to decorate them, but for weddings, showers, or other parties I like to dress them up.
Here are some ideas:
- Drizzle the cookies with melted chocolate.
- Dip the cookies in melted chocolate or different colored chocolate candy melts. Regular chocolate or white chocolate will both work.
- Add some sprinkles while the chocolate is wet.
- Dust the cookies with edible silver dust.
Can you make these gluten-free?
I have not tested this recipe with gluten-free flour or other flour alternatives.

More Recipes to Try

Homemade Fortune Cookies
Ingredients
- 1 egg white from a large egg
- 1/8 tsp vanilla extract
- 1/4 cup all purpose flour
- 1/4 cup granulated white sugar
Instructions
- Preheat oven to 400°F. In the bowl of a stand mixer, add egg white and vanilla. Beat on highest speed until completely foamy. The foam should turn white in color and you should have about 3 times the volume of what you started with, but you don't want to beat to the point where it start to form peaks. Using an egg straight from the fridge, it took me about 30-40 seconds to reach the white foam consistency.
- In a small bowl, sift together sugar and flour. Add to mixing bowl. Mix on medium speed just until flour and sugar are completely incorporated and a smooth batter forms. Be careful not to mix too long. This part should take about 1 minute.
- Prepare baking sheets. You will want to prepare at least 2 sheets as you will be making these in very small batches (I recommend making two cookies at a time, and the max I've been able to do before the cookie dough hardens is 3). Cookie sheets need to be lined with silicone baking mat or parchment paper. I preferred how they came out with the silicone mats better. You will be making 3 inches circles on your mats. There are several ways to do this: you can do it free hand and measure them with a ruler; you can use silicone cookie mats that have 3 inch circles already drawn out (like the ones above which I got at Costco); you can print out a stencil of 3 inch circles and place them underneath your silicone mat to guide you which you then remove once you are done.
- If you are putting custom messages in your cookies, have them cut and ready.
- Measure 1 tsp of batter and place into the center of your circle on the baking mat. Use your finger to slowly thin and spread out the circle until it reach 3 inches in diameter, doing you best to keep your circle smooth and even. It will be a very thin layer of batter, which is what you want. Start with just 2 circles on each baking sheet. I prepared 2 baking sheets and would alternate placing them in the oven. Allow baking sheets to sit for about 5 minutes on a flat surface. The batter should spread ever so slightly and smooth out any slight unevenness in your circles.
- Place one baking sheet into the oven and cook for about 5 minutes. You will want to watch closely at the end. You want to cook until the edges are a light brown and it's okay if the middle is still pale or white. Some may cook more than others due to uneven temperatures in the oven or slightly different amounts of batter. Just make sure you don't remove until the edges are brown, otherwise you will not be able to remove them from the cookie sheet.
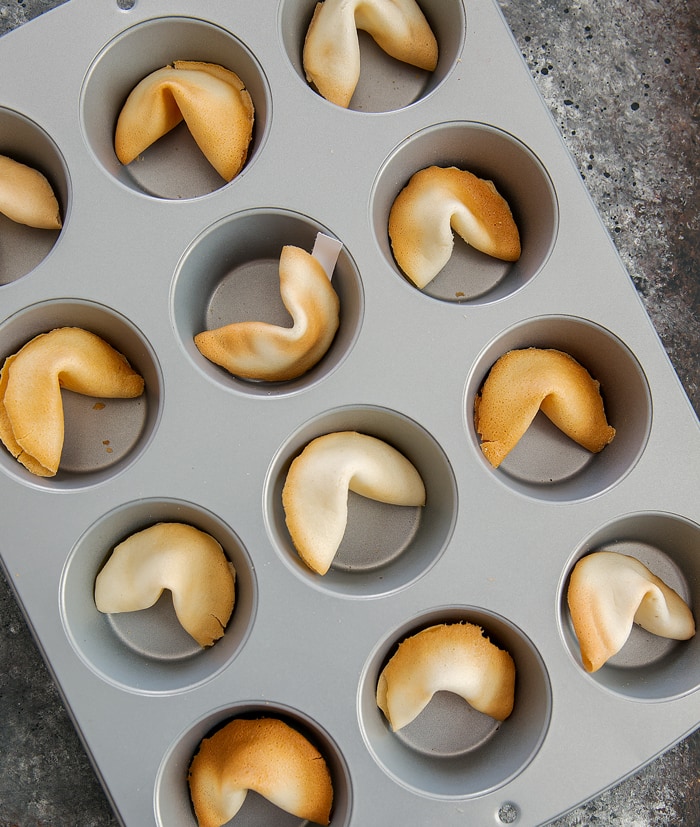
- When they are done, remove from oven and place other baking sheet into oven. Working very quickly, use cookie spatula to remove one of your cookie dough rounds (don't remove the second one yet!). It should be a bit like a pancake and still soft. If you are having trouble getting it to come off the mat with the cookie spatula, you should also be able to peel it right off the mat once you loosen one edge. Once it is peeled off, flip over so the side that was facing down (the rougher looking side) is now facing up. If you have a message, place into middle. Then fold pancake in half. Quickly grab the ends of the fortune cookie and press down on the side of a coffee mug to form fortune cookie shape. Place cookie into a muffin pan mold so that it holds its shape. Repeat with remaining round on baking sheet.
- Wipe the cookie sheet and then make 2 more circles in preparation to go into the oven when the ones in the oven are finished. You don't want to put fresh batter on any part of the silicone mat that has cookie crumbles from the last batch, so make sure to wipe clean. Continue and repeat until all of the batter is used up.
- If you plan on eating the cookies right away, you can. If you want darker colored fortune cookies or you want these to stay crisp for a longer amount of time, place muffin pans into the just turned off oven (wait until temperature drops to about 200F). Allow fortune cookies to dry out in warm (but turned off) oven for 1 hour. During this time, the fortune cookies will also turn a darker brown and should even out in color. After the hour mark, remove fortune cookies, allow to cool for a few minutes and place in sealed ziploc bags or airtight containers. If desired, you can dip in chocolate and decorate how you wish. Make sure to keep cookies stored in airtight containers though because they will begin to lose their crispness when they sit out for several hours.
Notes
- You will likely have a few mess-ups so you may need to make several batches.
- I tried lowering the oven temperature so that the cookies would all cook evenly. While that did help prevent some of the cookies from turning too brown too fast, the consistency of the cookie wasn't right and it was hard to remove the cookies from the sheet and they would get cold too quickly to shape. So I found that sticking to 400F is best and some cookies will just be slightly darker than others. But the color does mostly even out when you put them back into the oven to dry.
The nutrition information provided are only estimates based on an online nutritional calculator. I am not a certified nutritionist. Please consult a professional nutritionist or doctor for accurate information and any dietary restrictions and concerns you may have.


Hi I am wondering if you have ever made these gluten free?
I have not
can I freeze leftover dough?
no
how long will these keep if i put them in the cooled oven for the hour and then into a ziplock bag. can i make them a week earlier for an engagement party?
A week may be too long but I don’t know for sure. I’ve tested them to about 3 days and they are still crisp.
How many cookies will your recipe make? I need to make a huge batch.
As stated in the recipe box, 16 cookies.
Hi! Thanks for the recipe. I have just made it. Taste is amazing but they break as soon as I try to fold them. What can be happening???
I’m sorry to hear that. The window of time to fold is very limited. As soon as these start to cool they will break so you have to do it while they are still hot and pliable. Your circles may also be too thin or thick which could cause them to break.
They look beautifully golden brown! Perfect treat for CNY! Have a sweet and happy new year! 🙂
happy new year!
Wow! Never thought of making it by myself.
you should make them!
Oh dear! Never thought these beauties could be homemade 🙂 Thank you very much. To do this weekend to celebrate 🙂
I hope they turn out well for you!