
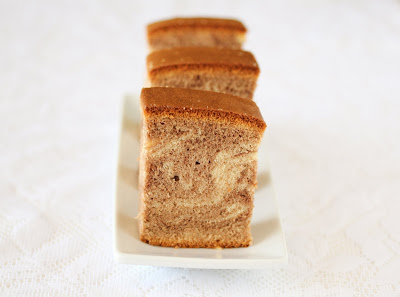
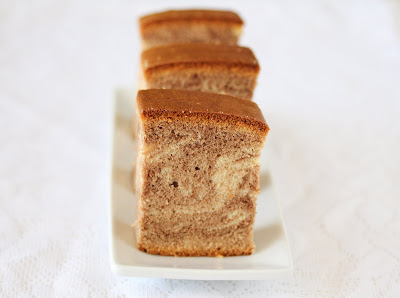
Since I’ve made honey castella cake several times, I wanted to make some variations. The other day, I made two castella cakes. Originally, one was supposed to be a matcha one and one was supposed to be a marble one. For the matcha one, I forgot to add the matcha powder. This one is the marble one.
I think I over marbled my cake. I would have liked there to be more distinct lines.
For those of you unfamiliar with castella cake (also called kasutera cake), it is a popular Japanese sponge cake. It’s different from most sponge cakes in that it doesn’t use oil or butter, it doesn’t require separating the eggs, and it has a tighter, denser crumb rather than a light and airy crumb.
Making a castella cake can be tricky, but once you get the hang of it, it’s not so bad. You can read my posts here and here to find out the steps I took to finally master the castella cake.
For this cake, I used the same recipe I’ve been using, which can be found here. I took half the batter and added 1 tbsp of unsweetened cocoa powder. Then I alternated pouring the batter into the pan and then used a knife to swirl the batter around.
Marble Castella Cake
Ingredients
- 8 large eggs
- 10.5 oz 300 g granulated sugar
- 7 oz 200 g all-purpose or bread flour
- 3 ½ fl oz 100 cc milk
- 4 tbsp honey plus 1 tbsp for the top of the cake, warmed
- 1 tbsp unsweetened cocoa powder
Instructions
- Preheat oven to 340°F (170°C). Lightly butter a 8x8-inch cake pan and line it with enough parchment paper so some hangs over the sides. The butter will help keep the parchment paper in place. Sprinkle some sugar in the bottom of the pan (on top of the parchment paper).
- Bring a large pan (big enough to cover the bottom of your large mixing bowl) of water to a boil and then turn off the heat.
- In a small bowl, combine the milk and 4 tablespoons of honey. In a separate bowl, measure the flour and sugar and sift them twice using a fine mesh sieve or sifter.
- In a large bowl, whisk the eggs. Place the bowl over the pan of hot water that you boiled. Add the sugar and whisk, holding the bowl on top of the pan, until the mixture warms to a lukewarm temperature. Remove the bowl from the pan and continue whisking. If the mixture cools, place it over the pan of hot water to warm it back to lukewarm. Continue whisking until the mixture holds soft peaks, about 15 minutes if you are using an electric whisk. It will take much longer if you are whisking by hand. See the notes and links in my post about how I completed this step for more details.
- Once the mixture holds soft peaks, whisk in the milk and honey. Add the flour, one tablespoon at a time, and beat the batter until no dry lumps of flour remain.
- Pour half of the batter into a separate bowl. Add the cocoa powder and stir until combined.
- To create the marble effect pour some of the plain batter into the prepared pan. Top it with some of the chocolate batter. Repeat this process until the baking pan is filled with batter. Use a knife to create swirls in the batter. Bake the cake for 50 minutes or until an inserted toothpick or skewer comes out clean.
- While the cake is baking make the glaze by mixing 1 tablespoon of honey with a little hot water. Once the cake is out of the oven, brush the top with the glaze.
- Once the cake is cool enough to handle, but still warm, lift it out of the pan using the parchment paper hanging over the edges like handles. Place the cake (with the paper) in a plastic bag and seal the bag. Chill the cake for several hours in the refrigerator. This will ensure the cake maintains it’s moist texture, so be sure you place it in the refrigerator while it’s still warm.
- To serve, slice the cake into pieces using a sharp knife. Cut the sides off the sides of the pieces leaving a crust on the top and the bottom of the slice.
Notes
The nutrition information provided are only estimates based on an online nutritional calculator. I am not a certified nutritionist. Please consult a professional nutritionist or doctor for accurate information and any dietary restrictions and concerns you may have.


Hello Kirby! That’s one delicious looking cake! I tried making a plain castella cake yesterday morning for the first time (: While it turned out fine and everything… the top crust was literally black! Yours looks so lovely and golden! Do you have any tips for this?
Hmm, you might want to try tenting your cake with some aluminum foil on top if you cake is turning black. The crust should be very dark around the edge of the cake (usually you cut off all four edges and only serve the middle), but it shouldn’t be black. So try tenting your cake with some aluminum foil to prevent it turning black or maybe try adjusting the rows in your oven.