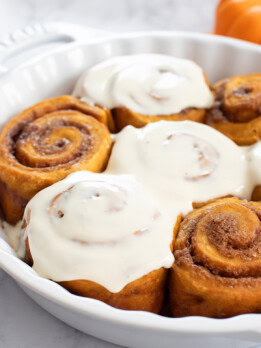
2 Ingredient Dough Pumpkin Pie Cinnamon Rolls
These 2-Ingredient Pumpkin Pie Dough Cinnamon Rolls bring the flavors of fall in an easy-to-make treat. The dough is made with just pumpkin pie filling and self-rising flour to create super fluffy and soft rolls. There’s no eggs, oil, or yeast so there's no waiting for the dough to rise. They are filled with layers of cinnamon-spiced sugar and topped with an optional maple cream cheese frosting, making them a delicious way to celebrate the season.
Ingredients
Dough
- 1 cup (252 g) pumpkin pie mix
- 2 cups (260 g) self-rising flour, see note before starting
Filling
- 6 tbsp (86 g) unsalted butter, softened to room temperature
- 1/2 cup (96 g) packed brown sugar
- 2 tsp (6 g) pumpkin pie spice, or cinnamon
Optional Maple Cream Cheese Icing
- 4 oz (113 g) cream cheese, softened to room temperature
- 3 tbsp (1.5 fl oz/45 ml) maple syrup
- 1 tbsp (0.5 fl oz/15 ml) hot water
Instructions
- Preheat the oven to 350°F (177°C). Grease an 8-inch round baking pan with non-stick cooking spray. Make sure you use a solid one piece pan rather than a springform pan because the filling will leak through a springform pan
- In a large bowl, mix together the pumpkin pie mix and flour. Stir with a spatula until a cohesive dough forms. If needed, knead a few times with your hands to make a cohesive dough that is uniform in color. If dough is too sticky to knead, add a little more flour.
- Transfer the dough to the fridge until chilled and firm enough to roll out, about 20 minutes.
- While the dough chills, make the filling: In a small bowl, stir together the softened butter, brown sugar and cinnamon spice until evenly combined and a smooth paste forms. Set aside.
- Once the dough has chilled, lightly sprinkle your work surface with additional self-rising flour. Add the dough and roll out into an approximate 9x12 inch rectangle.
- Using an offset spatula, spread sugar butter mixture across the dough in an even layer.
- Starting from the short end of the dough, roll it up tightly to form a log. (If your dough is too soft to roll, place it back into the fridge to firm up before rolling). Place the dough roll back into the fridge for about 10-20 minutes so that it is firm enough to slice. Using a serrated bread knife, first slice off the uneven ends (try to avoid slicing off too much). Then slice the log into 7 equal-sized rolls (use a ruler to make them all the same). Wipe your blade after each slice to keep the cuts clean.
- Transfer the cinnamon rolls to the prepared baking pan. Bake for about 25 minutes, or until rolls are puffy and a light golden brown around the edges. Let rolls cool slightly before adding icing.
- If making icing: Combine cream cheese, maple syrup and water into a mixing bowl and whisk until smooth and the cream cheese is evenly combined. If you prefer a thicker frosting, place it into the fridge while the rolls are baking to allow it to firm up a little.
- When rolls have cooled slightly (about 15 minutes) add the icing. Cinnamon rolls are best enjoyed soon after they are done baking.
Notes
- Self-rising flour amount. There are 2 main kinds of self-rising flour sold in the US. One that is a lower protein (2 grams per 1/4 cup serving) flour and one that has a regular amount of protein (3 grams per 1/4 cup (30g) serving). The amount of protein affects how much liquid is absorbed. For this recipe, I tested it with Gold Medal self-rising flour (Amazon | Walmart)* (regular amount of protein). Please use a self-rising flour with a regular amount of protein (3 grams per 1/4 cup), or make your own self-rising flour with the recipe below.
- *This product link is an affiliate link. This means I earn a commission from qualifying purchases.
- Homemade self-rising flour: Whisk together 2 cup all purpose flour, 3 tsp baking powder and 1/2 tsp salt. Make sure your all purpose flour has a regular amount of protein (3 grams per 1/4 cup). Most brands in the US contain this amount but there are some brands with higher protein (4 grams per 1/4 cup) such as King Arthur Flour and Bob's Red Mill.
- Estimated nutrition is for the rolls only without the optional icing. Some of the filling does run out of the rolls as they bake so the estimated nutrition is going to be a little higher than the actual amount since it assumes all of the filling is consumed.
Serving: 1roll, Calories: 312kcal, Carbohydrates: 53g, Protein: 4g, Fat: 10g, Saturated Fat: 6g, Sodium: 406mg, Fiber: 1g, Sugar: 23g, NET CARBS: 52
The nutrition information provided are only estimates based on an online nutritional calculator. This is not a comprehensive list of all the nutrients in the recipe (i.e., does not include vitamins, cholesterol, etc). I am not a certified nutritionist. Please consult a nutritionist or doctor for accurate information and any dietary restrictions and concerns you may have.
Did you make this recipe?Please leave a star rating and review below!