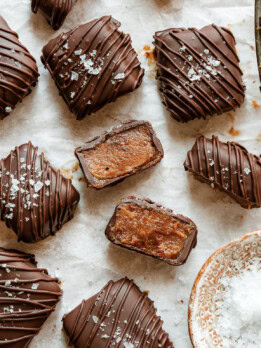
3 Ingredient Caramel Chocolates
These 3-Ingredient Caramel Chocolates are a simple homemade treat with a soft, healthier caramel center and a rich dark chocolate shell. They’re an easy no-bake dessert that tastes like a decadent chocolate caramel candy.
Ingredients
- 1 ¼ (packed) cups (205g) pitted Medjool dates
- 5 Tbsp (85g) creamy natural salted peanut butter, no added oils
- 2 cups (372g) dark chocolate chips, see note before starting
Instructions
- Line 2 baking sheets with parchment paper. Set aside. Place the dates in a heatproof bowl and cover with boiling water. Let soak for 10 minutes to soften. Drain the dates, but reserve ¼ cup of the soaking water.
- Add the drained dates, peanut butter, and 1 tablespoon of the reserved soaking water to a food processor or a small high-powered blender. Blend until completely smooth and creamy, stopping to scrape down the sides as needed. If the mixture is too thick to blend smoothly, add more reserved soaking water, ½ tablespoon at a time, until smooth. You can also add 1/8 tsp salt to the mixture for a stronger salted caramel flavor, but there is already some salt from the peanut butter.
- Line an 8 x 4-inch loaf pan with parchment paper, leaving some overhang on the sides. Transfer the date caramel to the prepared pan and spread into an even layer. Freeze for at least 4 hours, or until very firm.
- Using the parchment overhang, lift the caramel from the pan and transfer to a cutting board. Use a sharp knife to cut into approximate 1-inch squares. Arrange the pieces on a parchment paper-lined baking sheet and freeze for another 30 minutes.
- Add the dark chocolate chips to a microwave-safe bowl. Microwave in 30-second intervals, stirring between each with a spatula, until completely melted and smooth. If your chocolate consistency seems too thick for easy coating, add 1-2 tbsp of melted coconut oil to thin it out.
- Working with just a few caramel pieces at a time, remove them from the freezer and dip each piece in the melted chocolate until completely coated. Let the excess chocolate drip off, then transfer to a parchment paper lined baking sheet. Keep the remaining caramels in the freezer while you work, as they soften quickly at room temperature. If desired, you can also add thin chocolate drizzles or coarse salt for garnish.
- Place chocolates into the fridge until set. They are ready then ready to serve. Store uneaten chocolates in an airtight container in the fridge or freezer.
Notes
- Chocolate note: You can use whatever type of chocolate you prefer. However, if you need the bars to be dairy-free, make sure to choose dairy-free dark chocolate. If you need the bars to be refined sugar-free, use a chocolate that is sweetened with unrefined sugar. I used Hu dark chocolate chips.* You can also use chocolate candy melts which are easier for dipping/coating and create a more snappy/firm chocolate shell (but they usually do contain refined sugar).
- *These product links are affiliate links. This means I earn a commission from qualifying purchases.
- Peanut butter note: Natural peanut butter usually has oil separation. Make sure to mix the oil back in before using. Make sure to use peanut butter with no added oils. The only ingredients should be peanuts and salt. I used Kirkland peanut butter.
- Estimated nutrition assumes 1 1/2 cups of chocolate used because not all of the chocolate ends up on the bars.
Serving: 1piece, Calories: 128kcal, Carbohydrates: 14g, Protein: 2g, Fat: 7g, Saturated Fat: 4g, Sodium: 17mg, Fiber: 2g, Sugar: 11g, NET CARBS: 12
The nutrition information provided are only estimates based on an online nutritional calculator. This is not a comprehensive list of all the nutrients in the recipe (i.e., does not include vitamins, cholesterol, etc). I am not a certified nutritionist. Please consult a nutritionist or doctor for accurate information and any dietary restrictions and concerns you may have.
Did you make this recipe?Please leave a star rating and review below!