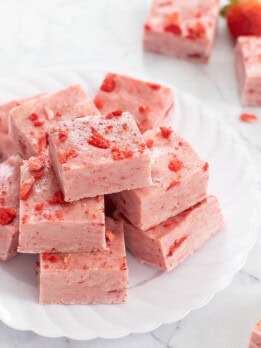
3 Ingredient Strawberry Fudge
This creamy fudge is naturally pink and full of strawberry flavor. The fudge is easy to make and only need 3 ingredients. No candy thermometer is needed.
Ingredients
- 1/2 cup (10 g) freeze dried strawberry slices
- 5 fl oz/148 ml sweetened full fat condensed milk
- 1 1/2 cups (268 g) white baking chips, see note before starting
Instructions
- Line the bottom of an 8 x 4 inch loaf pan with parchment paper, leaving some overhang for easy removal later.
- Add strawberries and condensed milk to an upright blender (also called countertop blender). You can also use a food processor. Blend on low speed until strawberries are crushed to small pieces and the condensed milk is fully pink. You will still have pieces of strawberries in your mixture. You just want to blend until your mixture is fully pink in color. See notes section for additional tips on blending the condensed milk strawberry mixture.
- Add white chocolate baking chips to a large microwave safe mixing bowl. Heat in 15-30 second intervals, stirring in between with a spatula until baking chips are completely melted and smooth.
- Working quickly, fold in the strawberry mixture to the melted chocolate with a spatula. You do need to work quickly because the chocolate thickens almost immediately once the strawberry mixture is added. It's okay if the mixture is not uniformly pink. You just want to do your best to evenly mix the strawberry mixture into the chocolate. I also recommend to stop mixing once you see the mixture start to get a little oily (caused by the oil separating from the chocolate). A little oil is okay because it will settle back into the fudge as it sets but if you keep working the mixture after you see the oil, you risk the batter becoming too oily.
- Transfer your mixture to your prepared loaf pan. Use a spatula to smooth the surface. If desired, you can sprinkle some additional crushed freeze dried strawberries on top for decoration. Place fudge into fridge to set (mine took less than 1 hour). It should feel completely solid once it is set.
- Once fudge is set, remove it from fridge and let it come to room temperature for a few minutes. Then cut into small pieces with a large sharp knife. Store uneaten fudge in the fridge or freezer.
Notes
- In the US, white baking chips are commonly referred to as white chocolate chips which is why I use the two terms interchangeably. However, they are not technically white chocolate because they don't contain cocoa butter, so they are always labeled white baking chips or white morsels.
- White baking chips note: White baking chips can be a little more difficult to melt than other types of chocolate chips. I recommend using a premium brand and starting with a new, not-yet-opened bag. Some cheaper brands don't melt well. In addition, if your baking chips are old or were previously opened and exposed to air, they also don't melt well.
- Avoid using dairy-free baking chips. I have found that ones without dairy don't melt or set well. Enjoy Life brand does not work well.
- I used Nestle white baking morsels to make this fudge. (Amazon | Target | Walmart)*
- I have only tested this recipe with white baking chips. I don't think the fudge will set if you use white candy melts. I also have not tested this recipe with real white chocolate and am not sure if the fudge would set using real white chocolate.
- Freeze dried strawberries: You must use freeze dried strawberries and not fresh strawberries which have too much moisture. Freeze dried strawberries are usually found with dried fruit in grocery stores. They can also be purchased online (Amazon | Walmart | Target)*
- *These product links are affiliate links. This means I earn a commission from qualifying purchases.
- Strawberry Mixture Blending tips:
- Don't blend the strawberries first on their own. I tried to do this and while it helps make the strawberries into a fine powder, the powder sticks a lot to the sides of the blender/food processor and it made it even harder to blend.
- I chose to use freeze dried strawberry slices rather than freeze dried strawberry powder because I find that the powdered versions I have purchased have a very dull pink color and is usually very clumpy and hard to work with.
- I find it easiest to blend the mixture in an upright blender (also known as a countertop blender, basically your classic blender) and to do so at very low speed. You can also use a food processor.
- I don't recommend using a personal blender for blending this mixture. The condensed milk is so sticky that it will stick to the top of a personal blender and you won't be able to mix properly.
Serving: 1piece, Calories: 102kcal, Carbohydrates: 13g, Protein: 0.05g, Fat: 4g, Saturated Fat: 4g, Sodium: 17mg, Fiber: 1g, Sugar: 13g, NET CARBS: 12
The nutrition information provided are only estimates based on an online nutritional calculator. This is not a comprehensive list of all the nutrients in the recipe (i.e., does not include vitamins, cholesterol, etc). I am not a certified nutritionist. Please consult a nutritionist or doctor for accurate information and any dietary restrictions and concerns you may have.
Did you make this recipe?Please leave a star rating and review below!