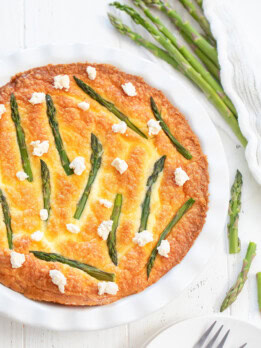
4 Ingredient Asparagus Quiche
This 4-ingredient asparagus quiche is the perfect addition to your brunch table this spring. Creamy, soft herb cheese is whisked into an egg custard to create a savory and decadent base for this dish. It’s super easy and a crowd-pleaser.
Ingredients
- 1/2 lb (227 g) thin asparagus
- 8 large eggs
- 1 (5.2 oz) package Boursin herb & garlic cheese
- 1 1/2 cups (12 fl oz/355 ml) heavy cream
Instructions
- Preheat the oven to 350°F (177°C). Grease a 9-inch pie pan or tart pan with non-stick cooking spray.
- Please note that these instructions are slightly more complex in order to make the quiche in the photo with decorations. If you don't care to decorate the top of your quiche, there is a quicker way to make this quiche which is provided in the recipe notes section. Wash asparagus and pat dry. Trim off ends. Take 11 spears and cut tip pieces that are between 3-4 inches long. Mine weighed 53 grams total. Save these tips for decoration on top. Cut the rest of the asparagus into 2-inch pieces, cutting just enough to fill 1 cup worth. Your 1 cup of 2-inch pieces should weigh about 102 grams. Depending on the thickness and size of your asparagus, you may need more than 11 spears to fill 1 cup worth. 11 is just the number that is needed for the longer tips for decoration, but the filling can be a mix of tips and the rest of the asparagus.
- Fill a large bowl with a little water and a lot of ice to create an ice bath. Set aside. Bring a pot of water to a boil. Add asparagus and cook for 15 to 30 seconds until bright green and tender. Transfer to the ice bath to cool for 1–2 minutes, then drain and let dry on a paper towel. Make sure to thoroughly pat dry each asparagus piece. Asparagus naturally releases water as it cooks so you do not want any excess water breaking up your egg custard.
- Remove 1.5 tablespoons (9 grams) of the cheese and set aside for topping later. In a large bowl, mix together the eggs and remaining cheese until evenly combined. You can use a hand mixer on low speed or an immersion blender. Add in the heavy cream and mix until no egg white streaks remain.
- Fold in the 1 cup of 2-inch asparagus pieces into the custard mixture.
- Transfer the mixture to the prepared pie pan. Then bake for about 15-20 minutes or until the the center is just starting to set and you can place the asparagus tips on top without them sinking under (mine needed 20 minutes). Place your reserved asparagus tips on top.
- Place the quiche back into the oven and bake for another 35-40 minutes or until the center is set. Crumble up the remaining cheese into small pieces and spread it across evenly across the top (see photos for reference) . This extra crumble of cheese adds decoration and helps ensure a punch of salty herby flavor on each slice. Let quiche cool for about 30 minutes before serving. If you plan on serving it the next day, let it cool completely then cover the surface with plastic wrap. Store it in the fridge. Remove from fridge 30 minutes before serving so that it can come to room temperature and then place into the oven to reheat.
Notes
- If you don't want to decorate your quiche, only use 1 cup worth of 2-inch asparagus pieces. Skip the step on cutting the 3-4 inch tips. You can also skip the step of removing the quiche after 20 minutes and instead just let it bake for 55-60 minutes total.
- It’s important to really dry off the asparagus after blanching to get it dry so that your custard doesn't break or become too watery.
- I think this recipe works best with thin asparagus since they are more tender but regular asparagus also works. You will need approximately 1/2 lb but you won't necessarily use all of it. If you make it with the decoration on top you will use a little under 6 oz of asparagus in the recipe. If you make it without the decoration then you will use about 3.5 oz of asparagus.
- Make sure your 9 inch pie or tart pan is 2 inches high so that your mixture does not spill over during baking.
- It's important to mix the eggs until there are no egg white streaks, otherwise it will prevent the quiche from baking evenly. I used an immersion blender to make sure the egg mixture was completely uniform with no streaks. I recently purchased the Mueller Living Immersion Blender* and have found it to be so helpful and much more reasonably priced than I expected. You can try using a hand mixer on low speed if you don't have an immersion blender.
- *This product link is an affiliate link. This means I earn a commission from qualifying purchases.
Calories: 241kcal, Carbohydrates: 4g, Protein: 9g, Fat: 22g, Saturated Fat: 14g, Sodium: 161mg, Fiber: 0.3g, Sugar: 3g, NET CARBS: 4
The nutrition information provided are only estimates based on an online nutritional calculator. This is not a comprehensive list of all the nutrients in the recipe (i.e., does not include vitamins, cholesterol, etc). I am not a certified nutritionist. Please consult a nutritionist or doctor for accurate information and any dietary restrictions and concerns you may have.
Did you make this recipe?Please leave a star rating and review below!