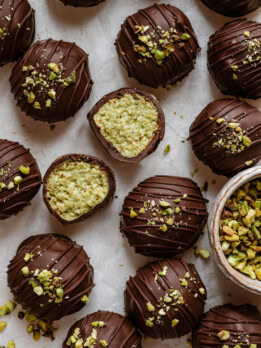
4 Ingredient Dubai Truffles
These creamy, crispy truffles taste like the popular Dubai chocolate bars but in an easy bite-sized truffle form. They are just 4 ingredients and easy to make.
Ingredients
- 1.5 cups (84g) toasted shredded kataifi, see note before starting; see note for substitute
- 3/4 cup (192g) pistachio butter, just pistachios, no added oils, sugars, etc
- 1.5 tbsp (22ml) maple syrup, cold
- 2 cups (305g) dark chocolate chips, melting wafers or chopped dark chocolate
Instructions
- Add kataifi to a large nonstick skillet and cook over low heat, stirring constantly, until the kataifi is golden brown. Allow it to cool for about 15-20 minutes.
- Once cooled, add it to a large mixing bowl along with the pistachio butter and maple syrup. Mix and stir until the mixture becomes dry and thick, like a thick dry paste.
- Use a 1 tbsp cookie scoop to scoop the mixture. The mixture should be firm enough to shape into balls. Roll each scoop between your palms until it forms a ball. Place balls onto a parchment lined baking sheet and place them into the freezer to freeze solid, about 15-20 minutes.
- Meanwhile, add 2 cups of dark chocolate to a microwave safe bowl and heat in 15-30 seconds, stirring in between with a spatula, until chocolate is completely melted and smooth. If you find your chocolate is too thick, you can add a little coconut oil to help thin it out. The chocolate consistency really depends on the type of chocolate you use. Melting wafers and chocolate bars usually have a thinner consistency when melted and don't require any added oil.
- Remove frozen balls from freezer. Use your favorite dipping tool to dip each ball into the melted chocolate, making sure to cover it completely. Gently shake off any extra chocolate and make sure coating is smooth and even, and carefully place the coated balls back on the parchment sheet. Try to wipe off as much of the bottom puddle of chocolate that the coated ball makes when it touches the parchment paper. Repeat with remaining chocolate balls.
- If desired, use the remaining melted chocolate to drizzle over the truffle balls. You can also garnish truffles with finely chopped pistachios, sea salt or any other decorations you prefer. Place the truffles briefly in the fridge to allow the coating to set. Keep truffles in the fridge until ready to serve. Uneaten leftover truffles can be stored in the fridge or freezer.
Notes
- Kataifi note: I used UniqBite Kataifi* which is already chopped into two inch strands. Sometimes kataifi is sold still in long threads and then you will need to chop it into 2 inch pieces before adding to the skillet. The kataifi shreds will become even smaller as you toast them, and should end up being more like 1/2 inch pieces when you are done. Cup measurement is for the kataifi after it has been toasted as it is difficult to get an accurate cup measurement while the kataifi is still in longer shreds.
- *These product links are affiliate links. This means I earn a commission from qualifying purchases.
- Pistachio butter note: You can use store bought pistachio butter to save time. Just make sure the only ingredient is pistachios. There should be no added oils, sugar, cream, dairy, etc. If your pistachio butter has added ingredients, it will not thicken enough when added with the maple syrup. I did use homemade pistachio butter because I wanted a really nice green color for the filling and store bought pistachio butter tends to be more yellow green.
- You do need to use maple syrup and pistachio butter with no added oils. It is this combination that allows the filling to thicken. The filling will not thicken with another sweetener.
- Kataifi substitute. If you are unable to purchase Kataifi, I have also made these bars with shredded coconut and maple syrup which mimics the texture of Kataifi. To make the recipe with coconut and maple, you will need the following:
- 1.5 cups unsweetened finely shredded coconut or unsweetened fine coconut threads
- 3 tablespoons maple syrup
- Preheat oven to 350F (177C). Line an extra large baking sheet with parchment paper.
- In a large bowl add shredded coconut and drizzle maple syrup across. Use a spoon to stir vigorously for about 20-30 seconds until all the coconut is evenly coated in syrup.
- Transfer the coconut to your prepared baking pan, spreading it out in as thin as a layer as possible. It’s okay if the coconut is clumped together as long as it is still a very thin layer.
- Bake for about 8 minutes or until all of the coconut is a medium brown (you want it cooked more than golden brown but before it starts getting burned). Baking time can vary and it doesn’t take long for the coconut to turn from brown to burnt so I do recommend watching the oven carefully starting around 5 minutes. Let the coconut fully cool. Once cooled, the coconut should be very crispy.
- You do need to coat the coconut in maple syrup to achieve a very crispy coating that stays crispy even after being mixed with the pistachio cream. Just toasting coconut will not be enough. Also don't coat the coconut in honey. Honey will prevent the coconut from crisping up enough.
- Estimated nutrition assumes 1 cup of chocolate since not all of the chocolate ends up on the truffles.
Serving: 1truffle, Calories: 142kcal, Carbohydrates: 14g, Protein: 4g, Fat: 9g, Saturated Fat: 2g, Fiber: 2g, Sugar: 6g, NET CARBS: 12
The nutrition information provided are only estimates based on an online nutritional calculator. This is not a comprehensive list of all the nutrients in the recipe (i.e., does not include vitamins, cholesterol, etc). I am not a certified nutritionist. Please consult a nutritionist or doctor for accurate information and any dietary restrictions and concerns you may have.
Did you make this recipe?Please leave a star rating and review below!