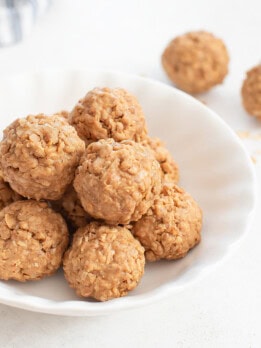
4 Ingredient Healthier Crispy Oatmeal Balls
These crispy oatmeal balls are crunchy and crispy. They are great for breakfast, snack or a treat. They only need 4 ingredients and don't require any flour, eggs, refined sugar, dairy or butter.
Ingredients
- 1 cup (88g) + 2 tbsp (11g) quick oats, divided
- 2 tbsp (27 g) coconut oil, melted
- 3 tbsp (1.5fl oz/44ml) + 2 tbsp (1fl oz/30 ml) maple syrup, divided, can substitute with honey
- 6 tbsp (96g) natural peanut butter with no added oils
Instructions
- Preheat oven to 350°F (177°C). Line a large cookie sheet with parchment paper.
- Add 1 cup quick oats to a medium mixing bowl. Drizzle melted coconut oil evenly across. Using a spatula, stir the mixture briskly for about 20-30 seconds, stopping a few times to scrape the sides of your bowl, until most of the oats look slightly moistened with coconut oil. The oats only need a little oil so they should not look fully wet.
- Add in 3 tbsp maple syrup. Make sure to scrape the sides of your measuring spoon or cup to make sure all of the maple syrup ends up in the bowl. Mix with your spatula until the oats are evenly coated in syrup. If you are using honey instead of maple syrup, warm up the honey for about 10-15 seconds in the microwave so that it is more liquidy and easier to mix and coat.
- Transfer the oats to your prepared baking pan. Do your best to spread them across so that there aren't any large clusters or clumps. If you are using honey, the oats will clump up more, but with maple syrup you should be able to spread the oats out more easily.
- Bake the oats for about 12-15 minutes or until the surface is light to medium brown and the oats are crispy.
- Remove the oats from the oven but don't transfer them off the baking sheet until they are fully cooled and set. They firm up more as they cool. This should take about 20-30 minutes.
- Add peanut butter, remaining quick oats and remaining maple syrup to a large mixing bowl. Add in the cooled baked oats. If you made the baked oats with honey, see note before adding them in. Stir and combine the mixture, breaking up any clumps of baked oats as you mix. You want the baked oats to be about the size of large crumbs so that you can easily press them together into a ball. If they are too large, you won't be able to shape them. Stir until you have a thick dough/paste that you can scoop and shape. If it seems like your mixture is too dry to shape, you can add a little bit more peanut butter and maple syrup. If the mixture is too sticky, you can add a little more untoasted quick oats.
- Use a 1.5 tablespoon cookie scoop to scoop the mixture. Pack the dough into the cookie scoop, then release it onto your hand. Press and lightly squeeze the dough between your palms a few times to compact it further, then roll it into a smooth ball. Place onto plate or baking sheet lined with parchment paper. Repeat with remaining dough.
- You can enjoy the balls right away. If they feel a little too warm or sticky, you can put them in the fridge for about 15-30 minutes to help them firm up a little more. Once they are firm, you can enjoy right away. Store any uneaten balls in an airtight container. They can be kept on the counter for a few days or store in the freezer for longer storage time.
Notes
- This recipe works best with quick oats. Regular rolled oats do not bind as well. I used Happy Belly Quick Oats.*
- Make sure to use natural peanut butter with no added oils. The dough will not set if you use peanut butter with added oils. I used Kirkland natural peanut butter.*
- *These product links are affiliate links. This means I earn a commission from qualifying purchases.
- Oats baked with honey note: If using honey, the oats will likely be larger clumps and firmer when they are cooled. You will need to use some extra effort to break up the clumps while mixing them into the dough. You can also briefly run them through a food processor to help break them up, but be careful to only run for a few seconds to crush them to about the size of large crumbs--you don't want them to turn into flour. The maple syrup version is less firm so you should be able to break the clumps up easily when mixing by hand.
- Honey is stickier than maple syrup and also retains more moisture so your balls will be a little stickier/wetter if you use honey.
Serving: 1ball, Calories: 118kcal, Carbohydrates: 13g, Protein: 2g, Fat: 7g, Saturated Fat: 3g, Sodium: 16mg, Fiber: 2g, Sugar: 5g, NET CARBS: 11
The nutrition information provided are only estimates based on an online nutritional calculator. This is not a comprehensive list of all the nutrients in the recipe (i.e., does not include vitamins, cholesterol, etc). I am not a certified nutritionist. Please consult a nutritionist or doctor for accurate information and any dietary restrictions and concerns you may have.
Did you make this recipe?Please leave a star rating and review below!