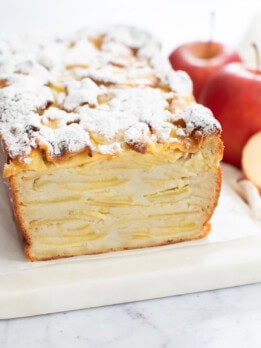
5 Ingredient Invisible Apple Cake
This easier version of Invisible Apple Cake (Gâteau Invisible) is a unique dessert that is easy to make and features dozens of layers of apples that disappear into the cake as it bakes.
Ingredients
- 2 lb apples, peeled, cored and thinly sliced (between 1/16 inch-1/8 inch), see note
- 3 large eggs
- 3/4 cup (6 fl oz/177 ml) heavy cream
- 2/3 cup (132 g) granulated white sugar
- 1 cup (130 g) self rising flour, see note before starting
Instructions
- Preheat oven to 350°F (177°C). Grease an 8 x 4-inch loaf pan with non-stick cooking spray and line with parchment paper.
- In a large bowl, whisk the eggs, heavy cream, and sugar until evenly combined and no egg streaks remain. Sift the flour in with a fine mesh strainer and whisk until batter is smooth.
- Add the sliced apples to the batter and fold and toss with a spatula to make sure each slice is coated with batter on both sides. Do your best to separate any slices stuck together.
- Use a very large spoon (like a serving spoon) to scoop the apple batter into the prepared loaf pan. Try your best to make the apple slices all face the same way. You do want to spoon in the batter so that you have an even distribution of apple and batter layered into the loaf pan. When you are no longer able to spoon any more batter, use a spatula to scrape the bowl to get every last bit of the leftover cake batter into your loaf pan.
- Bake for 60-70 minutes, rotating the pan halfway through, until the cake is a medium golden brown on top, lightly puffy and a toothpick inserted comes out clean.
- Let the cake cool to room temperature before serving. If desired, sprinkle the surface with powdered sugar before serving. Store any uneaten cake in the fridge.
Notes
- 2 lbs of apples is measured before they are peeled and cored. I highly recommend using a mandoline slicer to cut the apples because they need to be cut very thin. You want to cut them as thin as you can without breaking the slices.
- I own this mandoline slicer* which I love. I cut myself too many times on the hand-held ones so I like this one so much better and I am also able to cut so much faster as well.
- I also recommend using a sweet apple type (such as Fuji, Cosmic Crisp or Envy) because the cake is not that sweet.
- Self-rising flour amount. There are 2 main kinds of self-rising flour sold in the US. One that is a lower protein (2 grams per 1/4 cup serving) flour and one that has a regular amount of protein (3 grams per 1/4 cup (30g) serving). The amount of protein affects how much liquid is absorbed. For this recipe, I tested it with Gold Medal self-rising flour* (regular amount of protein). Please use a self-rising flour with a regular amount of protein (3 grams per 1/4 cup), or make your own self-rising flour with the recipe below.
- *This product link is an affiliate link. This means I earn a commission from qualifying purchases.
- Homemade self-rising flour: Whisk together 1 cup all purpose flour, 1.5 tsp baking powder and 1/4tsp salt. Make sure your all purpose flour has a regular amount of protein (3 grams per 1/4 cup). Most brands in the US contain this amount but there are some brands with higher protein (4 grams per 1/4 cup) such as King Arthur Flour and Bob's Red Mill.
Serving: 1slice, Calories: 217kcal, Carbohydrates: 35g, Protein: 5g, Fat: 8g, Saturated Fat: 5g, Sodium: 168mg, Fiber: 2g, Sugar: 23g, NET CARBS: 33
The nutrition information provided are only estimates based on an online nutritional calculator. This is not a comprehensive list of all the nutrients in the recipe (i.e., does not include vitamins, cholesterol, etc). I am not a certified nutritionist. Please consult a nutritionist or doctor for accurate information and any dietary restrictions and concerns you may have.
Did you make this recipe?Please leave a star rating and review below!