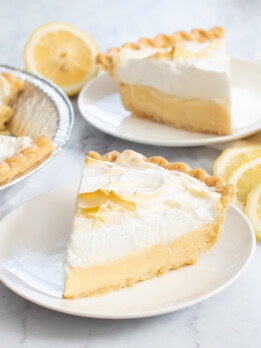
5 Ingredient Magic Lemon Pie
This magic lemon meringue pie only needs 5 ingredients. The magic is the way the filling instantly becomes a custard without the need for baking, cooking or added thickeners. It's finished with a fluffy meringue topping.
Ingredients
- 1 (9-inch) frozen pie crust
- 1/2 cup (4 fl oz/118 ml) lemon juice
- 1 (14 oz/397 g) can full fat sweetened condensed milk
- 2 large eggs, whites and yolks separated
- 5 tbsp granulated white sugar
Instructions
- Preheat the oven to 375°F (191°C). Let pie crust soften to room temperature, about 10-15 minutes.
- Use a fork to prick the bottom of the pie crust several times (I did about a dozen times). You want there to be holes fairly evenly spread across the bottom. This will prevent the pie crust from puffing up during baking. Bake pie crust for about 15 minutes or until golden brown and cooked. Most pie crust brands recommend a higher baking temperature but I found that lowering the baking temperature slightly helps reduce shrinkage.
- While pie crust is baking, make the filling. Add lemon juice, condensed milk and egg yolks to a large mixing bowl. Whisk until all the ingredients are evenly combined and egg yolks are fully beaten and incorporated.
- Pour filling into the pie crust when it is done baking. Reduce oven temperature to 325°F (163°C). Place the pie back into the oven and bake for about 20 minutes or until filling is cooked.
- While the pie is baking, add egg whites to clean mixing bowl of a stand mixer. Using the wire whisk attachment, beat eggs at medium speed (about 5 speed) until light and frothy. With the mixer still running, gradually add the sugar, 1 tbsp at a time, waiting about 15-20 seconds for the sugar to dissolve before adding more. When all the sugar is added, increase the mixing speed slightly to medium high (around 7 speed) and beat until your meringue forms soft peaks. This will take about 5-7 minutes. You don't want to mix at the highest speed, which will cause the meringue to stiffen too quickly. You want to gradually build up the meringue to soft peaks. This will result in more volume and a better meringue.
- When the pie is ready, remove from oven. Add the meringue on top, sealing the meringue to the edges of the crust. You want to do this while the pie is still hot. Evenly spread the meringue across using a spatula. You can then make waves or soft peaks across the meringue layer with your spatula for decoration.
- Place pie back into the oven but this time place it on the lowest oven rack. This is important because it will give the meringue more time to cook without the top becoming too brown. Bake for about 10-15 minutes or until the meringue is cooked and lightly golden brown. Place pie into the fridge to chill. Pie is best served a few hours after baking because the meringue will start to weep after a while. Any uneaten pie should be stored in the fridge or freezer.
Notes
- If you are not experienced with making meringue, you can also add 1/4 tsp cream of tartar to the egg whites. I don't use it but it does help ensure that you have a stable meringue.
- If you want a tall meringue layer that goes above the pie crust, you can use 3 egg whites instead of 2. I prefer using 2. Even though the meringue layer is not as high, I think it is a better ratio of custard and meringue.
- Make sure to seal the meringue all the way to the crust. This will help prevent weeping.
- This pie is best served within a few hours after it is baked because the meringue topping will start to weep after a while.
- This recipe will not work with dairy-free condensed milk alternatives. See post for more details.
- I used Wholly Wholesome 9 inch frozen pie crust*. You want to use a pie crust that already comes shaped in the pie tin to prevent shrinkage. You can also use a graham cracker pie crust.
- *This product link is an affiliate link. This means I earn a commission from qualifying purchases.
- You can use fresh squeezed lemon juice or store bought lemon juice. I used store bought. If using store bought, make sure that the only ingredient is lemon juice. Just because it is labeled "100% lemon juice" does not necessarily mean there aren't other ingredients in the bottle so make sure to check the nutrition label. I used Santa Cruz Organic 100% lemon juice*. The RealLemon brand (sometimes in those little lemon shaped containers) will not work.
- *This product link is an affiliate link. This means I earn a commission from qualifying purchases.
Serving: 1slice, Calories: 230kcal, Carbohydrates: 33g, Protein: 2g, Fat: 9g, Saturated Fat: 4g, Sodium: 75mg, Fiber: 3g, Sugar: 24g, NET CARBS: 30
The nutrition information provided are only estimates based on an online nutritional calculator. This is not a comprehensive list of all the nutrients in the recipe (i.e., does not include vitamins, cholesterol, etc). I am not a certified nutritionist. Please consult a nutritionist or doctor for accurate information and any dietary restrictions and concerns you may have.
Did you make this recipe?Please leave a star rating and review below!