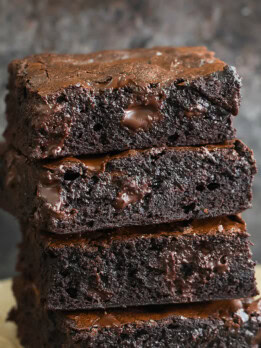
Best Fudgy Brownies
These brownies are my ideal brownies. Ultra fudgy, slightly chewy, with a shiny crackly top. And they are an easy one bowl recipe!
Ingredients
- 1/2 cup (1 stick) unsalted butter
- 1 1/8 cup granulated white sugar
- 1/2 cup + 2 tbsp Dutch process cocoa powder
- 1/4 tsp baking powder
- 1/4 tsp table salt
- 1/2 tbsp vanilla
- 2 large eggs, room temperature
- 1/2 cup all purpose flour
- 1 cup chopped bittersweet chocolate
Instructions
- Preheat oven to 350°F. Grease the interior of an 8-inch by 8-inch baking pan. Line the bottom with parchment paper.
- In a large microwave-safe bowl, melt butter in microwave. When butter is fully melted, add in the sugar.
- Whisk sugar until it is fully incorporated. The mixture should look thick and grainy. Place bowl back into the microwave and heat for about 40 seconds. The butter should be hot and liquid but you don't want it to be bubbling.
- Whisk the sugar and butter together so that it is uniform. You should notice it come together into a thin, smooth paste and the top should have a glossy finish.
- Add in cocoa powder, baking powder, salt, vanilla. Whisk until everything is evenly incorporated.
- Add in eggs and whisk until batter is smooth.
- Add in flour and gently whisk until flour is just incorporated. The batter should look glossy. You do not want to overmix once flour is added because it will add too much air and make the brownies cakey.
- Stir in 3/4 cup of the chopped chocolate. Your batter should be very thick.
- Pour batter into prepared baking pan. Smooth and even out with spatula. Sprinkle remaining chocolate over surface.
- Bake brownies for about 20-25 minutes, until surface is no longer wet and center is no longer jiggly. Because the brownies are so fudgy, the toothpick test will not come out clean. Allow brownies to set for at least 30 minutes before cutting and serving.
Notes
- I recommend using Dutch process cocoa. Dutch process cocoa likely won't be at your local Vons, Ralphs, Krogers or Albertsons. However, it is sold at Whole Foods, Amazon and specialty stores like William Sonoma or Sur La Table. Dutch process cocoa will be labeled "Dutch process" or “cocoa processed with alkali,” “alkalized."
- I used this cocoa powder.*
- Dutch process cocoa has been treated with an alkalizing agent, neutralizing some of its acidity and giving it a milder taste. Using natural cocoa will make the brownies have a more bitter taste.
- I added chopped chocolate to the batter and on top so that there are melted chocolate pieces mixed in. You can use chocolate chips instead but know that chocolate chips will not melt as much as chopped chocolate bars.
- I prefer to bake brownies in a light metal nonstick pan. Darker metal pans tend to cook the brownies edges too soon and glass pans tend to cook the brownies slower.
- I grease the interior of the baking pan and then line the bottom with parchment paper, with the paper coming up two of the sides of the pan. This makes it easy to remove the entire brownie batched once it is fully baked, so that you can slice them on a cutting board rather than attempting to slice them in the pan.
- Bake the brownies in the middle of your oven to prevent the top or bottom from getting too hot.
- Make sure your eggs are room temperature. Using cold eggs will harden the butter and make the batter too thick.
- You will need to pour the batter into prepared pan as soon as it is done mixing. You do not want to set this aside for later as the brownie batter will become too thick and hard.
Shiny Crackly Surface
- The key to creating that thin, crackly shiny surface is how you incorporate the sugar, which is why the sugar is melted into the butter twice.
- If you do not want to do this with a microwave, you can also melt the butter and sugar in a saucepan on the stove. You would follow the same steps: melt the butter first, stir in sugar, melt again without boiling and whisk together again until smooth and glossy.
Best Way to Cut Brownies
For super fudgy brownies or brownies that are still warm, the secret is to use a warm sharp blade. I usually use a kitchen chopping knife. Run the knife under hot water to heat it up (or dip it into a bowl of hot water), wipe the blade dry and then make one swift slice into your brownies. They should cut straight through with minimal crumbs. If your brownies are extra fudgy, some of the brownie batter will cling to the knife but the hot blade will keep the amount to a minimum. You then dip the blade in hot water again, wipe it clean, and cut again. You need to wipe the blade clean each time before the next cut.Brownie Variations
- To make a larger batch, you can double the ingredients and bake in an 8 inch by 12 inch baking pan. Baking time may vary but I would start checking around 20 minutes. It can also be done in a 9 inch by 13 inch pan, but the brownies will be thinner.
- These brownies can be made in a 9 inch x 9 inch pan but they will be thinner. Baking time will also be less.
- If you like thicker cakier brownies, add an additional 1/4 cup flour and 1/4 tsp baking powder.
- If you like even fudgier moist and barely set brownies, skip the baking powder and reduce the baking time by a few minutes.
The nutrition information provided are only estimates based on an online nutritional calculator. This is not a comprehensive list of all the nutrients in the recipe (i.e., does not include vitamins, cholesterol, etc). I am not a certified nutritionist. Please consult a nutritionist or doctor for accurate information and any dietary restrictions and concerns you may have.
Did you make this recipe?Please leave a star rating and review below!