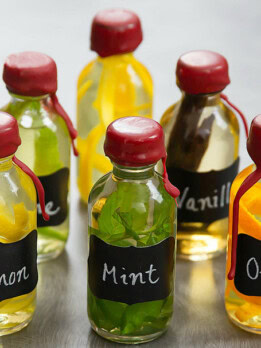
Homemade DIY Extracts
Homemade extracts are easy to make and are great for gifting. I like to make different ones and package them in decorative bottles. If you want to make these as gifts plan to make them well in advance because the extracts need to sit for up to four weeks until they are ready to use.
Ingredients
Vanilla Extract
- 3-4 vanilla beans, split beans in half, lengthwise, so that the inside content is completely exposed
- 8 oz vodka
Lemon/Orange/Lime Extract
- 2 large lemons, oranges, or limes
- 8 oz vodka
Mint Extract
- 1 cup mint , stems removed
- 8 oz vodka
Instructions
How to Make the Extracts
- For vanilla extract, add vanilla beans and vodka into a large sterilized canning jar. Tightly close lid, then shake a few times. Keep in a dark, cool place. Shake every few days. Let sit for about 4 weeks before using. The extract will turn a dark brown (browner than in the photos, which I poured out prematurely). Once extract is ready, you can pour into small bottles with a funnel for gifting. You can add half of a fresh vanilla bean inside each for decoration.
- For lemon extract, carefully peel off the skin of two clean lemons. Add lemon skin and vodka into a sterilized canning jar. Tightly close lid, then shake a few times. Keep in a dark, cool place. Shake every few days. Let sit for about 4 weeks before using. The peels will eventually brown. Remove peels after extract is ready. When the extract is ready, you can pour into small bottles with a funnel for gifting. You can add a few fresh lemon peels for decoration but advise your gift receivers to remove the peels once they brown. For orange or lime extract, repeat this same step except replacing lemons with oranges or limes.
- For mint extract, add leaves and vodka to a sterilized canning jar. Lightly crush leaves while in the jar, to release the oils. Seal jar and shake. Keep in a dark, cool place. Shake every few days. Let sit for about 4 weeks before using. The extract will turn a light green/brown (darker than in the photos, which I poured out prematurely). Remove mint leaves when the extract is ready. When the extract is ready, you can pour into small bottles with a funnel for gifting. You can add a few fresh mint leaves for decoration but advise your gift receiver to remove them once they brown.
- For all extracts, store in a dark, cool place.
How to make wax seals
- Wrap a layer of filament tape all the way around the bottle cap. I used a 9mm tape, which fit within the caps of the bottles I used.
- Melt wax beads down. Make sure you use equipment that will not be used for food later. I used a disposable aluminum pan which I covered in foil. I added enough wax to the pan so that it would be a deep enough to dip the entire bottle cap once melted. I then put the pan on top of a pot of simmering water. After a few minutes, the wax will start to melt and you can stir it until it is completely melted.
- Once the wax is completely melted, dip your already filled, closed and taped bottle upside down into the wax so that the wax covers the bottle cap. Lean your bottle a little to one side while still in the wax before lifting upright, to create a drip down the side of the bottle when you lift the bottle out of the wax. Let the wax cool. If you don't like how your seal turned out, you can gently break it off after it has cooled, put the wax back in and melt it and redo your seal.
The nutrition information provided are only estimates based on an online nutritional calculator. This is not a comprehensive list of all the nutrients in the recipe (i.e., does not include vitamins, cholesterol, etc). I am not a certified nutritionist. Please consult a nutritionist or doctor for accurate information and any dietary restrictions and concerns you may have.
Did you make this recipe?Please leave a star rating and review below!