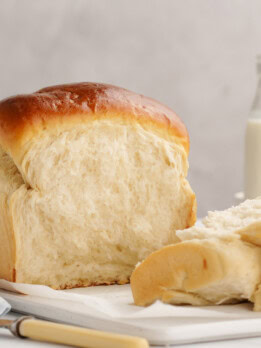
Soft and Fluffy Milk Toast
Many recipes for milk bread call for an ingredient called "bread improver" which is very difficult to find in the US. It's what makes this Asian-style bread so soft and fluffy, so I was so happy to discover Yvonne Chen's tangzhong method, which is basically a DIY bread improver. It's a simple bread and water mixture that is cooked to 150°F (65°C) and then cooled before adding it to the dough, so plan to make the tangzhong in advance because it needs several hours to chill. I like to make it in the morning and prepare the rest of the bread in the afternoon.
Ingredients
For the Tangzhong
- 1/3 cup bread flour
- 1 cup water
For the Milk Bread
- 2 ½ cups bread flour
- 3 tbsp plus 2 tsp sugar
- 1/2 tsp salt
- 2 tsp instant yeast, see note
- 2 large eggs
- ½ cup milk
- 120 g tangzhong, use only half- add this to notes
- 3 tbsp cubed butter, softened
- Oil
Instructions
Make the Tangzhong
- To make the tangzhong, whisk the flour and water until smooth.
- Transfer the flour mixture to a small saucepan and warm it over medium heat. As the mixtures heats up, stir continuously. You want to cook the mixture until it thickens and creates "lines" (see the blog post for more details). These lines indicate it's reached approximately 150°F (65°C). If you are unsure, use a kitchen thermometer to measure the temperature. Once it's at temperature, turn off the heat and set the pan aside to cool. Once the mixture is cooled transfer it to a bowl and place a piece of plastic wrap large enough to directly cover the surface of the mixture (to protect it from drying out) and to seal the bowl. Place the bowl in the refrigerator and chill it for several hours. You will use half of the tangzhong for this recipe, so keep the leftovers in the refrigerator for up to two days.
Make the Milk Bread
- In a large bowl, combine the flour, sugar, salt, and yeast. In a separate bowl, whisk one egg, milk, and tangzhong. Make a well in the dry ingredients and pour the wet ones into it. Using your hands, mix the dry ingredients with the wet ones until a loose dough forms and add the butter. Continue mixing until the butter is incorporated. At this point, the dough will be very sticky so remove it from the bowl and knead it on the countertop. Knead the dough until it's no longer sticky. It should be elastic, which means you should be able to stretch a piece of it quite thin without it breaking. This process will take approximately 30 minutes to do by hand. To shorten the kneading process, you can use the kneading function on a breadmaker or a high-powered food processor instead of doing it by hand.
- Coat the inside of a large bowl with oil. Shape the dough into a ball, place it in the oiled bowl, and cover the bowl with a wet towel. Leave the dough to proof for 40 minutes or until it has doubled in size.
- Transfer the dough to a clean work surface and divide it into four equals parts and shape each into a ball. Cover the dough balls with plastic wrap and rest them for 15 minutes.
- Using a rolling pin, roll each dough ball into an oval shape. Fold one end of the dough to the center of the oval. Fold the other end so that it just overlaps the other in the middle. Turn the dough over with the folds facing down and flatten the dough with a rolling pin. Turn the dough over again - with the folds facing up - and, starting at one end, roll the dough up. Repeat with the remaining dough balls. Place each rolled dough in a baking pan. Leave the dough to rise for 40 minutes.
- In a small bowl, beat the remaining egg and brush it on the top of the dough rolls in the pan. Bake the bread at 350°F (177°C) for approximately 30 minutes.
Notes
- For this recipe, it's important to use instant yeast, which is mixed right into the dough and not dry active yeast, which needs to dissolve in water before using.
The nutrition information provided are only estimates based on an online nutritional calculator. This is not a comprehensive list of all the nutrients in the recipe (i.e., does not include vitamins, cholesterol, etc). I am not a certified nutritionist. Please consult a nutritionist or doctor for accurate information and any dietary restrictions and concerns you may have.
Did you make this recipe?Please leave a star rating and review below!