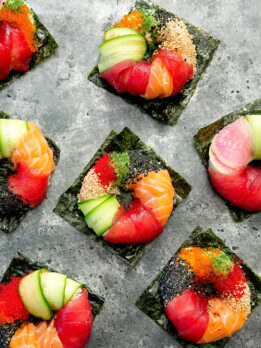
Sushi Donuts
These colorful sushi donuts are a fun way to make sushi at home and you can customize them to suit your own tastes.
I recommend, for best results, that you use a rice cooker to prepare the rice using the measuring cup that came with your cooker since 1 rice cooker cup is equal to 180ml (whereas 1 US cup is 240 ml). If you don't have a rice cup, adjust your measurements accordingly.Ingredients
- 3 cups uncooked sushi rice
- 80 ml seasoned rice vinegar for sushi
- 1/2 lb sashimi grade tuna, thinly sliced
- 1/2 lb sashimi grade salmon, thinly sliced
- 2 Persian cucumbers, thinly sliced (see note)
- 1 small watermelon radish, thinly sliced (see note)
- 1/2 cup roasted white sesame seeds
- 1/2 cup roasted black sesame seeds
- 6 oz masago eggs
- any other toppings of your choice, avocado, other sashimi, etc
- 4 full sized sheets of roasted seaweed for sushi making
Instructions
- Rinse rice with water a few times until water drains out mostly clear. Drain the rice in a colander and let it dry for 15 minutes. Transfer the rice to a rice cooker and add water up to the 3 cup water line. Close rice cooker and cook according to manufacturer instructions.
- When rice is finished, pour it into a large wide bowl, giving it a big surface area so that it cools faster. Pour sushi vinegar over rice while it is still hot. Use the rice cooker rice paddle to mix the sushi vinegar into the rice and help cool the rice. Instead of doing a stirring motion, make diagonal slashes through the rice, alternating starting from the right and left side. Repeat until rice is cooled.
- To make the rice donuts, place one end of a piece of plastic wrap over the surface of one donut mold cavity. The plastic wrap should be a little more than twice the length of the mold so that it can later wrap around your entire donut. Add about 1/2 cup (using the rice cooker cup) of sushi rice on top of the plastic wrap that is covering the donut cavity. Use the other end of the plastic wrap to cover the top of the rice and use your fingers to press down on top of the plastic wrap to shape the rice into the donut cavity. Your fingers should not be touching the rice and instead should be on the plastic wrap. Continue to shape and press as you want a tightly packed ring or the rice will fall apart.
- Once you are satisfied that you have a tight donut ring, lift the sides of the plastic wrap so that the rice ring comes off of the mold and then flip over so that the flat side of the donut is on the bottom. Unwrap the plastic so that the donut is still sitting on it with the top exposed so you can decorate. Don't take the donuts off the plastic wrap because you will need it to rewrap the donuts once they are decorated.
- Wrap the fish and toppings of your choice around the top of the donut. You want to cut the cucumbers, radishes, and sushi to a length so that they just barely wrap around the top of the donuts. It helps if you do a test piece on one of your sushi donuts before making the rest of the slices. If the slices are a little long, you can tuck the edges into the bottom of the donut. But you don't want to have to wrap completely underneath the donut as it will loosen the rice and cause it to lose its shape.
- Decorate each sushi donut to your own liking. For the slices, you want them to slightly overlap. For the smaller ingredients like sesame seeds, you can simply spoon them on and press them into the rice. When you're finished decorating, wrap the plastic wrap back over the sushi and shape and press the donut ring a few more times.
- When you're ready to serve, cut each sheet of seaweed into 4 squares. Carefully remove donuts from plastic wrap and place each donut on top of a seaweed square. Don't add them to the squares too soon as they will wilt soon after from the moisture of the donuts. Eat immediately.
- You can also add a filling to middle of your donuts. I've seen ones with an imitation crab filling and avocado puree filling. If you do this, fill your rice rings halfway with rice, add pipe filling and then cover with more rice before pressing and shaping.
Notes
For the cucumbers and radish, I recommend using a mandolin slicer and the thinnest setting possible (The setting I use is "1".)
To shape these sushi donuts, I used this donut mold.*
*Some of the links contained in this post are affiliate links. Much like referral codes, this means I earn a small commission if you purchase a product I referred (at no extra charge to you).
Serving: 1sushi donut, Calories: 255kcal, Carbohydrates: 33.8g, Protein: 16.7g, Fat: 6.6g, Saturated Fat: 1.1g, Sodium: 97.7mg, Fiber: 2.8g, Sugar: 0.8g, NET CARBS: 31
The nutrition information provided are only estimates based on an online nutritional calculator. This is not a comprehensive list of all the nutrients in the recipe (i.e., does not include vitamins, cholesterol, etc). I am not a certified nutritionist. Please consult a nutritionist or doctor for accurate information and any dietary restrictions and concerns you may have.
Did you make this recipe?Please leave a star rating and review below!