
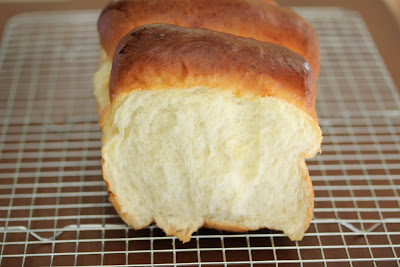
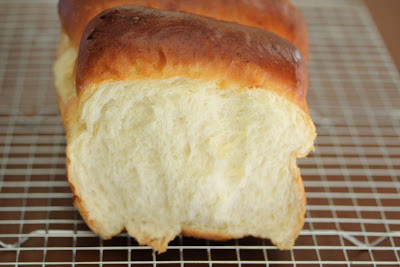
Since I’ve been working with the Tangzhong method a lot, I decided to revisit the milk bread which was the first recipe I tried, which you can read about here. As a brief summary, the “tangzhong” method was created by a Chinese woman, Yvonne Chen, who calls herself the bread doctor, wrote a book which translates to “65 degrees Tangzhong.” Her method is a natural method of creating a bread that is incredibly soft, bouncy and fluffy, which is often a signature style for Asian breads.
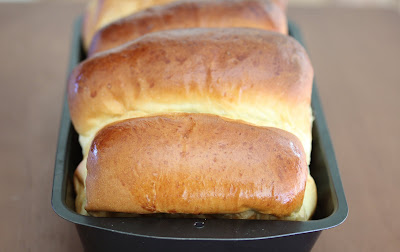
Armed with more experience, this bread came out better than the first one I had made. The only problem I had was that my dough rose too much. I should have taken some dough out because it ended up being squished in the 9 x 5 bread pan I was using.
I wanted to create an updated post with my new insights and step by step photos.

Milk Bread (adapted from two of Christine’s recipes here and here,which she adapted from the 65 degrees book)
Yields 1 loaf
Ingredients:
3tbsp+2tsp sugar
1/2 tsp salt
1 large egg
½ cup milk
120g tangzhong (click here for making tangzhong; please not the recipe for tangzhong makes more than 120g so you will only use a little more than half)
2 tsp instant yeast
3 tbsp butter (cut into small pieces, softened at room temperature)
Directions
1. Combine the flour, salt, sugar and instant yeast in a bowl of a stand mixer. Make a well in the center. Add in all wet ingredients: milk, egg and tangzhong. Fit the dough hook attachment on your stand mixer and begin mixing on medium speed and knead until your dough comes together and then add in the butter and continue kneading. Keep kneading until the dough is smooth, not too sticky on the surface and elastic. I kneaded the dough for about 18-20 minutes. Each mixer may vary.
2. Knead the dough into a ball shape. Take a large bowl and grease with oil. Place dough into a greased bowl and cover with a wet towel. Let it proof until it’s doubled in size, about 40 minutes.
3. Transfer to a clean surface. Divide the dough into four equal portions. Knead into balls. Cover with cling wrap, let rest for 15 minutes.
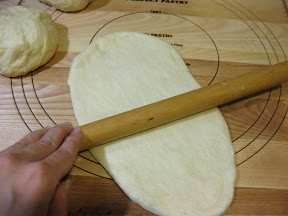
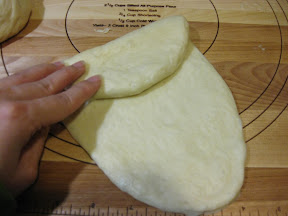
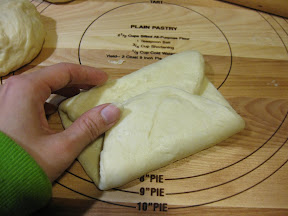
4. Roll out each portion of the dough with a rolling pin into an oval shape. Take one end of the dough and fold to meet the middle of the oval. Take the other end and fold to meet on top.
8. Bake at 325 degrees F for approximately 30 minutes.

Milk Bread
Ingredients
- 2 1/2 cups bread flour
- 3 tbsp + 2 tsp granulated sugar
- 1/2 tsp salt
- 1 large egg
- 1/2 cup milk
- 120 g tangzhong (see note)
- 2 tsp instant yeast
- 3 tbsp unsalted butter cut into small pieces, softened at room temperature
Instructions
- Combine the flour, salt, sugar and instant yeast in a bowl of a stand mixer. Make a well in the center. Add in all wet ingredients: milk, egg and tangzhong. Fit the dough hook attachment on your stand mixer and begin mixing on medium speed and knead until your dough comes together and then add in the butter and continue kneading. Keep kneading until the dough is smooth, not too sticky on the surface and elastic. I kneaded the dough for about 18-20 minutes. Each mixer may vary.
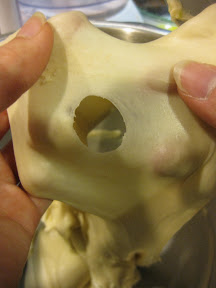
- When the dough is ready, you should be able to take a chunk of dough and stretch it to a very thin membrane before it breaks. When it does break, the break should be form a circle.
- Knead the dough into a ball shape. Take a large bowl and grease with oil. Place dough into greased bowl and cover with a wet towel. Let it proof until it’s doubled in size, about 40 minutes.
- Transfer to a clean surface. Divide the dough into four equal portions. Knead into balls. Cover with cling wrap, let rest for 15 minutes.
- Roll out each portion of the dough with a rolling pin into an oval shape. Take one end of the dough and fold to meet the middle of the oval. Take the other end and fold to meet on top.
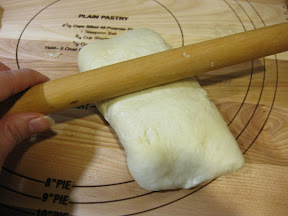
- Flip dough over with the folds facing down,and flatten dough with rolling pin.
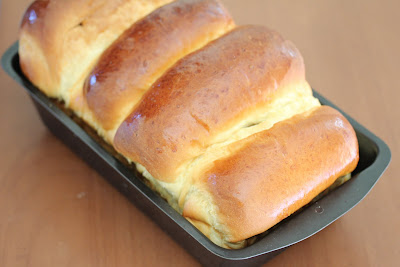
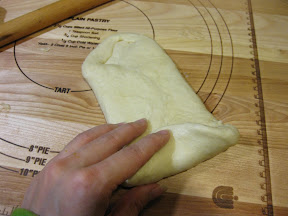
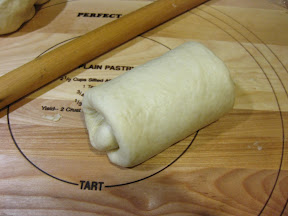
- Flip dough over so the folds face up. Now roll the dough up. Place each of the rolls into a lightly greased 9 x 5 inch loaf pan and put a piece of plastic wrap over the rolls. Let them rise until double the size, approximately another 40 minutes.
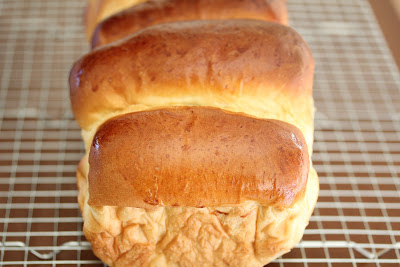
- Beat an egg and brush egg mixture on top to create shiny eggwash finish.
- Bake at 325°F for approximately 30 minutes.
Notes
The nutrition information provided are only estimates based on an online nutritional calculator. I am not a certified nutritionist. Please consult a professional nutritionist or doctor for accurate information and any dietary restrictions and concerns you may have.


I’ve been using this for a few years now and just wanted to say how amazing it is. I’ve used it for cinnamon rolls, dinner rolls, loaf bread, and breadsticks. Everything comes out amazingly soft and stays that way just as the recipe indicates. I never make bread any other way now as it is just inferior. Thank you so much!
We’re so glad you love it!
Hi Kirbie, can you make the dough ahead of time and bake it the next morning?
Sorry – we haven’t tried that.
Hello from Greece!!! I tried the recipe. Very easy to make. It might take a little time because we have to let the dough rest, but it is so worth it!!!! My family and friends found the milk bread delicious!! I will definitely make it again!!! Thank you so much !!!
We’re so glad it was a hit!
Hi Kirby!
I’ve made this recipe probably at least 5-6 times now and I absolutely love it! Weirdly, the last time I made this bread was my most successful one and it turned out wonderful. Just wanted to thank you for this recipe! It’s delicious!
That’s so great – thanks for letting us know!
Hi Kirbie;
Thanks for the recipe, I am going to try it. I use bread machine to make dough for my breads. It takes 1.5 hours for the dough to be kneaded and raised. I wonder when it’s ready how I should follow your recipe and resume from which step. Should I go ahead and divide in 4 and flatten and make balls; repeating two times and then bake?
Thanks
Farshad
Sorry, but we haven’t used a bread machine to make this recipe.
Hi Kirbie, thanks for your recipe! That was awesome! I am wondering if I could use wheat flour on this recipe? Will the amount of the flour be the same or I need to adjust some ingredients? Could you please advise? Thank you!
I believe it can be done with wheat flour but some adjustments may need to be made. I haven’t tested it myself so I don’t know what the adjustments are
Hi there. Thanks for recipe. However I have a question. I do all following your recipe. But bottom of bread after baking is done is yellowish and looks like it wasn’t baked enough. Is there any way how to avoid it? Or problem is in oven?
Thank you for help.
You may have needed longer baking time.
Hi, Thank you so much for this recipe! I’m making it as we speak. I had one question:
I had to knead by hand because I don’t have a mixer. It took me 40 minutes and I thought it was done. But now when it came to rolling out the balls into an oval shape the dough kept sticking to the rolling pin. I had to do it by hand. Do you know where I could have gone wrong? I ended up shaping it by hand. I would really appreciate your advice.
If the dough is still sticky it sounds like you needed to knead it longer.
oh wow… really? Longer than 40 minutes? I felt like I had a good workout with all that kneading! Anyway, I ended up using my hand to spread it into the desired shape and the end result was beaauuutiful! Had a great rise and was super fluffy. Thank you SOOO much for this recipe. Will make it again when I buy my stand mixer. Thanks!
I have used this recipe since the time it was posted. This has been a favorite recipe of ours ever since. Thank you for sharing this recipe!
I’m so glad you like the recipe! Thank you for the kind comment
I just baked it
It was delicious thank you for the recipe but I believe I did something wrong because it was soft but not fluffy. I didn’t feel it was light or “airy” I don’t know how else to explain it’s texture.
I don’t know if it’s the tangzhong or the kneading time! But taste wise it was a 100%
I’m not sure why your bread wasn’t as fluffy. It may have been kneading or resting time. Also make sure you only add in part of the tz and not the full amount. But I’m glad it tasted good
Hi! This bread is delicious! Thanks for sharing your recipe. Can this recipe be doubled?
I think your mixer will have difficulty trying to knead if you double the ingredients.
Followed this recipe and the bread was so soft! Thanks for the detailed steps and explanation. I kneaded the dough by hand and bcoz of ur detail on how to determine the readiness i din over knead. Thank u so much!!!
I’m so happy this turned out well for you!
So exited to have come across this recipe. Thank you so much. I do have a question though, is the sugar in this recipe a necessity for rising etc. or just for the flavor? Also, can I use the tangzhong for a regular white bread to make it light and fluffy. I feel that the bread I make in my bread machine comes out a little dense and not fluffy.
The sugar is more for flavor. Yes this can be used to make regular white bread fluffier too.
What a great recipe, it came out so light and fluffy! It was very sticky after it was kneaded which made me nervous and it barely rose the first time in the bowl but the second time in the pan it rose beautifully. One question: can you suggest how I can make this diary free? Could I use marg instead of butter? I don’t know what to substitute the milk with. Any suggestions? Thanks so much again for posting!!!
Sorry I have not experimented with making this dairy free
Hello Kirbie, I have tried baking with Christine’s recipe recently and it turned out great! I was just wondering if this is just a half version of her recipe? Another question I have is about instant yeast. I stored my yeast in the freezer, and before I use it, do I need to thaw it out first? If I do need to thaw it out, should I measure out the amount I need to use so that I don’t have to thaw out the whole jar of yeast and freeze it everytime I need to use it? I read online about it and people are saying thawing and refreezing over and over again could affect the yeast, is that true? And I love how descriptive you are with each steps! Keep up your good work!
Hi Alisa, my recipe is a combination of 2 of Christine’s recipes (that I linked to) as well as insights from the cookbook. It’s not just half of one recipe. With regards to the yeast in the freezer, I’ve never stored yeast in the freezer before so I’m not sure but I would guess you should thaw first.
HI Kirbie! Thanks for sharing this recipe and your notes on them! I tried it and the texture was amazing! But mine turned out to have a very yeasty/alcoholic smell and taste. I followed your instructions and measured two teaspoons from an envelope of Fleischmann’s instant yeast. However, I had let the bread proof for a little over an hour instead of 40 minutes because the weather is rather cold here. Do you think it may be the brand of yeast or that I let it proof too long?
Hi Cindy- the brand of yeast is the same I used. I think it might be that you needed to proof longer. With the colder conditions, you probably needed even longer than an hour unless you place the bread somewhere warm. When I make bread in the winter, I usually place the bread in a slightly warmed up oven or near a windowsill if it’s sunny, to get to proof properly. hope that helps!
Can this be baked in a 13 x 4 pullman bread pan?
I haven’t tried. I think so though you may need more than the recipe amount as stated.
Hi,
I have a question, if you are hand-kneading the dough, do you knead it till it’s no longer sticking to your hands? Because my dough is always able to stretch to a very thin membrane and even create holes when it tears but it’s always very sticky and I haven’t been kneading long enough.
I don’t do my baking in an air conditioned environment, furthermore Singapore is humid and warm, do these factors play a part?
humidity and warmth can play a factor, but yes, the idea is also to knead the dough until it’s no longer sticky. I recommend kneading with a mixer if you have one as it’s much easier to get the right consistency.
To the commenter Michelle, I had the same problem with my bread too, and I’m guessing is that you could have possibly spaced your bread dough too far apart, hence allowing the dough to rise more and the air bubbles in the dough to be bigger, allowing to be dry out faster. So you could sort of squish the dough in smaller pans and make sure they are closer together. (It should rise up?) Please note that this is simply a theory and I haven’t tested it out yet. And you should definitely check google for a solution.
I’ll try this recipe again tomorrow, thanks for sharing this lovely recipe, it is by far the sweetest and tastiest bread I have ever eaten.
Hi Kirbie,
I use the regular white muffin paper cups. I assume they’re the same as parchment paper but thicker? I usually bake it in an aluminum pan in the middle rack of my oven.
Hi Jennifer- so then, if I understand correctly, you are making individual bread rolls in muffin cups and not baking this altogether as one big bread? In that case, you may need to adjust baking time or temp. The breads cook much faster as small rolls which would explain why they might be browning too fast
Hi Kirbie,
I’ve tried baking them longer but the bottom starts to burn and the top starts getting too dark and hard.
Hmm, this is quite strange. Just double checking, you are using parchment paper and not wax paper right? Another thing–you might try a different baking pan or baking in a different section of the oven. for example, i only use the top half of my oven because my baked goods always bake unevenly on the bottom half.
Hi Kirbie,
I’ve used this recipe a few times now to make dinner rolls but the bottom is always sticking to my parchment paper even though I dust the bottom of my buns prior to placing them on the piece of paper.. Any ideas why? Also, the “feet” portion tends to get a bit wrinkly after I pull them out of the oven. Thanks! =]
Hmm, I haven’t had any sticking issues, especially with parchment paper. I wonder, have you tried baking them slightly longer?The wrinkling you describe sounds like maybe they need to cook slightly longer so they don’t deflate as much.
thank you for the recipe, i made it today and it turns out great. Really hard to knead the dough by hands though, so sticky that i thought i did something wrong. i wish i had a machine. The bread is extremely soft and delicious! ?.?~
Hi, glad it worked out! yes it’s super hard to knead by hand. if you have a stand mixer, that is the best and easiest way
hi dear.. may i know it’s about how many ounces is a cup of flour?
tq
i dont have the conversion. you can try looking for a conversion site on the internet
I would definitely change the recipe and say NOT to use the whole tangzhong. It’s a bit misleading as I bet many added the whole thing instead of measuring out the tangzhong. I dumped the whole thing and the dough was extremely sticky. Then I see that it’s for doubling the recipe…
Making it right now and hope it comes out good! =)
it states in the original post that it’s about half. i’ll make the change here as well
Hi what speed do you use for your mixer? I have a kitchen aid and have been using speed 2 but find it takes very long to knead. You say you used a medium speed so is it fine to use speed 4 instead to make the kneading process faster? Thanks! Love this bread and the kid inhale it the moment the buns are cool enough to eat!
2 seems too slow. I would increase to 4 and give it a try. I usually mix mine between 5-6, but I am using a Cuisinart and not a Kitchenaid. I’ve heard that kitchenaid sometimes struggles with kneading bread, so I’d watch it carefully.
Hi~ First time making bread and I have a few questions regarding this delicious looking recipe.
– How sweet is this bread?
– Did you used unsalted butter?
– Did you used normal or full fat milk?
Thanks!
sweeter than standard toast, but not so sweet to be a sweet bread. yes, unsalted butter. i used fat free milk, but i think it should be fine with low fat or full fat.
I did end up halving the tangzhong and it worked so well. My family love it it was so soft and fluffy!
so glad it turned out well!!
Thank you also about how many cups is 120g?
Sorry I dont know as I always weigh it. it’s a lot less than 1 cup though
Hi can I half the recipe for tangzhong if I’m only gonna make one loaf?
The TZ recipe isn’t quite enough for two loaves unfortunately. If you use 120g, you will have less than 120g leftover. also it is hard to reduce the quantities to make a smaller amount.
Thank you! The bread turned out great! I will be trying the whole wheat version next.
yay! so great to hear. I haven’t tried a whole wheat version yet. I need to do so!
I saw this recipe on christine’s website and yours and I have been dying to try it. I just took it out of the oven and will taste it tomorrow. It seems like everything went well.
i hope you love it!
Hi Kirbie,
I tried the recipe and it turned out great. The only issue i have is, when the bread cools down it hardens up and dry too. It’s not soft like the in shop. Am i doing something wrong?
Hmm, it does sound like something went wrong because the bread is supposed to stay super soft. Did you do the recipe exactly or did you make any modifications such as a diff flour, etc?
Hello! I made this last night, and it is perfect!! The way the bread pulls apart and you can see all the fibres ripping was pure joy for me!! I kneaded the dough in my Kitchen Aid with a dough hook for 20 mins. My pan was the same size as yours, so my dough was busting out–but still delicious. I will have to get a bigger pan! I started reading your blog to look at your Cookies and Cream cookie recipes, then I tried your savoury dishes, now I made this bread. You have many lovely recipes and I’m always excited every time I get a new post delivered to my Inbox. Thank you so much!
Hi Kathy, thanks for your very sweet message! It totally made my night. I’m so glad you are enjoying my recipes and I hope you continue to enjoy many more.
My next project will be your milk bread rolls! Thank you for the recipes.
have fun!
I followed your original recipe and thought it was perfect. Can you tell me why you revisited it. I noticed the baking temp change (original was 350, and revisit is 325). In my first attempt, I used 335, baking for 30 minutes, and the bread was barely cooked. When I followed your original recipe (350 for 30 minutes), bread was absolutely perfectly cooked. I used an 8 x 4″ loaf pan and it was overflowing. I will try a 9 x 5″ pan (when I can get one). Thank you for the revisit, but I will stick to your original!
The second post was meant to provide more clarity and more details since I had more experience with the recipe. I included photos of the dough, etc. I also had issues that my bread top was overcooking with the original temperature, but of course everyone’s oven is different.
I just finished making the bread and it is fluffy and soft and
Reminds me a lot of egg bread challah however
I needed to add 1/2 cup of flour and it took like 3 hours for
The dough to rise. Not sure why ?
Did you use the entire amount of TZ or just part of it? If your dough is too wet that might have been why you needed more flour. As for rising, it might have something to do with your yeast. Did you use instant yeast?
Is there a way to make a whole wheat version of this?
I’ve seen whole wheat versions, but I’ve never tried myself. It’s not the same exact recipe. If you try google search, I’m sure you’ll find a few recipes.
Do you know how this works with corn flour? My mom still remembers fondly the breads she used to get in korea with corn in it and I’m hoping to recreate it for her…
You need to use bread flour to make the bread. Some corn meal probably can be added to have a corn flavor but I’ve never done a corn one. You might try to do a google search to see if anyone has made it.
Hi, I tried this recipe. Was worried I messed up since the dough was really sticky. It took 30 minutes in the mixer…My search is over. Thank you for sharing. My brother says it tastes like ensaymada. So I put some butter sugar glaze and some grated cheese on top. Absolutely loved it. Thank you so much for sharing this recipe 🙂
this is my all time fav bread recipe!
Hello! This is such a great recipe, I’ve been literally baking variants of it every day for the past week because my parents and I love it so much! I’m going to try to make a version of this with some corn flour, rosemary, and pine nuts, and if it turns out well, I’d like to post the recipe on my blog. Would you mind that? I’ll definitely link back to your post about the 65 degree method.
Sure!
Hello!
I made bread for the first time yesterday and this was the recipe I used! (Yayy) It came out to taste pretty nice, but the coloring is a little weird? It’s this darkened yellow color, and the texture of the bread isn’t as fluffy as yours either ;_;
Hmm, I’ve never experienced that issue before. Did you use bread flour?
Hi there, I used the same recipe from Christine’s blog and my bread turned out soft and fluffy only on the first day. It turned kinda hard and dry the next day, although it still tasted very good after toasting it. Do u have any idea why?
That is so strange. I’ve never had that happen before. Did you keep the bread covered overnight? Also did you use bread flour?
It tastes perfect! Awesome!
yay!
I added the full amount of tangzhong… Now I’m waiting on the final rise, and then I get to discover if it turns out. (Crossing fingers)
eek. it might be too much. I’m actually not sure what will happen. Please let me know!
I’m trying this recipe today and was wondering if you had tried baking it in a Pullman loaf pan? I love the way the Japanese bakeries have their loaves baked and am trying to recreate that….
I have not tried baking it in a pullman loaf pan. I’m not sure what the result would be.
Hi Kirbie, I made this recipe here in India, ended up using only 2 cups of all purpose flour and absolutely loved the resulting bread. I also added milk powder because I love the milky sweet resulting taste. Though I altered the proportions, I found your pictures to very helpful and used those as a guide for the bread. Without the picture of the dough being strecthed, I would have had no idea what I was aiming for. Thanks for the detailed post.
Glad to be of help! I’m happy the recipe worked even with the reductions and using all purpose flour instead of bread flour
On your first posting of milk bread you had the oven temperature at 350 degrees F, on this posting you have it at 325 degrees f. Did you find the lower temp to work better?
Yes. The first time I made it, the top was getting too dark brown before the bread was done. So I lowered the temperature and it still baked fine and the top didn’t get too brown.
Can this recipe me be baked in the bread machine without the added step of rolling out the dough?
I believe it can be baked in a bread machine but may need some tweaking of the recipe. I haven’t tried making it in a bread machine so I don’t know what the tweaks are. You can try google search to see if other bloggers have made a version with bread machine.
First and foremost, let me say i LOVE this recipe! Its super easy to make, the bread always comes out delicious and theyre always so fluffy and soft! I use this recipe for many types of bread recipe. The other day i made cinnamon roll, i used this recipe. I have also made pull apart cheese garlic bread, again using this recipe. One thing i modified when making the garlic bread, i added a little bit more salt and less sugar. (cant provide exact amount cause i just used the feeling method). So, thanks a lot for the recipe!!! <3
I’m so glad you like all the bread and I love hearing all the variations you’ve made.
I make the TangZhong roux in an 1100-watt microwave. Use a pyrex? cup. 100-gm room temperature water, 20-gm flour. Mix well with whisk.
-Microwave 20-seconds. Stir, take temperature. Will be about 120-F.
-Microwave 10-seconds. Stir, take? temperature. Will be about 135-F.
-Microwave 10 more seconds. Stir, take temperature. Will be about 145-F.
-Microwave a? final 5-seconds. Stir and take temp. The roux is at about 150-F.
The roux will be thick and creamy and a translucent white color.
Cool to below 130-F, mix with other wet ingredients and add to bread maker.
Thanks! I need to try the microwave method
I made Tangzhong Cinnamon Swirl Milk Bread.
I didn’t have any plain milk in the house, so I substituted
1/2 cup of buttermilk. Other than that, I followed the Milk Bread recipe exactly from this website.
I used my bread machine dough cycle to knead and for the 1st rise.
But when it came to shaping the loaf, I shaped it into a traditional Cinnamon Swirl Loaf and used this filling below.
What a wonderful dough to roll out and work with. It was so light and smooth. Hardly any snap back when rolling out. A pleasure to work with.
Filling:
1 egg, beaten with 1 tsp vanilla extract (for egg wash inside and outside)
1/2 cup Craisins (Dried Cranberries)
Mix these dry ingredients together, sprinkle as filling:
2 Tablespoons white granulated sugar
2 Tablespoons brown sugar
2 teaspoons Penzey’s Vietnamese cinnamon
2 teaspoons Penzey’s Apple Pie Spice
1 Tablespoon flour
Placed shaped loaf in 9×5-in loaf pan. Standard rise and baking at 350-F until center of loaf reached 195-F.
This was the lightest, highest rising, best tasting Cinnamon Swirl Bread I have ever made. It is so light and fluffy.
This will be my go to Cinnamon Swirl Bread in the future.
I tried making this bread and I thought I had a bag of bread flour, put everything together in my ka mixer but it was still very sticky and did not seem to come together. I rechecked all my ingredients and it turns out the bag of “bread flour” was a bag of “bread mix!” is this the culprit? I kept adding ap flour to thicken up the dough mixture so it’s not so sticky. And transferred it to a bowl. I didn’t have the heart to throw the dough out. It’s sitting in my refrigerator hoping there might be a way to save it?
Thank you
Bread flour and bread mix are not the same thing so that is probably the problem. I’m not quite sure how to save it. You might try googling and seeing if anyone out there has discussed it in a forum or something.
Hi Kirbie. Thanks for the pictorial guide. Its really helpful. I tried this couple of times but could not get the dough to pass the windowpane test. I did everything with hand, mix and knead since I dont have a mixer. May I know how long did you knead using hand? I tried kneading for 40 mins, stretch and roll method, but the dough still tear when I did windowpane test. Thanks!
It’s really hard to get the desired consistency kneading by hand. I only kneaded hand once a long time ago, I don’t remember how it took, but I actually had my husband help me knead because it took a lot of strength and time. Do you have a mixer you can use? It works very well with the mixer.
Wow..the bread looks yummy and I can’t wait to try it.
I have a question on the yeast. Can I replace the instant yeast with active dry yeast? What additional steps do I have to do?
Thank u
I believe it can be done, but I don’t know exactly the extra steps as I always just buy instant yeast since it’s so much faster.
I plan on making this hopefully this weekend ! I am so excited LOL ! Have you ever tried this without the egg? Unfortunately, my 2 year old is allergic (anaphylactic shock) to it. Cheers !
I have not tried it without the egg. I think the egg is pretty essential to the recipe, so not sure how it will turn out with it. Maybe you canfind an eggless bread recipe to try for your 2 year old?
How much is 3 tbsp of butter for your recipe above?
I’m sorry, I don’t understand your question. What are you trying to convert tablespoons to?
This bread is the most delicious bread I have ever seen ! My question was, do i have to divide the dough into 4 equal parts? Can i just make one big one and bake it like a regular bread?
Actually it does make a difference. It doesn’t quite rise as well if it’s just one big lump.
I made this bread last night for my white-bread addicted daughter. I usually only make whole wheat, but finally relented and I’m so glad I did! I ate more of this bread than she did, and it’s just as soft and wonderful as it’s made out to be. Thanks (I think)!
Haha, I’m so glad you love it! This is definitely my favorite white bread recipe. It takes a little effort, but the results are amazing every time!
hi, can i use all purpose flour? i’m making this tomorrow and i don’t have time to buy bread flour. I heard its going to be tougher but will it be softer than regular white bread or the same? 🙂
I would say it’s not a good idea to use all purpose. I’ve done it before and the bread comes out tasty very doughy.
The bread didn’t turn out to be soft and fluffy. Although it has risen quite nicely but it’s hard on the outside and dense in the inside. I’m still trying to figure out what went wrong, not sure if it’s too dry or I didn’t knead sufficiently although I let the mixer went on for an hour. Would be grateful if you can advise. Thanks much
Hi Lorna. I’m sorry to hear that. I actually am not sure where you went wrong because I haven’t had it be super dense before and I’m not so much of an expert to know what would cause that. Hopefully someone reading the comments can give advice. Did you use instant active yeast? As opposed to the dry yeast?
I’m trying your recipe now but the dough seems dry and rough when I tear it. It isn’t as smooth as yours… any idea what is wrong, insufficient kneading? I’ve been kneading for close to an hour using kitchen aid at level 2 intensity.
The dough should actually be really sticky and after a lot of kneading, it becomes less sticky. It sounds like you have too much dry ingredients because the dough should not be dry at all.
Hi, I just made a loaf last Thursday and every last bit of it was gone by Sunday morning! Store bought bread never get finished before it gets yucky and moldy. My daughter said the bread was delightful! Thank you for sharing the recipe and step-by-step method.
Oh that’s so great to hear. My loaves never last long either. Haha. =)
Hi, I just want to check the time taken for you to knead the dough using the stand mixer – starting from adding the wet ingredients to time you have stopped. Cause am not too sure if my stand mixer is not fast enough. I took around 2 hours to knead the dough. It is not as sticky as I did the first time. Do you reckon if this is the problem with the speed or power of the stand mixer?
Hi Angela, It should not take that long. The wet ingredients come together in only a few minutes, maybe five at most. And then after that you knead for about 18-20 minutes to achieve elasticity. I think you need to try turning up the speed of your mixer. Do you have a mixer that is good for kneading bread?
Hi, I’ve tried making the dough and leave it overnight before baking. It taste just simply nice. Fluffy and tasty even it is plain. However, am not too sure if I didn’t knead long enough using my mixer. The dough is abit sticky. What do you reckon – is it that I did not mix long enough?
Yes I would recommend kneading longer if it is sticky. The dough should be slightly sticky, but it should not actually stick to your hands.
Hi, I’ve tried making the bread today, kneading by hand since i didn’t have the a bread mixer. Wasn’t too sure about the texture (i’m new to breadmaking) and since I have had problems with bread the last few times I tried making, I almost gave up because I couldn’t get the right elasticity and it was so sticky. But in the end, I still decided to give it a go to see what happens. Guess what? It still turned out quite nice! Although not as perfect as yours. The texture is still soft and nice but I realized that maybe I need an oven thermometer? The tops and the edges are a bit crusty/crunchy. Baked too long? baked at a temp too high? But I did follow the length 30 mins and the same oven temp. What do you think?
Still love th bread by the way! thank you! 🙂
You may want to lower your oven rack so that the bread isn’t as close to the top. You can also tent the bread by putting a layer of foil loosely over the top of the bread if you see that it starts to get too brown. I’ve had it happen sometimes and I just put foil in and that stops it from continuing to get too brown. Basically secure the foil on one end of the pan, let it wrap around to the other and secure the foil into the other end of the pan. Don’t have it securely on top. It’s like a tent, where the bread is the person inside the tent. You can also try reducing the temperature slightly, maybe by 10 degrees towards the end.
Is it possible to knead using hang to that elasticity? Not sure if it’s becos I uses whole meal.. 1st failed.. I knead for more than 30 mins still can’t get that elasticity
;(
Whole meal definitely makes a difference in the recipe. it is possible to get the elasticity kneading by hand, I’ve done it before. I suggest you stick with bread flour. I don’t know the conversions for the other ingredients if you are using whole meal.
Hi,
I was wondering what type of milk did you use? I am new to breadmaking and my friend told me you can’t use 2% milk. I am in Canada. TQ 😉
2% should be fine. I use whatever I have on hand, sometimes fat free, sometimes whole milk, etc.
Thanks for the recipe can wait to try it.do you add the Tangzong while it is still hot or when it’s cold? just wondering how the Yeast would rise in a cold mixture
You definitely need to let the tangzhong cool down first. I usually stick it in the fridge for a few hours. The yeast doesnt need anything warm because the recipe calls for instant yeast, which doesn’t need to rise. Only the active dry yeast needs to be mixed with warm water to rise.
Hi, I was making this and in the middle of preparation, I realized that I was using all-purpose flour instead of the required bread flour. I couldn’t start over since most of the ingredients were already mixed. Do you think the bread will still bake fine with the all-purpose flour instead of the bread flour?
Thanks!
It will still come out. I made the mistake before. The texture won’t be as great as using bread flour in my opinion, but I don’t think you need to start over. The bread comes out more dense with all purpose flour and doesnt stay as soft as long. But it still should taste good fresh out of the oven.
Hi there.
I tried this recipe (made a few tiny changes though), and the bread looks really pretty. The dough was very easy to work with too – very smooth and not sticky.
I don’t know if its supposed to be like a “chan bao” (chinese dinner roll) as the texture is more sturdy and not as fluffy as those buttery sweet breads from the chinese bakeries. It is also not as sweet as those sweets breads.
For the simplicity of the ingredients (compared to the Hokkaido Milk Loaf or Pai Bao on Christine’s site), this is a pretty good bread. The ingredients list for the Hokkaido Milk Loaf and Pai Bao take a lot of time to prepare.
I love that this recipe is so simple, but it’s too bad it’s not possible to make those super soft and fluffy ones from such a simple recipe like this.
Thanks for the recipe.
When I make this, it is similar o the Chinese toast breads. For the softer individual breads, the book has recipes for those too n they come ou great
Ever since I made this bread, it’s been the family favourite and I now bake a loaf every other day!! Thanks so, so much.
That’s so great to hear! I love it so much too. When I first discovered this bread I made it every week. Now I’ve slowed down, but definitely at least once a month!
I made this for my family today! Kneading by hand is definitely extremely tedious, but the results were well worth all of the effort. 🙂 Thank you so much for sharing this recipe with us. I’ll make this again and again, for sure!
Wow, I applaud you for making it by hand! I did it the first time, and then after that I always used my stand mixer. I’m so glad you like it though.
I ran across this recipe at a bread website called the Fresh Loaf and made it….Wow is it a wonderful bread. I am sure your readers will love this bread. RG
I’m so glad it turned out well for you!
I can’t wait to make this bread. Is there a reason you didn’t double the bread dough ingredients to make 2 loaves, since the tangzhong is already doubled?
There’s no real reason. You can definitely make two at once. Since the dough takes about 20 minutes to mix, I just had an issue with the timing. I tried doing two at once before, and I was getting mixed up with how much longer I needed to proof each loaf. I also tend to make these late at night, so I’m tired and that makes me make more mistakes if I’m monitoring two loaves. But you can definitely do two at once. I usually make one and then put the rest of the tangzhong in the fridge and then make another one the next day.
ah, that must be the problem, then. another thing is, when a put a towel over it, the dough always ends up sticking to the towel. is that normal?
That’s normal for the dough to stick to the towel. Oh I thought of another thing. Are you using the entire tangzhong mixture? Because 120g of tangzhong is only about half the mixture. So if you are using the whole thing then your dough will be too wet.
Lightly spray your towel with cooking spray. I’ve used my Misto filled with light olive oil, and various commercial sprays. It helps immensely!
great suggestion!
I tried making these today, and it came out pretty well, but it was a real struggle, because the dough was so sticky. Is there something wrong? I tried it twice, and the second batch of dough was even stickier than the first. I didn’t have a thermometer when I was making the tangzhong, so maybe the mixture wasn’t hot enough? The steam was already rising, and there were big bubbles. I used a bread machine mixer for about forty minutes. Thanks, and it was great. 🙂
I’m not quite sure what the problem is. The initial dough should be very sticky and it’s hard to knead my hand. But if you use a bread machine or a stand mixer, it should not be sticky after kneading it long enough (about 20 minutes for me). Maybe it is your tangzhong? Mine usually is bubbling for a while before it hits 65c. It’s usually done right around the time you start seeing lines in the paste from stirring if that makes any sense (it makes more sense if you’ve made the tangzhong often). Maybe try cooking your tangzhong a little longer next time.
Have made a loaf of this today and it worked out really nice, though probably could have done with a touch more time in the oven for my batch..
Decided to make another tonight – this time after 15 minutes the mixer started smoking – oops!
I have a Breville branded one – clearly it’s not quite up to the mark for this job! See how it goes later in the week..
Oh no. Hopefully it doesnt smoke next time…Or maybe you can break it up. Knead for 10 minutes, give your mixer a rest for a few minutes, then knead again. I have a Cuisinart stand mixer.
Thank you so so so much for those photos and such detailed instructions! Now I know for sure that my dough wasn’t kneaded enough or something is wrong with it! Do you mind me asking if you’re using a breadmaker now or a kitchenaid or something? I’m currently making the Pineapple Buns and both times I’ve used the Kitchenaid dough hook attachment, it’s taken an hour and it still doesn’t have the right elasticity!! 🙁 I don’t know if it’s something to do with my tangzhong or?? Do you have any suggestions or idea what might be wrong?
It’s hard for me to tell what is wrong. I use a cuisinart stand mixer, similar to the kitchenaid. I use the dough hook attachment and have never needed to knead for more than 18-20 minutes on high speed. What is the texture of your dough? is it sticky? are you only using half of the tangzhong mixture? Maybe if you take some step by step pictures I can tell you what is going wrong.
That looks wonderful! Bouncy bread, yes, I think I’ll take one, please.
It is wonderful! I haven’t tested how many days it can last because it’s always gone so fast!
In the Philippines, mamon is not a bread, it is a sponge cake. I love your bread too. We do not have a counterpart back home. Even the softest pandesal is not as billowy as this Japanese style loaf.
Thanks for clearing that up! I asked the BF was mamon was but he didn’t know and I’ve been wondering ever since!
I followed your directions the first time and my bread was perfect! I also love this bread. I have a Chinese friend who was raised in the Phillipines and I described this bread to her. She said it sounded like “mamoon”? I am not sure what she said and really not sure of the spelling. I am born and raised in the USA so this explains
why I am unsure. I am going to make it for her. I love the bread! (and the recipe!)
I’m so glad you like the bread! I know I’ve tasted a filipino equivalent, but I’m not sure what it’s called. I just asked the BF, but he’s not sure. He says the similar one is Pan de sal. Oh well. Hopefully your friend will like it. I’ve been making it a lot lately; it disappears so quickly in my house.
Mamon, is a type of buttery spongecake, which is velvety in texture. Mybe thats what he/she thought when you describe this bread as ” very soft”. But, cake not = bread lol