You only need two ingredients for these peanut butter cups and they’re very easy to make!
I’ve always loved peanut butter cups and making your own is pretty easy and they definitely taste better than store-bought ones. I’ve already made Chocolate Nutella Cups and Biscoff Chocolate Cups so I figured I needed to make classic peanut butter cups, too.
How to Make Peanut Butter Cups
My peanut butter cups are a little different than store-bought ones because they only have two ingredients and the cups are filled with pure peanut butter. For a version that is more like store-bought ones, check out my other Peanut Butter Cups recipe.
Chocolate
I used semi-sweet chocolate chips for the chocolate coating, but you can use your favorite chocolate like dark chocolate or milk chocolate. You can even use white chocolate for a different twist.
I like to melt my chocolate in the microwave. I recommend melting the chocolate chips in 30-second increments and stirring them each time. It should only take about one minute to fully melt the chocolate this way.
If you prefer, you can also melt the chocolate on the stove with a double boiler.
Peanut Butter
I recommend using creamy peanut butter for this recipe. I didn’t use natural peanut butter because I didn’t want the filling to be too runny.
I wanted to keep these very simple so I didn’t add anything to the peanut butter filling. This creates peanut butter cups with very creamy centers.
Preparing the Peanut Butter Cups
- I like small peanut butter cups so I used my mini muffin pan*to make them.
- Line the muffin pan with mini muffin liners and spoon some melted chocolate into the bottom of each. You want it thick enough to hold in the peanut butter but not so thick that you don’t have room for the filling.
- Dip the back of the spoon in the chocolate and use it to cover the sides of the muffin liner. Once you’ve completed coated the bottom and sides of the liners place the muffin pan in the freezer until the chocolate is set.
- Once the chocolate is set, place a small spoonful of peanut butter into each chocolate cup. Top each cup with more chocolate and use the back of a spoon to smooth the top.
- Place the peanut butter cups back in the freezer until the chocolate is set.
Storing Peanut Butter Cups
I recommend storing your peanut butter cups in the refrigerator. You can store them at room temperature, but keeping them cold will prevent them from melting. Or, you can store them in an airtight container in the freezer.
*Some of the links contained in this post are affiliate links. Much like referral codes, this means I earn a small commission if you purchase a product I referred (at no extra charge to you).
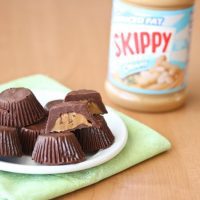
Peanut Butter Cups
Ingredients
- 8 oz chocolate chips of your choice I used semisweet
- Peanut butter
Instructions
- Line mini muffin pan with candy/mini muffin liners. Put chocolate chips into a microwave safe bowl and microwave for about 30 seconds. Mix with large wooden spoon. Microwave again for 30 seconds. Stir again. if chocolate is not yet completely melted and smooth, repeat for another 15 second interval.
- Take a small spoon and scoop some melted chocolate into the bottom of each cupcake liner so that it completely lines the bottom (you want it thick enough to hold in the peanut butter but not too thick so that you don't have room for filling the cups). Take the back of the spoon and dip into chocolate and line the inner sides of the candy liners with chocolate as well. Repeat with all candy liners. Once the inside of the liners has been completely coated with chocolate, put in the refrigerator to harden, for about 20 minutes.
- Remove liners from fridge after the chocolate has hardened. Take a small spoonful of peanut butter and place into each chocolate cup. Take a spoonful of the remaining melted chocolate and pour on top of peanut butter filling until you can no longer see the peanut butter. Attempt to smooth top with back of spoon. Repeat with remaining cups. Place cups in fridge for another 20 minutes until chocolate has hardened. Eat immediately, store uneaten ones in freezer or fridge to prevent melting.
The nutrition information provided are only estimates based on an online nutritional calculator. I am not a certified nutritionist. Please consult a professional nutritionist or doctor for accurate information and any dietary restrictions and concerns you may have.


Hi! Is it okay for me to use your pictures of the PB cups? Mine is in the fridge by now and yours are stunning 🙂 I will link you! But in swedish, since my blog is swedish. Tell me if it’s not okay and I’ll remove it all.
I am okay if you use one photo, and link and credit me for the photo and do not copy and past my recipe into your post. Thank you.
These look fantastic!