I once had these pretzel rolls that were served as a bread starter at a restaurant I was dining at. I loved the shape and look of the rolls but I was a little disappointed because they didn’t really taste like pretzels.
After that, I came across a few pretzel rolls posts and made a note that I wanted to try making them at some point, but then I forgot about it. Recently, I saw some homemade pretzel rolls posted by fellow SD blogger Vicki of A Work in Progress, and I really wanted to make them. Hers came out so much prettier than mine so you should definitely take a look at hers.
She used a recipe provided by Stresscake, which is actually an adaption of Alton Brown’s soft pretzel recipe which I use all the time for my soft pretzel creations. I wrote about in my Best Homemade Soft Pretzels post which is a great recipe for traditional pretzels.
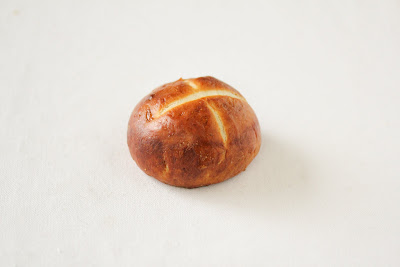
The pretzels are supposed to have a slash mark on the top exposing the white underneath but I was having trouble slashing my dough without the dough getting indented and losing its round shape, so a lot of my slash marks didn’t pierce the skin of the dough properly.
Also, my pretzel balls ended up having two-tone colors, with the bottom being much darker than the surface of each roll. I think what happened was that when I was poaching the dough, my water level wasn’t high enough so the bottom side got exposed to more water and ended up being much darker than the top of the dough which wasn’t really poached properly.
Also I didn’t have any pretzel salt to decorate with. So they don’t look perfect, but they still tasted great. Dense, soft and chewy on the inside, they are like a soft pretzel, but with more of the soft inside layer. These rolls taste good on their own but would be great for a sandwich too.
I’ll have to make them again soon and hopefully, they will come out better looking next time.
The full recipe can be found here.
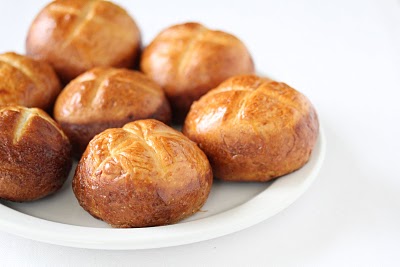
Pretzel Rolls
Ingredients
- 1 ½ cup warm water 110-115°F
- 1 tbsp active dry yeast
- 2 tsp granulated sugar
- 4 ½ cup all-purpose flour
- 2 tsp kosher salt
- 4 tbsp unsalted butter melted
- ¼ cup baking soda
- 1 egg beaten
- pretzel salt optional
Instructions
- In the bowl of a stand mixer, combine the water and yeast. Let it sit for five minutes until it turns foamy.
- Add the sugar, flour, salt, and butter to the yeast. Mix with a dough hook until the dough comes together. You know it’s ready when the dough is not very sticky.
- Cover the bowl and let the dough rise for an hour or until it’s doubled in size. One it’s risen, punch it down and transfer it to a floured surface.
- Divide the dough into 18 pieces. Take a piece of dough and form it into a round ball by pulling the sides and pinching to seal. Place the ball, pinched side down, on a work surface. Cup your hand around the ball and rotate your hand and lightly roll the ball. Repeat with the rest of the dough balls.
- Place the dough balls seam-side-down on baking sheets lined with parchment paper or Silpat mats. Space the dough balls about 1 inch apart. Cover with a towel and let the rolls rise for 30 minutes or until they have doubled in size.
- Preheat the oven to 425°F.
- In a large pan, bring 2 quarts of water to a low boil. Add the baking soda and lower the heat to maintain a simmer. Place the rolls in the water and poach them for 30 seconds. Transfer them back to the sheet pan. Space the rolls, seam-side-down, about 1-inch apart.
- Brush the rolls with the beaten egg and roll them in the pretzel salt, if using. Cut an “x” in the top of each roll.
- Bake the rolls for 15 to 20 minutes. Rotate the pans halfway through the bake time to ensure even browning. Cool the rolls before serving.
Notes
Nutrition
The nutrition information provided are only estimates based on an online nutritional calculator. I am not a certified nutritionist. Please consult a professional nutritionist or doctor for accurate information and any dietary restrictions and concerns you may have.





Awesome! These are sooo good! I make them regularly and my daughter normally helps me so it is a team effort since I like to make several at one time since everyone loves them so much!
It definitely goes faster when you have someone else helping!
Hi Kirbie,
yes it looks like you didn’t have enough Brezellauge (Sodium hydroxid alkaline) to submerge your dough. This will probably have caused the colour shades. I work for a German bakery and would suggest you freeze your dough rolls after they have risen to the desired size. That is the “common way” of doing it. After they are frozen throughout, submerge them in the alkaline water for a few seconds, sprinkle with salt and let them defrost until the outer 5 millimeter are soft. Now slice them and bake the rolls. They should be perfect now.
Thanks for the suggestions! I will try it with your suggestions next time.
Hi! I’m having a linky party called A Themed Baker’s Sunday where this weeks theme is bread! I would love for you to join! Hope to see you there!
https://cupcakeapothecary.blogspot.com/2011/05/themed-bakers-sunday-4.html
Alyssa
I love making these a bit bigger and build sandwiches with them. Fantastic!
I still need to make sandwiches with them!
Hey Kirbie – Aren’t these wonderful? I’ve made them 3 times already, and plan on doing them as long sticks next. I’m addicted.
Wow, 3 times! Yes I am going to do the baguette size ones next time and stick some sausages in them or make them as sandwiches. I need to find a sharper knife for the slash marks.
These look fantastic, I actually made your recipe for Soft Pretzel Bites (haven’t blogged about those yet but definitely planning on it) and they were a HUGE hit! These look great, too, so I’ll definitely be trying them out.
Thanks. I think next time I’m going to make these a little bigger so I can use them as sandwich rolls or maybe make them longer and stick a hot dog in them. So glad you like the soft pretzel bites. I love them too, though I think I end up eating way too many little bites. More than if I just ate one soft pretzel. Oh well.