
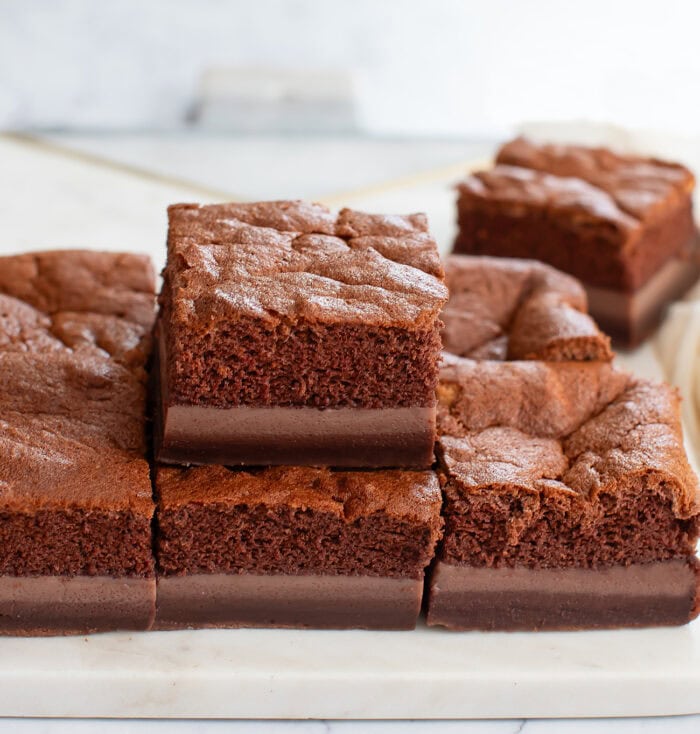
This chocolate magic cake magically separates into three distinct layers as it bakes. It is an impressive and unique-looking dessert that is actually easy to make. You only need 5 simple ingredients to make the cake. The cake has a fluffy chocolate cake layer, a creamy custard layer and a crust layer.
This chocolate magic cake may be my favorite of all the magic cake flavors I’ve made. The cocoa flavor is deep but not too rich. This cake is made with just a few simple ingredients that you may already have on hand.
Ingredients
- All purpose flour
- Cocoa powder
- Sugar
- Eggs
- Milk
All purpose flour: This cake is made with all purpose flour. You do not need baking powder or baking soda for this recipe.
Cocoa powder: The chocolate flavor comes from using unsweetened cocoa powder. I used dutch process cocoa power because I think it gives the cake a richer chocolate flavor and color.
Sugar: The cake is sweetened with regular granular sugar.
Eggs: Eggs are separated and the egg whites are folded into the batter. This creates the structure for the cake and helps it separate into its distinct layers.
Milk: Milk is used to create the custard and crust layers. We recommend using lowfat milk.
What is Magic Cake
Magic cake is a French cake known as gâteau magique. It gets its name because of the way the batter becomes a three-layer dessert when it bakes. The top layer is a soft fluffy sponge cake. The middle layer is a creamy custard. The bottom layer is often described as a crust. It is not a crust like pie crust though. It is more like a firmer flan layer that acts like a crust.
This cake is a lighter dessert. It is not super sweet or rich.
How to Make Chocolate Magic Cake
- Add the flour, cocoa powder, egg yolks, sugar and 1/2 cup of milk to mixing bowl and mix until you have a smooth batter.
- Add in the rest of the milk and mix until just combined. The batter will be very thin.
- Beat the egg whites in a separate clean mixing bowl until stiff peaks form. Gently fold the egg whites into the cake batter in batches.
Expert Tips
- Do not make the egg white meringue ahead of time. You do need to wait until after the rest of the cake batter is ready so that it can be mixed in right away. If you make the egg white meringue ahead of time the cake will not turn out correctly and the top layer will collapse too much as it cools.
- This recipe works best with lowfat milk (1% or 2%) and not nonfat or whole milk.
More Magic Cake Recipes
5 Ingredient Chocolate Magic Cake
Ingredients
- 4 large eggs whites and yolks separated
- 3/4 cup (96 g) all purpose flour
- 1/4 cup (32 g) unsweetened dutch process cocoa powder
- 1 cup (197 g) granulated white sugar
- 2 cups (16 fl oz/473 ml ) low fat milk (1% or 2%) divided
Instructions
- Preheat oven to 325°F (163°C). It's important that your oven is preheated before your cake batter is done because the cake needs to go in the oven immediately after it is prepared. Line an 8 x 8 inch baking pan with parchment paper leaving some overhang for easy lifting later.
- In a large mixing bowl, add egg yolks, flour, cocoa powder, sugar and 1/2 cup (4 fl oz) of milk. It's important to add some of the milk before you start mixing. If you try to beat without any milk, your flour will become a paste and you won't be able to mix out the lumps later. Also make sure to only add 1/2 cup right now. If you add all of the milk you will not be able to mix your batter because it will be too liquidy. Beat on high speed until batter is smooth and uniform in color and no flour lumps remain. Once batter is smooth, add in remaining milk (1 1/2 cups). Reduce speed to medium low on mixer and mix until the milk is incorporated into the batter. Your batter will be very thin.
- In a separate clean mixing bowl, add egg whites. Beat egg whites on medium high speed (I did mine at speed 8 out of 10) until stiff peaks form. Your mixing bowl and mixer must be completely clean before adding and beating the egg whites, otherwise the egg whites will not form stiff peaks. It is important that you wait until after you are done with the rest of the cake batter before you beat the egg whites. The egg white meringue must folded in immediately, otherwise the cake will collapse too much when it is done baking.
- Gently stir and fold in 1/3 of the egg whites into the cake batter with a spatula. Because the cake batter is so thin, you do need to swirl and fold to make sure the egg whites are fully incorporated. Make sure to fold all the way from the bottom of the bowl, otherwise the liquid batter at the bottom won't get fully mixed with the egg whites. You do not need to fold until no egg white streaks remain. There should be lumps of egg whites. Just fold until the egg whites are incorporated into the batter and the egg white lumps are small (about the size of large crumbs). Repeat with the next 1/3 and then final 1/3. For the final 1/3, it's okay if you have some slightly larger lumps of egg white remaining (they can be about the size of a dime but not larger). Your batter should look light, airy and be very liquidy.
- Pour batter into the prepared cake pan. Bake for about 55-60 minutes, or until cake is puffy and evenly browned on top. The cake should not be very wobbly. If you are unsure if your cake is done, it is better to bake a little longer (5 minutes or so) to make sure it is done so that your cake does not deflate. Turn off the oven but don't remove the cake yet. Let it sit in the oven for 5 minutes with the oven off. During this time, the cake will deflate a little. After 5 minutes, remove the cake from the oven and let it cool. As the cake cools it will deflate even more.
- Once cooled, while you can enjoy the cake right away, it is recommended that you put it in the fridge for a few hours or overnight. Doing so will help the cake flavors develop, firm up the layers and also reduce any eggy flavor that is normal with just baked souffle type desserts. Cut cake with a large sharp knife. Store any leftovers in the fridge.
Notes
- Make sure your all purpose flour has 3 grams of protein per 1/4 (30g) cup serving. This is the standard amount of protein for all purpose flour in the US but there are some brands with a higher amount of protein which will not work well for this recipe.
- Make sure you don't beat your egg whites until after the rest of your cake batter is ready. You need to fold them in immediately otherwise they start to weep which will cause the cake layer to collapse when it is done baking.
- Make sure your oven is ready and preheated before you finish making your cake batter. You want the cake to go in the oven immediately after it is done, otherwise the batter will separate and break down too much if you let it sit out waiting for your oven to finish preheating.
- We found this cake works best with low fat milk. Nonfat milk doesn't have enough fat and whole milk has a little too much fat which causes the cake layer to be thinner.
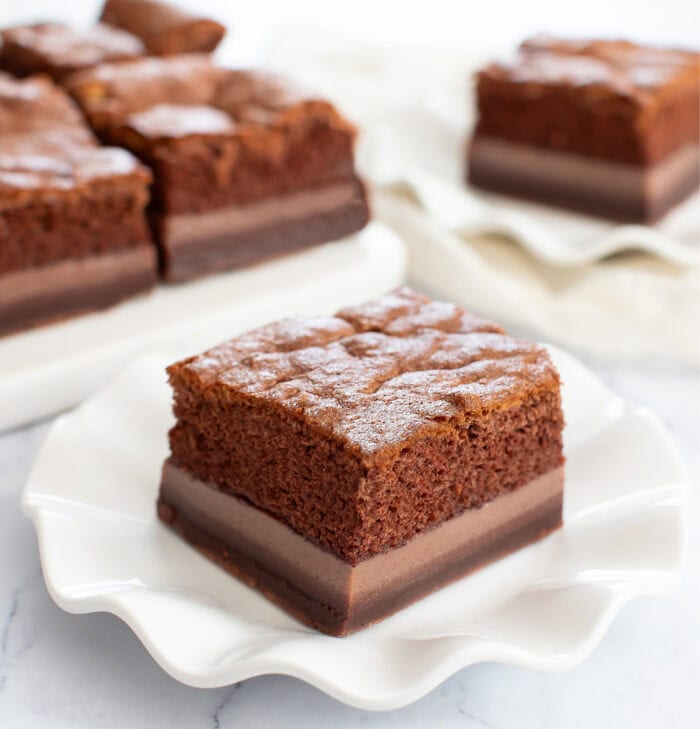
- The texture of the cake does change a little if you eat it a few hours after it is baked versus the next day. When it is first baked, you have a light sponge on top, a cream filling in the middle and a firmer flan layer at the bottom. If you let the cake settle overnight, the bottom two layers firm up more. The middle layer becomes a creamy custard. The bottom layer becomes something like a very moist pie crust. The cake can be served at room temperature or cold. Any uneaten leftovers should be stored in the fridge.
Nutrition
The nutrition information provided are only estimates based on an online nutritional calculator. I am not a certified nutritionist. Please consult a professional nutritionist or doctor for accurate information and any dietary restrictions and concerns you may have.


Awesome dessert- easy and turns out like the photo. I was a bit hesitant when I saw how the batter appeared ;but, what a surprise how it developed into the layers. It truly is a magic cake.
Thank you!! We’re so glad you enjoyed this recipe!
I think I might’ve overmixed my batter with this, because the end result was a 1.5 cm thick sponge layer, and the other 4 cm being just a really dense chocolate pudding that…. didn’t taste the best, the sponge part did tho
We’re sorry to hear it didn’t turn out great! We’re not sure where you could have went wrong, but it sounds like you may have overmixed the eggs, and hopefully you can give it another try!
My son and I have just made this. We adapted it as our children are coeliac. It has turned out fantastic using gluten free flour. Another winner.
Thank you!!
We’re so happy to hear you loved this recipe!!
Can I substitute almond milk or oat milk? Can I use pure cane sugar instead of granulated sugar?
We have not tested this recipe with a non-dairy milk so we are unsure what the final result would be! We found this cake works best with low fat milk. Nonfat milk doesn’t have enough fat and whole milk has a little too much fat which causes the cake layer to be thinner. You could also try using pure cane sugar.