
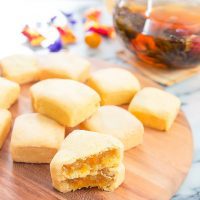
Chinese pineapple cakes (鳳梨酥, pronounced Feng Li Su) are a famous pastry in Taiwan. Usually square-shaped, it has a buttery, shortbread-like casing with a pineapple filling similar to a very thick jam. It is often served and gifted around Lunar New Year and for years I’ve been wanting to attempt to make my own.
A lot of research went into perfecting these treats. Wasted hours, failed trials, curse words, vows to never make them again all occurred these last several days. But the end result was wonderful. I could barely contain my excitement when this batch was done and bit into one before it had even cooled. There really is nothing quite as satisfying as eating something you made yourself, especially when you finally got it right. This post includes very detailed step by step photos and instructions so that hopefully you won’t go through the same frustrations I did.
When I visit Taiwan, I always bring home pineapple cakes. You can find them at every bakery, but not every place makes a good version. In fact, most versions I’ve had are quite poor, especially the offerings in the US. My favorite brand, if you’re ever visiting Taiwan, is Chia Te. People line up everyday at their bakery to buy these treats. Pineapple cakes are also surprisingly pricey, usually more than $1 each for these small, two-bite tarts. The key is the exterior. It needs to be buttery, soft, yet also malleable and sturdy enough to hold its form. Most versions I’ve had are extremely pale, too dry, too soft, or too hard.
My journey to making these pineapple cakes started three and a half years ago. It went something like this:
Year 1. I found a few pineapple cake recipes and they didn’t seem that difficult. I announced I would make them for Lunar New Year. I then went to my local Asian grocery stores in search of pre-made pineapple jam filling which all the recipes called for, but could not find any.
Year 2. I vowed again to make my own pineapple cakes, even if it meant I would have to make the jam myself. I bought myself a few cans of pineapples and found a recipe for the filling. The cans of pineapples sat in my pantry for several months past New Year’s and I eventually just opened and ate them.
Year 3. A few months ago, my good friend invited me over to make pineapple cakes. Of course I said yes. She has the most gorgeous kitchen. I’m not even exaggerating when I tell you that her kitchen looks like something out of a magazine spread. Her kitchen island is enormous and a beautiful shade of black and white granite. Everything you photograph on that kitchen counter comes out looking lovely. I could live in her kitchen.
Anyhow, we followed a very popular recipe and set about making the cakes. With two people, everything went by much faster and it didn’t seem that hard at all. The only problem was, we were not happy with the recipe we found. The dough was very hard to work with and the jam consistency was far too watery and tart. We didn’t love the recipe, but with a few tweaks, we figured we could get it to work. I vowed to continue researching, but of course, never got around to it.
And that takes us to the present. The process ended up taking far longer than I expected, but that is mainly because I was trying to figure out the best recipe, the best method, etc. Hopefully, with this recipe in hand, it won’t take you nearly as long to do.
A few notes:
- The pineapple jam filling is pure pineapple. Many store-bought pineapple cakes are made partly with winter melon which is a cheaper substitute and uses maltose as a thickener. I think the real pineapple filling is even better. I also did not use maltose because I know it’s not a common ingredient to locate. This jam isn’t quite as thick without the maltose, but it does hold up pretty well and tastes much fresher.
- I actually found two versions of the crust I liked. First, I made a crust following a recipe I found. The dough was soft and easy to work with. The problem was when I tried to stuff the dough into the square pastry molds, they immediately started to crack. Once the dough cracks, that’s how it will remain even after it is baked so you want the dough to be as smooth as possible. I baked a few this way and I really loved how the crust tasted but I hated all the imperfections. So I then tried again, adding egg yolks. The egg yolks did the trick. It kept the dough from cracking, but it does also add a slightly firmer texture to the crust. You can try the recipe both ways, with the egg yolk or without and see which you prefer.
- Pineapple cakes need a special square pastry mold which they are baked it. It’s quite hard to find. I finally purchased these on Amazon*. Actually, I purchased the square ones which they no longer carry, but they carry the rectangle ones which are the same size. The set of 10 was perfect. I was worried when they arrived because they seemed to be the right length and width but not enough height. However, once they were filled and baked, they puff up a little above the molds, which made them just the right thickness as traditional pineapple cakes.
*Some of the links contained in this post are affiliate links. Much like referral codes, this means I earn a small commission if you purchase a product I referred (at no extra charge to you).
Chinese/Taiwanese Pineapple Cakes
Ingredients
Pineapple Filling
- 2 (20-oz) cans crushed pineapples, drained
- 1 cup granulated sugar
- 1/2 cup corn syrup
- 1/4 cup honey
- 2 tbsp all-purpose flour
Pineapple Pastry
- 250 grams cake flour
- 60 grams icing sugar
- 1/4 cup fat free milk powder can be found in the baking aisle of most grocery stores and on Amazon
- 1/4 cup custard powder
- 180 grams cold unsalted butter cut into small pieces
- 2 egg yolks
Instructions
- In a medium, nonstick saucepan, add drained crushed pineapples. Bring to a simmer on the stove and cook, uncovered, for about 20 minutes or until most of the excess liquid evaporates and mixture thickens.
- Stir in sugar, corn syrup, and honey. Cook mixture at a low simmer for about 40 minutes, until it becomes quite thick, with very little liquid. Stir occasionally. You may also want to taste it a few minutes after everything is mixed together to see if the filling is sweet enough. If not, you can add a little more sugar. Stir in the flour and cook for an additional 15 minutes. Pour filling into a glass bowl, cover with plastic wrap and refrigerate for at least one hour. You can leave it for several hours or even make it the day before. You want the filling to be completely cooled when you work with it.
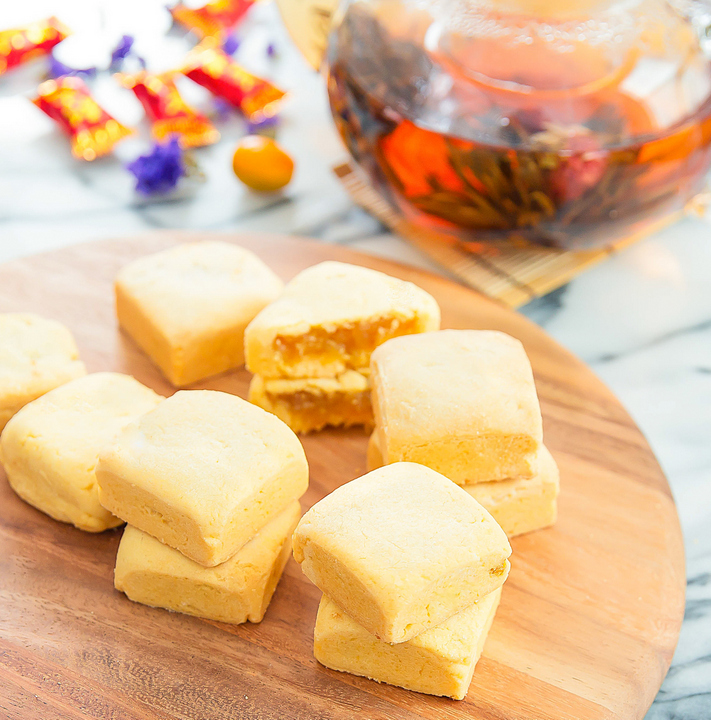
- To make the pastry, add all ingredients except egg yolks into a food processor. Turn on and let it mix for about 2 minutes or until it becomes little balls of dough. See photo above; they look like dippin dots. At first the dough will turn very crumbly as your food processor breaks down the butter, but it will eventually turn soft into the little dough balls. If you want to try the recipe without egg yolks (as discussed in my notes), you can just squeeze these dough balls together to form one big ball of dough. Otherwise, add egg yolks in and pulse for about 1 minute, until smooth dough forms (shown in photo above).
- Scoop out 1.5 tbsp dough balls and shape between palms to form round balls. Continue until all dough is used up. Set aside.
- Take pineapple filling from the fridge. Scoop out 1 tbsp of filling and compress between palms. Filling will be sticky and wet to work with. Gently roll between palms to shape into balls. Make enough filling balls to match the dough balls.
- Lightly grease the inside of your square molds, by brushing them with oil.
- Take a sheet of plastic wrap and stretch over a flat surface, keeping it as smooth as possible. I found that plastic wrap really helped to make these cakes pretty. You want the plastic wrap to be smooth because your dough will have creases if your plastic wrap has creases. Take one of your dough balls and place it on top of the plastic wrap. Press down with your palm until it spreads out to a thin round. You want the round to be just big enough that it will wrap over the filling. It may take a few tries to determine the best length to stretch your To make to. The round should be thin because the pastry is supposed to be only a thin layer of crust. However, keep the middle section of your round slightly thicker and thin out more on the edges. This way, when you bunch all the edges together to seal your pastry, the bunched edges won't become too thick, which would make one side of your cake uneven.
- Place a pineapple filling ball in the middle of your round. Lift one side of plastic wrap and peel the round from that side. You should be able to easily peel it off and the bottom side of the round should be completely smooth. Lift round completely from plastic wrap and then cover your pineapple filling with the dough, sealing the edges on top, attempting to smooth them as much as possible.
- Place your square mold on top of the plastic wrap. Place your dough ball inside the square, with the bunch up ends side facing up, smooth side facing down. Carefully push and spread your ball until it spreads out completely across the square mold. It may take a few tries to get the hang of it. The dough should fit completely inside the mold. Try to smooth the surface of the dough as much as possible. Flip over. The underside of your dough should look nearly completely smooth and should fill the entire square mold. One of the photos above show both the finished smooth side and the side with the bunched edges.
- Place mold, with the smooth side facing up, on a baking sheet lined with silicone mats or parchment paper. Preheat your oven to 350°F. While your oven is heating up, finish making the rest of your pineapple cakes.
- Bake for about 25 minutes or until the tops turn a light golden brown. Remove from oven and let cool a few minutes. After about 15 minutes, gently push the cakes out the molds. You can eat immediately or wait for them to finish cooling. Store any uneaten ones in an airtight container at room temperate. Because these have a fruit filling, do not store for too many days.
Video
Notes
- I'm sorry I didn't have a chance to convert all these measurements into cups. However, if you do a google search, you should be able to find the conversions you need if you don't have a kitchen scale.
- Recipe adapted from Suzie Sweet Tooth and My Bare Cupboard
The nutrition information provided are only estimates based on an online nutritional calculator. I am not a certified nutritionist. Please consult a professional nutritionist or doctor for accurate information and any dietary restrictions and concerns you may have.






I have made these 4 or so times over the last 7-8 years, and this is a fantastic recipe! The pastry has a delightful texture that crumbles and then melts in your mouth! The first time I couldn’t find custard powder, so I tried substituting it with ¼ cup cornstarch + splash of vanilla. I believe this made the dough too dry, so I added the egg whites as well, and things turned out just ok. I was able to find the custard powder later so the other 3 times I used it, and the dough came together much better (and had better end texture and color too). I find it convenient to weigh out the dough balls (~29g each). For the jam, I have found that I tend to need to simmer it for much longer than the recipe calls for, but it’s difficult to mess up. I like to use a melon baller / small cookie scoop to portion out the pineapple jam into the flattened dough rounds. I make the pineapple jam as described in the recipe, and I always need to make double the dough. I end up with 40-ish pineapple cakes, which makes my husband very happy lol.
Thank you for sharing your experience!
While the pastry part of the recipe was great (definitely tricky to wrap the filling), I found the filling part to be FARRR too sweet. It was so sweet that my teeth hurt. Another commenter said they used pineapple and omitted the honey and sugar – I would agree with that. With the crust being as thin as it is, the overly sweet filling is overwhelming, which is really disappointing. Unfortunately, couldn’t serve this and honestly, not sure if I would go through the hassle to make these again.
We’re sorry they were too sweet for you. This is the way we prefer them (and many other readers), so it might not be the recipe for you.
Can these be made using a mooncake press?
We haven’t tried doing that, but let us know if you do and how it works!
These turned out so good! I only used the recipe for the pastry and used my own recipe for the filling, but the pastry part was delicious. It was so tender the day after and it wasn’t a crumbly mess.
We’re happy it worked for you!
These are truly divine, the crust ( using 2 egg yolks) is short and delicate. Everyone (8 people) thought they were one of the best things I ever made….I have bake a lot of pastries over my life time..I’m 63. I don’t think I could have made the crust without the yolks to work. Because I’m a cautious baker when trying a new recipe, and I have never used custard powder, I did a trial run of 1 finished cake to be sure I wanted to continue.I didn’t want to commit the jam if the pastry was a fail. I also just made pineapple jam that was made of minced fresh pineapple , sugar and a squeeze of lemon to brighten it up…none of the corn syrup and honey. This was a fantastic pineapple filling. There are 4 things to maybe consider to do differently ..
1. Wet your hand when handling the jam so it doesn’t stick to your palms
2. Use egg white to run around the circle of pastry to help the pastry hold together when shaping the little
pockets of joy. It didn’t change the texture at all. The egg white also helps to stick tiny thin pieces of
pastry over a crack to help seal it up.
3. Brush gold pastry powder over the top of the finished, baked pastry. It took the look to the next level.
4. My square molds came with square press to fit the molds…VERY helpful.
This is a very special delicacy that is now in my list of go to bakes for any occasion. WE LOVED THEM!
Thank you so much for your thoughtful review – these are great tips – especially love the gold pastry powder!
Do you know what the adjustments would be if I did have some maltose to use? I’ve made this recipe as is before and it is delicious! I am just curious about adding a little more chewy texture to the pineapple.
We’re glad you enjoyed the recipe! As far as the maltose, we haven’t tried that.
Hey there !
I really like those little cakes. But I personally prefer the ones with the lychee filling. So, I was wondering if you have a recipe for that.
I hope I am not asking too much ><
Sorry, we don’t have that recipe.
Great recipe, however I had trouble with the pineapple filling leaking out of the dough / molds
We’re glad you enjoyed it – it sounds like they’re might have been cracks in your dough which would cause the filling to leak.
These came out great! Really happy with them. There are a few things I could do better next time that I’ll note for anyone making them now:
It took much longer than 40 minutes to get the pineapple filling to the point of having very little liquid left. I think I had the heat too low. After another 40 minutes on higher heat, it looked better.
Then, I slightly overbaked them in the oven. I had enough dough and filling for 20 pineapple cakes (the dough was definitely the limiting factor), and since I only had 10 molds, I did two batches. The first batch baked 22 minutes and was past golden brown, almost dark brown. The second batch baked 20 minutes and was closer to golden brown but still a little darker than I would have liked. Next time I’ll start checking them earlier!
All in all a fantastic recipe, thanks for your research!
Thanks for sharing your experience – we’re happy you love the recipe!
This is Taiwanese, not Chinese!!! Pineapple fillings are usually made with fresh pineapples
You can start with fresh pineapples but the end result is the same. The pineapples are cooked to a jam consistency. It’s easier to use canned pineapples since pineapples aren’t in season all year long.
I haven’t had pineapple cakes since I moved internationally a few years ago and this recipe was absolutely delicious. Just like what I remember eating. I didn’t have any square molds but used a greased muffin tin. I made them in the same ball shape as the recipe but just set them in the openings of the tin instead of pressing them into a mold. They came out perfectly like little round baozi.
I’m so glad the recipe worked out well for you!
Hi, I don’t have powdered milk, is it okay to go without it or substitute with actual milk?
You will need powdered milk for the recipe -regular milk won’t work.
Can you freeze these before baking? Then defrost and then bake?
Sorry I don’t know
Hi Kirbie,
Instead of square molds, can I use a brownie baking pan instead? https://www.amazon.com/gp/product/B008KE7L2S/ref=ox_sc_act_title_2?smid=ATVPDKIKX0DER&psc=1
I think you will have difficulty removing them from the brownie molds
I’ve just baked some in the Wilton silicon brownie mold and they came out perfect! Since my mold was only a 1 1/2″ square, I made a smaller size. With the extra dough and filling I used a mini muffin mold that I oiled and they turned out as well.
We’re so glad to hear that!
Would this filling work inside of a traditional mooncake dough?
it should work!
This is the most legit recipe for Pineapple Cakes ever. Just went through a tasting tour of a bunch of bakeries in Taiwan (chia te, sunny hills, leechi, and a few others), and this one is still right up there in terms of flavor and texture. Went through some Pineapple Cake withdrawals when returning to the states and this recipe has made life 100% better : )
Oh wow, thank you for your very kind words! I’m so glad you enjoy the recipe.
Kirbie,
I am going to try to make your version of the pineapple cakes. I made them before from another recipe, and the crust cracked to the point that I couldn’t form them around the filling. So, I am hoping your recipe will come out better. I like the ingredients. One question…would it make a difference using the powdered creamer instead of the powderd milk?
Thank you.
I have not tried with powdered creamer before. Good luck in making them!
I have not tried with powdered creamer before. Good luck in making them!
Hi,
When you say fat free milk, is there a reason for it being fat free? Does it change the texture when working with half and half milk?
Is the milk powdered or in liquid form?
Would be glad to know.
Thanks!
Liz
the recipe actually lists fat free milk powder, not fat free milk. So yes it is in powder form, not liquid form. You need milk powder for the pastry recipe to come out properly
Hi kirbie,
Could I replace the corn syrup with maltose syrup? I have two jars on hand for peanut candy
I think so but I haven’t tried it
Sunny Hills Fengli Su is hands-down THE BEST! Pure pineapple- no filler. Also what is “custard powder” in the recipe?
Bird’s custard powder is what I use. You can find it at the grocery store or on Amazon.
Your recipe is perfect! I have made them 2 times now. I end up with a little extra pineapple jam, but will save it and use it for future batches, or put it on my toast. Everyone says they taste even better than Chia Te. You have done a great job and I thank you for sharing the recipe. I hope to share your link with others.
Oh wow, better than Chia Te? That’s such a wonderful compliment. So glad you like the recipe!
Thank you for your recipe. I have done this twice. The taste was good but the crust is a bit too dry when eating. If I want them to mealt in my mouth, how should I do?
You may have overbaked a little. I would try less baking time
Are these the square molds you speak of (https://www.amazon.com/gp/product/B00K6TKX7K/ref=ox_sc_act_title_2?smid=A2IRHAF1PNRPGO&psc=1) as they may be back in stock? I wasn’t sure of the height…. Also, would they last longer in the fridge and then just take them out an hour before to get to room temperature – have you ever tried this or freezing them?
yes i believe those are it. you can put them in the fridge to last longer though the crust texture does change once these are refrigerated. I have not tried freezing
I’m excited to try this, ever since I tried packaged pineapple cakes from the Asian grocery. I can only get custard powder from Amazon. It looks like the ingredients are only “cornflour, salt, annatto, and flavoring.” Any idea on whether I can substitute cornstarch with maybe a little vanilla and a drop of yellow food color?
I’m sorry I do not know the answer to that as I don’t use those ingredients in my recipe
I did exactly that, subbed cornstarch and some vanilla extract, and they turned out great! My husband lived in Taiwan for a few years and had been missing treats like this, so I made these for his birthday. He gave it a 10/10
I’m glad these turned out well for you!
Hi, sorry to ask. If I do for selling how many days can keep and can I put a piece of refreshment chip to seal together coz need to wrap hamper
I do not know as I’ve never tried
A friend of mine was eating these, so I decided to research them. Thanks so much for this recipe. Making them this weekend! ; )
hope you enjoy!
Hi, I like your instructions but I was wondering if there is a chance you might upload a video tutorial on it…? I’m not too familiar with baking in general so seeing how it’s done will help alot.
sorry there is no plans at this time to make a video. Also, this recipe is a little more of an intermediate baker recipe so you might want to start with something easier
Hi, just wondering if you could clarify the quantity of pineapple please?
Is it 2 x 20 oz cans or 20oz total?
The cans I’ve got are 15oz or 9oz drained
Cheers 🙂
It is two 20 oz cans
Hi! I’m looking forward to making these for my son’s school’s International Dinner (his class is representing Taiwan), but I need to bring a lot of them—probably at least 60—so I’d rather not spend all day molding individual cakes (and I also can’t afford to buy so many molds!). I’m wondering if you think it would work if I made one big rectangular cake that was layered with dough, filling, dough (with the filling sealed around the edges). I would bake it, cool it completely, and then cut it up into individual squares. What do you think, could that work?
Hi Jenni,
Unfortunately I’ve never tried to make it as one big cake, so I’m not sure how well it works. My concern is that the bottom may not cook well.
Hi, Kirbie! Thanks for getting back to me. I shared your concern about the bottom crust so I consulted a Cook’s Illustrated recipe for raspberry streusel bars that instructed me to parbake the bottom crust before adding the fruit filling and top crust. So I baked the bottom crust by itself for about 15-18 minutes,, then added the mostly cooled filling and ever so carefully the top crust (that was the trickiest part! I had to pre-roll it to fit perfectly in my 9×13 pan). I then poked a few venting holes with a toothpick and baked the whole thing for about 25 more minutes. It turned out great! However, after cooling all the way, I cut it up into little squares and just about every single one cracked a bit on top. 🙁 But everybody at the party loved them anyway and ate them ALL up. Thank you so very much for this wonderful recipe!!! I look forward to trying it again as individually molded cakes.
Hi Jenni. Thanks for letting me know how these turned out! I’m glad you were able to get it to work. The crust is so delicate so that would be why they would crack when cutting–I didn’t think of that earlier. You shouldn’t have cracking with the molds but I am glad everyone enjoyed them!
I am trying to make these for a Taiwanese friend, but I ran in to hiccups with the dough. I’m hoping you could offer some insight. In my food processor (before adding the yolk) the dough clumped together…like I had a 1/4 inch layer of solid dough on the bottom. Above the solid layer, they looked like crumbs…not dippin dots. Any thoughts on why that would happen? I thought perhaps my butter became too warm, so I put the dough in the fridge for thirty minutes before continuing. It worked a little.
My second issue is that the dough broke when I was trying to flatten it out, especially the edges, so when I went to wrap the filling, it was just full of cracks. I experimented with different amounts of dough and thickness and amounts of filling. Nothing worked. Any advice?
Yours look so scrumptious! Thanks for the help!
Hi Valerie. Sorry you are having issues with the dough. For the first issue, you want to make sure that your butter is cold when you make the dough. Like many other pastry doughs, the butter needs to be cold and solid. You don’t want it to be room temp or melty. If it’s cold, then you should be able to achieve the little crumbles of dough rather than clumped dough.
With regards to your second issue- are you flattening with your hand or with a rolling pin? I found the best method was the one I stated, with the plastic wrap underneath and slowly flattening it out with your hand to prevent cracks. Also, you had mentioned that you refrigerated your dough. This may have stiffened and dried it too much which would also cause it to crack. Your dough should be quite soft and pliable once you mix in the egg yolk. It shouldn’t feel stiff or dry. So I would recommend not putting the dough in the fridge next time. If your dough still feels too stiff or dry, you can try adding another half of an egg yolk, which should soften the dough further. good luck!
I visited the grocery store for corn syrup but I have two options – light or dark corn syrup, which one does this recipe call for?
I used light!
I may actually make a batch one day (out of growing frustration with company bought examples) — but as I am currently in Taiwan, I wonder if anyone can tell me the current best real (no winter melon) pineapple cake seller — the one with the most filling and least crust, preferably with no cheese powder (as of June 2016)? We have tried many types — famous and less so, in Taipei and Taichung; even one brand sold in the States — which was good until early this year (they then increased the crust to pineapple ratio, making them less desirable — this is apparently common for companies with growing reputations). All recommendations are welcome! (We even thought to try companies that make real pineapple filled mooncakes, but they are harder to find.)
Thanks for this recipe! I was excited when you posted this because I had a collection of other pineapple tart recipes that I was hesitant to attempt making. I’ve wanted to try Taiwanese pineapple cakes but haven’t had the chance yet so I finally made your recipe today. The melt-in-your-mouth buttery crust paired so well with the sweet and tangy pineapple filling! I’m glad I chose your recipe. You saved me from going through the agony of trying multiple recipes. 😛
I’m so glad you enjoyed this recipe =) =) =)
I first tried pineapple cakes from you and Jinxi as food gifts (and I loved them). I like that your recipe uses pure pineapple an none of that wintermelon filler. Thanks for all of the details with the recipe as well as the link on where to get the molds.
pure pineapple is so much better!
These look so awesome! Pineapple cakes are one of my favorite desserts – thanks for sharing the recipe 😀
thanks! they are one of my favorites too!
What about trying egg white instead of the yolk?
I didn’t try that, but I don’t think that will work. The egg yolk gives the dough a little more fat, which makes it softer and easier to work with. The dough is basically supposed to be like a shortcut pastry, which is usually just butter and sometimes egg yolks, which is why I tried the egg yolk.
I LOVE pineapple cakes and have never considered making this at home. Saving this and finding a way to bake them in another shaped mold or maybe madeleine shaped pineapple cakes? Either way so excited that you found a working recipe!
You can actually free form bake them as well, but their shapes just won’t be as sharp. I did a few without any molds because I only had a set of 10. They still hold their form baking without the pretty well.
Thanks for sharing this recipe. =)
I hope you find it useful =)
These are BEAUTIFUL, Kirbie! I have tried making my own (also from a well known website) and wasn’t thrilled with the results. The exterior cracked and was dry, and the filling wasn’t as awesome as I wanted it to be. Thanks for doing all the research to find the best pineapple cakes! I will definitely try your version soon. P.S.- totally agree that Chia Te has the best ones in Taiwan!
Thanks Eva! I really wish I had my hands on the Chia Te recipe!
No need salt for the dough? Thank you.