This is the best soft pretzel recipe I’ve ever made, and it’s well worth the time it takes to make! In this post, I share all of my pretzel-making tips so you can make them, too!
This pretzel recipe is so good I don’t think I’ll ever buy a soft pretzel again. I’ve made soft pretzels a few times before this but haven’t been happy with the results. The biggest problem with homemade soft pretzels is that they don’t always taste as great the next day, or they don’t bake up as puffy as the ones you can buy.
Unhappy with my previous experiments, I tried a recipe for homemade soft pretzels from Alton Brown. Baby bro’s girlfriend helped me make them, and we were so happy with the results! We learned a lot about how to make delicious soft pretzels that remind us of the ones we usually buy. Plus, they reheat and freeze well, too.
Ingredients
- Warm water
- Granulated sugar
- Kosher salt
- Active dry yeast
- All-purpose flour
- Melted butter
- Vegetable oil
- Baking soda
- Egg wash – an egg yolk mixed with water
- Pretzel salt – this is optional
Unhappy with my previous experiments, I tried a recipe for homemade soft pretzels from Alton Brown. Baby bro’s girlfriend helped me make them and we were so happy with the results! We learned a lot about how to make delicious soft pretzels that remind us of the ones we usually buy. Plus, they reheat and freeze well!
Soft Pretzel Recipe Tips
Homemade soft pretzels are so fun to make, and I’m excited to share all of my best tips for making them. As I mentioned, now that I know how to make them, I don’t think I’ll ever buy one again!
Pretzel Dough
Making pretzels is a lot like making traditional bagels. The dough is similar, and both are boiled for a short time before they are baked. Like bagels, these soft pretzels are made with yeast, so it’s a good idea to plan ahead since they need time to rise before you bake them.
- I used my stand mixer fitted with the dough hook to make the dough. Start by combining water, sugar, and kosher salt in the bowl of the mixer. Sprinkle the yeast over the top and leave it for five minutes. The mixture will start to foam which indicates that the yeast is activated.
- Add the flour and butter and mix them with the yeast mixture until they are well combined. To knead the bread, adjust the speed to medium. Let the mixer knead the dough until the dough turns smooth and pulls away from the side of the bowl. This usually takes about four to five minutes.
- At this point, transfer the dough to an oiled bowl. I actually just cleaned my stand mixer bowl and oiled it, but you can also use a separate bowl. Cover the bowl with plastic wrap and leave the dough to rise in a warm place for 50 to 55 minutes or until it’s doubled in size.
How to Shape Pretzels
Once the dough has risen, you can shape the pretzels. The original recipe makes eight really big pretzels, but I prefer smaller ones, so we made 16 pretzels.
- Before you shape the pretzels, get your water boiling for the pretzels. You will need 10 cups of water and 2/3 cups of baking soda. This baking soda bath is critical for achieving the right kind of crust and flavor for your pretzels. While the water comes to a boil, you can shape the pretzels.
- Prepare two half-sheet baking sheets by lining them with parchment paper and lightly oiling them.
- Lightly oil your work surface and divide the dough into 16 pieces (or eight if you want really big pretzels).
- If making smaller pretzels, roll each piece of dough into a rope shape approximately 12 inches long. For the big pretzels, roll each into a rope approximately 24 inches long.
- Take one of the ropes and place it so it forms a “U’ shape. Take one end in each hand and cross them over each other and press the ends onto the bottom of the “U” to make the pretzel shape.
- Place the pretzel on the prepared baking sheet and repeat the process with the rest of the dough.
Boil the Pretzels Before Baking Them
What gives soft pretzels their distinctive texture and flavor is a quick dip in a large pot of boiling water with baking soda. The baking soda bath will help the pretzels puff up, giving them a crusty chewy texture exterior and that distinctive soft pretzel taste.
I can’t stress enough how important this step is – if you skip it, your pretzels won’t be as good as they can be. I’ve made pretzels following a recipe that suggested just hot water, and it didn’t work, so be sure your water is at a rolling boil.
It helps to have a large flat spatula or large slotted spoon to move the pretzels to and from the water. You want to boil them one at a time and only add the next one after the one before it has been removed.
You only need to boil the pretzels for 30 seconds each. So, for a batch of 16 smaller pretzels, it will only take eight minutes to complete the step. For larger pretzels, it only takes four minutes. You can place the boiled pretzels on the same sheet pan.
Pretzel Salt and Other Toppings
Before you add any salt or other toppings, you’ll want to brush each pretzel with an egg wash which will help create a beautiful golden color once they bake. It will also help whatever you sprinkle over the top stick to the pretzel.
Topping Ideas:
- Pretzel salt, kosher salt, or coarse sea salt
- Cinnamon sugar
- Everything bagel seasoning
Since making these plain pretzels, I’ve also made Cinnamon Pumpkin Soft Pretzels which are a sweet fall twist on the original.
Baking the Pretzels
The smaller pretzels only take six to seven minutes to bake at 450°F, and the large ones take about 12 minutes. Bake them until they turn golden brown.
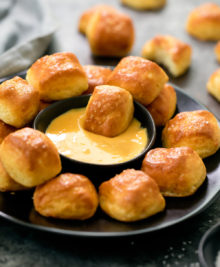
Enjoy them warm from the oven plain or with a dipping sauce – here are some sweet and savory options we like:
- Honey mustard
- Cheese dip or nacho cheese sauce
- Melted chocolate
- Warm peanut butter
- Melted butter
How to Store Soft Pretzels
Once the pretzels are cool, wrap them in plastic wrap. I like to wrap them individually and then store them at room temperature. They will keep well for two to three days.
I also like to freeze them. Wrap them tightly and store them in a freezer container. They will keep for up to a month.
Reheating Tips
You can warm soft pretzels in the oven at 350°F. If they have been stored at room temperature, they only need a few minutes to warm up. If they are frozen, warm them for ten minutes or so.
More Homemade Pretzel Recipes
- No Yeast (2-Ingredient) Soft Pretzels
- Keto Soft Pretzel Bites
- Soft Pretzel Bites
- Turtle-Shaped Pretzels
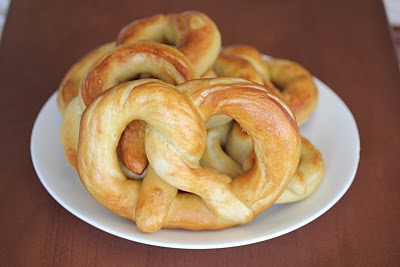
Best Homemade Soft Pretzels
Ingredients
- 1 1/2 cups warm 110-115°F water
- 1 tablespoon sugar
- 2 teaspoons kosher salt
- 1 package active dry yeast
- 22 ounces all-purpose flour approximately 4 1/2 cups
- 2 ounces unsalted butter melted
- Vegetable oil for pan
- 10 cups water
- 2/3 cup baking soda
- 1 large egg yolk beaten with 1 tablespoon water
- Pretzel salt optional
Instructions
- In the bowl of a stand mixer, combine the water, sugar and kosher salt. Sprinkle the yeast on top and leave it for five minutes or until the mixture begins to foam. Add the flour and butter and, using the dough hook attachment, mix on low speed until well combined. Change to medium speed and knead until the dough is smooth and pulls away from the side of the bowl, approximately four to five minutes.
- Remove the dough from the bowl, clean it, and then coat the inside of the bowl vegetable oil. Return the dough to the bowl, cover with plastic wrap and place it in a warm place for approximately 50 to 55 minutes, or until the dough has doubled in size.
- Preheat the oven to 450° F (232°C). Line 2 half-sheet pans with parchment paper and lightly brush them with vegetable oil. Combine the water and baking soda in an 8-quart pot and bring it to a rolling boil over high heat.
- While the water comes to boil prepare the dough by first transferring it to a work surface coated lightly with oil. Divide the dough into eight equal pieces (or 16 if you want smaller pretzels). Roll out each piece of dough into a 24-inch rope (12 inches for smaller pretzels). Make a U-shape with the rope and, holding the ends of the rope, cross them over each other and press onto the bottom of the U in order to form the shape of a pretzel. Place them on the parchment-lined half sheet pan.
- Boil the pretzels, one at a time, for 30 seconds. Remove them from the water using a large flat spatula and transfer them back to the sheet pan. Repeat with the rest of the pretzels.
- Brush the top of each pretzel with the egg wash and sprinkle with the pretzel salt, if using. Bake the pretzels for twelve minutes (or six to seven minutes for small pretzels), or until they golden brown. Transfer to a cooling rack for five minutes before serving.
The nutrition information provided are only estimates based on an online nutritional calculator. I am not a certified nutritionist. Please consult a professional nutritionist or doctor for accurate information and any dietary restrictions and concerns you may have.


Won’t be putting parchment paper on next time I make these. It’s not coming off and aren’t edible.
They should not stick to parchment paper…You might want to try a diff brand. And are you sure you aren’t using wax paper? Because people often confuse the two but they don’t work the same. I’ve never had anything stick to parchment paper.
I will say your recipe is spot on with only a couple changes to the one I use. The butter in mine is optional, and for pretzels you are eating right away you don’t need it, but the fat in doughs helps it stay good for longer. And traditionally pretzels are simmered in a lye/water solution, lye is Sodium Hydroxide, a caustic base. This is integral to the “pretzely” flavor. It seems scary, but it’s very easy to buy in granular form online, and you just mix it in with water and bring to a simmer then drop the dough forms in for about 15 seconds and make sure to bake on stainless steel, or parchment, not aluminum or foil. The baking soda is similar, but not caustic enough to really eat away at the outside of the pretzel to cause the flavor. This won’t add any salt flavoring to the pretzel. It also helps produce that shiny skin on the outside once baked and helps the big grains of salt adhere. Not trying to hijack your thread, but to just provide some more info on pretzel science.
I’ve never worked with lye! Thanks for providing the information.
Could it be that I left the water and baking soda boil for a long while before I began to dip? When my husband tried them he said they tasted like baking soda? You are probably right, I may have fooled up the recipe ! hahhaha! I will have to try it again and hopefully they will turn out better! 🙂
Hmm, how long did you leave the baking soda baking for? I usually dip mine soon after; I haven’t left it boiling for a long time before so I’m not sure. I’m trying to figure out about the baking soda taste. Did you have enough water? I think if you have too little water compared to baking soda that could cause it. Also making sure that they boil for at least 30 seconds each, or else that might cause the baking soda taste.
As for the salt thing, I actually did that the first time I made this recipe. That’s why I asked! I didn’t realize there was such a difference between kosher salt and regular salt, so the first time mine were salty and then we corrected it after and it tasted perfect. I would reduce salt to 1 tsp if you are using table salt. Hope this helps!
I just made these, and I have to say that I was a little disappointed! I think dipping them in the water and baking soda may have ruined mine! It made them super salty! Oh well.. live and learn I guess! Other than being super salty they look great!
I don’t think dipping it in water and baking soda would cause them to be oversalty. The water baking soda let’s them expand properly or else the dough is really tough and doesn’t have the right texture. I suspect maybe the problem might have been the salt you added? Did you add kosher salt or table salt? Because they aren’t equivalent. If you used regular table salt you would need to reduce the amount.
Pingback: Homemade Soft Pretzel Recipe : Alton Brown « Sophie's Dish
It’s cheaper to bake your own too!
Hi Sophie! I’m happy to hear you’ve joined the SD food blogging community. =)
Hi,
So I’ve been following your blog for quite some time.
I really love all your posts about san diego restaurants so your blog has inspired me to start my blog http://www.sophiesdish.wordpress.com
but anyways, I tried this receipe and they turned out pretty good. I was surprised because I rarely make anything from scratch. Though mine look more like swirly buns then pretzels. 😀
I love soft pretzels but I simply can’t find them anywhere here in Portugal, so I guess I’ll have to bake them myself next time I crave one 🙂
It is definitely cheaper to make your own and they taste just as good.
Yes you should definitely make these. I think you’ll like them!
I have a fear of yeast too, but these worked out. You should give it a try!
I love soft pretzels but they’re always so expensive at the mall. Yours look fantastic and I bet they’re much better than the bought ones.
Yum…
Need to pick up some kosher salt to make this.
Rad! I’m gonna try homemade pretzels someday soon. I need to get over my fear of yeast!
They are pretty easy to make. And they taste just like the ones that you can get from the vendors at fairs or other spots. I was amazed at how great these came out. I think I may try making extra next time and freezing the dough so I can enjoy these whenever I want.
Great work, they look very pretzel-y 🙂 I’ve never tried to make pretzels before, must give this recipe a try.