After successfully making soft and fluffy milk bread using the “tangzhong” method, I’ve been excited to try more recipes using the tangzhong method. I love how soft, fluffy and bouncy the bread is and how high it rises.
For those of you unfamiliar with the tangzhong method, a few years ago, a woman named Yvonne Chen wrote a book entitled 65 degrees Bread Doctor, which details her secret ingredient to keeping bread soft and bouncy. She uses a flour and water mixture, cooked to 65 degrees C, to make a flour paste called “tangzhong” which is added to the bread. What I loved about this idea is that it is natural and doesn’t use chemicals.
Christine’s recipes, which was where I found my first tangzhong bread recipe, has another tangzhong recipe, making bread rolls filled with custard coconut. I’ve had similar rolls from chinese bakeries. I normally don’t like filling in my breads. So instead, I decided to make the rolls and put some raisins in the bread rather than making a filling.
When I put the bread rolls together in the springform cake pan the raw dough rolls still had spaces between them. But when they baked, they all came together like they were supposed to.
The bread was really soft, just like the milk toast I made. It was soft, fluffy and I really like the addition of the plump raisins. You can easily pull apart each roll. I can’t wait to try out even more recipes. These tangzhong method breads have been devoured by my family.
Tips for Making the Dough
- Plan to make the tangzhong beforehand because it needs time to cool. The recipe (linked in the card below) makes more than you’ll need and the leftovers can be kept in the refridgerator for up to three days.
- One thing I did differently this time was using my stand mixer to knead the dough, and it made such a difference! The stand mixer was easily able to mix the dough and created a very elastic dough. You know the dough is ready when you can stretch it very thin without it breaking.
- This dough needs to proof and rest at different points in the process so be sure to account for that time when you make it.
How to Make the Dough Rolls
After you’ve made the dough and let it proof, you can make the rolls.
Step 1: Divide the dough into six equal parts and roll each into a ball. Let them rest for 15 minutes.
Step 2: Roll each ball into an oval shape. Sprinkle some raisins over the dough and lightly press them into it so they stick.
Step 3: Fold one end to the middle of the oval. Fold the other end so that it’s slightly overlapping the other end.
Step 4: Turn the dough over (fold-side down) and flatten it with a rolling pin.
Step 5: Turn the dough over again (fold-side up) and, starting at one end, roll the dough into itself like a jelly rolls
At this point, you can put the rolls in the baking pan and leave them to rise before baking them. I like to brush my rolls with an egg wash which gives them a shiny exterior.
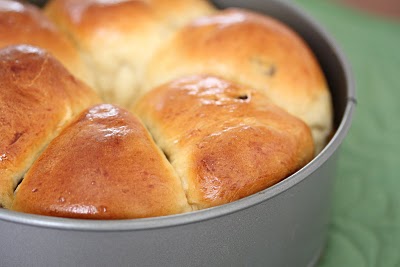
Raisin Rolls
Ingredients
- 2½ cups bread flour
- 3 tbsp +2 tsp sugar
- 1/2 tsp salt
- 2 tsp instant yeast
- 2 large eggs divided
- ½ cup skim milk
- 120 g tangzhong (see note)
- 3 tbsp unsalted butter cut into small pieces and softened at room temperature
Instructions
- In a stand mixer fitted with the paddle attachment, combine the flour, sugar, salt, and yeast. Make a well in the center of the mixture and place one of the eggs, milk, and tangzhong in it. Switch to the dough hook attachment and, on medium speed, knead the ingredients until a dough forms. Add the butter and continue kneading for 18 to 20 minutes, or until the dough is smooth and elastic. You should be able to stretch a piece of the dough very thin without it tearing.
- Coat the inside of a large bowl with oil. Form the dough into a ball shape and place it in the bowl and cover it with a wet towel for 40 minutes or until it has doubled in size.
- Deflate and divide the dough into six equal pieces and form each into a ball. Cover the dough balls with plastic wrap and let them rest for 15 minutes.
- Roll each dough ball into an oval shape. Sprinkle a handful of raisins across the dough and, using your rolling pin, press the raisins into the dough. Take one end of the dough and fold to meet the middle of the oval. Take the other end and fold to meet on top. Turn the dough over, so that the folds face down and roll and flatten dough with the rolling pin. Flip dough again, so folded side faces up. Roll the dough up from top to bottom. Knead into a ball shape. Repeat this step of rolling and wrapping fillings with the rest of the dough balls.
- Place the dough balls seam side down in a prepared 8-inch springform baking pan leaving the space in the center clear. Cover the pan with plastic wrap or a wet towel for 45 to 60 minutes, or until the rolls have doubled in size.
- Preheat the oven to 350°F. Beat the other egg in a small bowl and brush it on top of the rolls. Bake the rolls for 30 to 35 minutes or until they are golden brown. Cool completely on a wire rack.
Notes
Nutrition
The nutrition information provided are only estimates based on an online nutritional calculator. I am not a certified nutritionist. Please consult a professional nutritionist or doctor for accurate information and any dietary restrictions and concerns you may have.





Hi look interesting. May I know how much is the flour from cup to grams?
you can try finding conversions online, there are several baking websites that provide the information
Looks great. 2. Questions:
1. Can you simply double this recipe or is it better to make 2 batches?
2. How scientific is the recipe? The amount of sugar looks small and I am wondering if I can increase it without messing it up.
You can double the recipe. There is some room for sugar adjustment but I wouldn’t recommend adding too much because it could affect the texture of the dough
Perfect recipe! I have done this many times and i love it! Highly recommended even to first timers..????????
yay!!
Hi. I have played with your recipe and found that I get excellent results without the two-step TZ. I prepare the TZ by whisking the water and flour together in a microwave bowl and then heating in microwave for exactly 30 seconds. When it comes out, it’s at the perfect temperature and texture. A couple of good whisks and it’s smooth and silky. I allow it too cool for the time that it takes me to put the other ingredients – except the butter – into the bowl of my Kitchenaid. Using the dough hook, I combine the ingredients and then add the butter. The Kitchenaid does the rest of the work, kneading all the ingredients for about 10 minutes or until there are no longer visible chunks of butter. Instead of dividing the dough before adding the raisins, I add the raisins once the dough has reached the desired consistency and before rising. I the divide and roll as usual.
thanks for sharing! I need to try the microwave method next time!
Hello! 🙂 I’m wondering how many raisins I should add per roll and how to plump the raisins? Is this possible to be baked as a loaf instead of buns?
Thank you so much and your site is gorgeous!
The raisins should be divided evenly between the four sections. Also they plump up on their own when they bake. This recipe does make a loaf, not buns. The process of dividing it into four sections helps give it the fluffy texture, but it bakes up as one loaf with four distinguishable sections
I’ve tried this recipe and turned out very well…! the bread was moist, fluffy, with cotton like texture. so happy with the result. I live in Jakarta, Indonesia and this type of soft bread is the most popular here. Almost all well known local bakeries here are producing breads using the similar method…at first I was worried because the dough looked very sticky and wet. But after 15 minutes of high speed kneading the dough started to look blends in well. Thanks for the recipe …
The bread I get at chinese bakeries taste like this too. It’s so great being able to make my own. Glad it worked out for you!
how come i have super sticky dough? coz didn’t mix long enough? or anything that does wrong?
Well it could be several reasons. If you didn’t knead long enough that will cause super sticky dough. Also if you have too much moisture. Did you add the entire tz mixture, or only 120grams? Because 120 grams is about half of what the TZ mixture makes.
I make these rolls tonight and they came out perfect. I love this recipe!
Yay! Thats so great
Hi! Your soft breads look absolutely wonderful ! What kind of oven do you use ? My rolls turned out somewhat drier and browner on the surface, do you cover yours during baking ? I’m craving for char siu soft buns, and yours seems to be the perfect tangzhong bread recipe… But I think I still have to improve my skills !
Anyway, thanks for this nice website 🙂
I just used my regular stove oven. I didn’t cover mine during baking but if you are having that problem with it cooking too fast, you might want to tent it with foil on top to prevent that. good luck!
May I know how long this bread keeps at room temperature. I’ve read some blogs that says that after 2 days it will smell terrible, is it true? Thanks.
I have not had that problem. I’ve had the bread for close to a week with no issues.
If I use all purpose flour for the Tangzhong, will it work? Thanks!
I’ve never actually tried using all purpose flour. I’ve always used bread flour. So I don’ t know the answer to that unfortunately.
I’m loving your series on this milk bread…these little raisin rolls look sweet! =) I might have to give this a try over the holidays! =)
You should definitely try it out!
How lovely your bread! I already try to make a bread with TZ from her recept too and I know that I falling in love with a soft and fluffy bread ;d I think you should try an apple custard bun from her blogg too! and you will love it like me 😉
There’s quite a few recipes I want to try including the apple custard. I can’t wait to try more. =)