

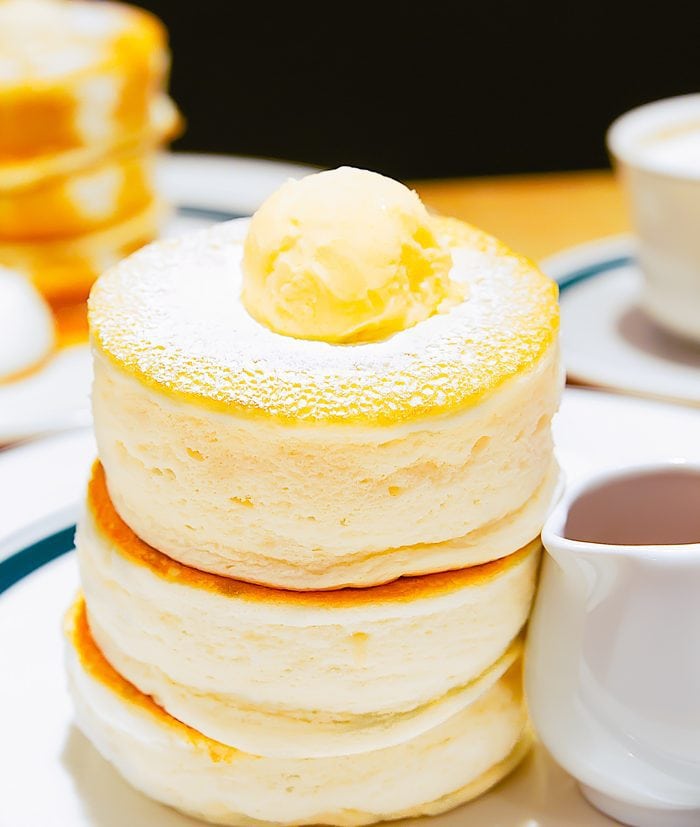
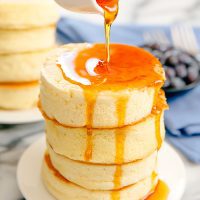
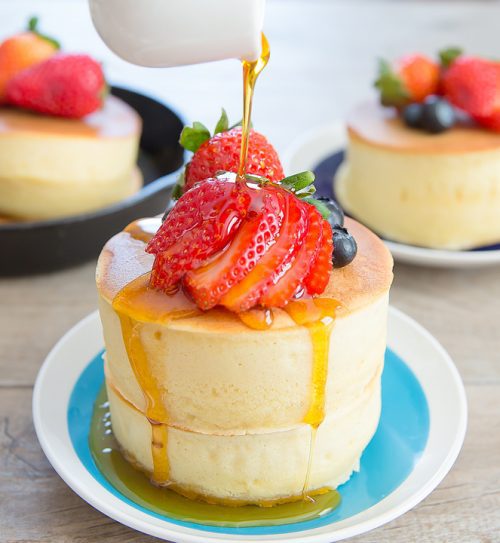
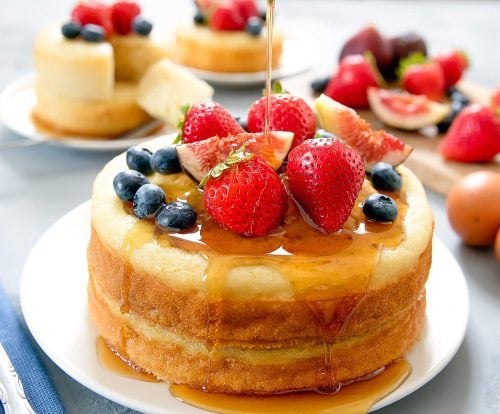
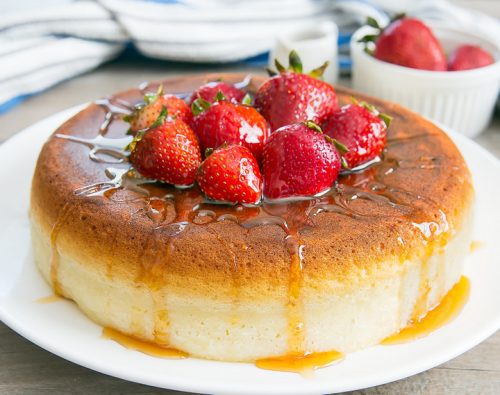
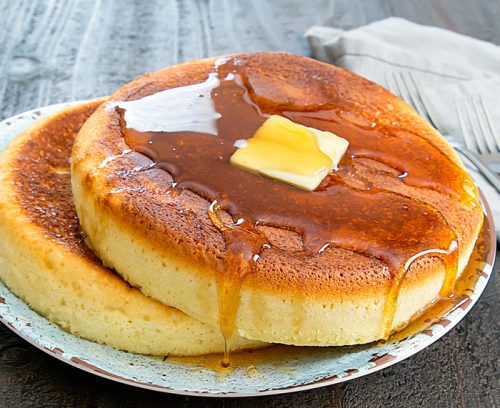
These Japanese-style Souffle Pancakes are incredibly light and fluffy. They are a popular trend in Japan, but you can recreate them in your own home.
As you may recall, during my trip to Tokyo, I had the most incredibly fluffy souffle pancakes at Gram Cafe. I’ve been wanting to recreate them ever since.
I tried quite a few recipes I came across on the internet and while they tasted delicious, they didn’t quite taste like the ones I had at Gram.
After about a dozen attempts, I think this is as close as I can get until they share their recipe.
These do take more effort than your regular classic buttermilk pancakes, but they are a fun treat. The pancakes are cooked in a skillet just like regular pancakes but the batter involves a meringue, which is what makes these so much lighter.

I’m sharing all my findings below so that you can successfully make these delicious hotcakes on your first attempt.
I’m actually sharing two versions. Here are the differences.
Version 1: Using baking powder
Pros: Nearly all the recipes I found use baking powder. The baking powder almost guarantees that your pancakes will rise high and helps create a more stable structure. Of the two, this is the easier recipe. They taste quite good, like fluffy little cakes.
Cons: I didn’t think these tasted as much like the version I had in Japan. I found that the baking powder changed the texture of the souffle pancakes, making them more cake-like. While fluffy, they aren’t quite as light and don’t “jiggle” the way the ones in Japan do. (If you look up videos of the ones in Japan, people love filming videos of the cakes jiggling.)
Version 2: Without baking powder
Pros: For me, this one tastes most like Gram Cafe’s version. It is even lighter than cake and tastes more like souffle. Souffle traditionally doesn’t use any baking powder and neither does Japanese souffle cheesecake. When I ate the version at Gram Cafe, they had a similar texture to Japanese Souffle Cheesecake, so I think this is closer to the original recipe.
Cons: The flavor of these might not be for everyone as it does have an eggier taste. Japanese tend to like these not as sweet. I know eggy might sound unappetizing, but a hot souffle usually is quite eggy unless masked with other flavors. However, once you mix it with the syrup and whipped cream, it masks most of that eggy taste.
It is also a little trickier to make these, especially if you don’t have a lot of experience with making meringues or souffles. If your timing is off and you flip these too soon, they will deflate and collapse.
Other Notes
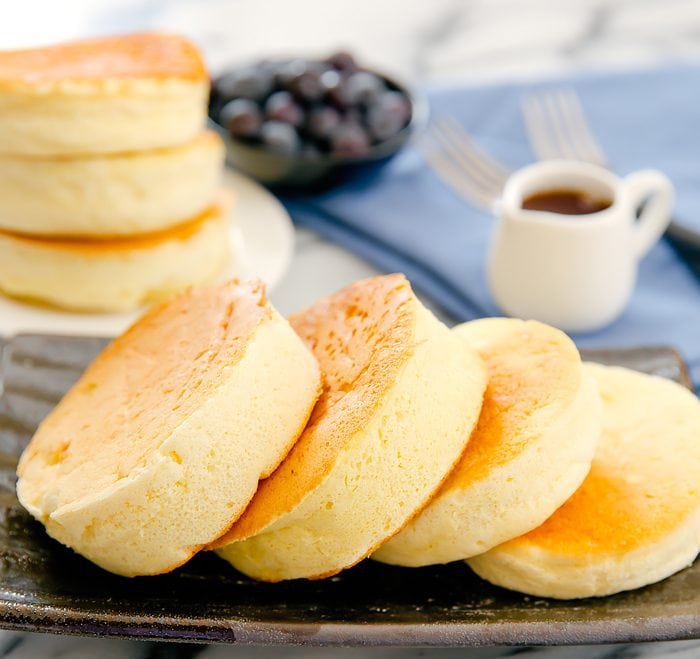
- I used these English Muffin Rings (linked in the recipe card) which helps to make these uniform and also helps them achieve a better height as they cook up instead of spreading out. I have seen people make them free form, they just likely won’t be as round and may not rise as high. If you do make them free-form, I suggest that you keep them small, so that the batter doesn’t spread out too much.
- These are best eaten hot and right away. It’s not really something you can make ahead of time. Once cold, the texture changes and they aren’t as fluffy.
- Make sure you sift the cake flour into the batter, otherwise it will make the batter too heavy. If you don’t have a flour sifter, a fine mesh strainer works just as well and is what I used.
- You want to use chilled egg whites as it will keep your meringue more stable.
- Adding a little water to “steam” the cakes helps them achieve their texture and rise.
Recipe now updated with video! You can also view all my recipe videos on my youtube channel.
Japanese Souffle Pancakes
Ingredients
Version 1: With baking powder
- 6 tbsp cake flour
- 2 1/2 tbsp skim milk
- 1 tsp baking powder
- 1/4 tsp vanilla extract
- 1/2 tbsp full fat mayonnaise or kewpie mayonnaise this is the Japanese mayonnaise
- 3 tbsp granulated white sugar
- 2 large eggs egg whites and egg yolks separated (keep egg whites chilled in fridge until ready to use)
Version 2: Without baking powder
- 5 tbsp cake flour
- 1 1/2 tbsp skim milk
- 1 tbsp unsalted butter melted
- 1/2 tsp vanilla extract
- 2 1/2 tbsp granulated white sugar
- 2 large eggs egg whites and egg yolks separated (keep egg whites chilled in fridge until ready to use)
- 1/4 tsp cream of tartar
Instructions
Version 1
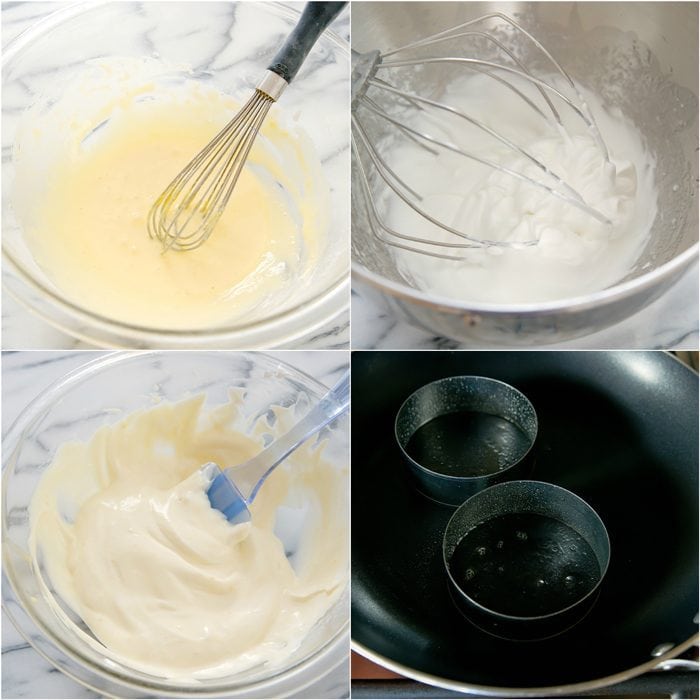
- In a medium bowl, add milk, baking powder, vanilla, mayonnaise and egg yolks. Sift in cake flour using a flour sifter or fine mesh strainer (make sure you don't skip this!). Mix with a whisk until batter is smooth and the mixture is a pale yellow.
- In the bowl of a stand mixer, add chilled egg whites and sugar. Make sure your mixing bowl and whisk attachment are completely clean and dry. If there is any oil, your egg whites won't turn into meringue. Whip on the highest speed your mixer allows, until stiff peaks form. (About 2-3 minutes.) Your meringue should be able to hold its form and if you turn the mixing bowl upside down, the meringue will not slide out.
- Using a spatula, scoop out one-third of the meringue and add to your egg yolk batter. Gently fold the meringue into the batter until there are no more white streaks. Make sure you start your folds from the bottom so that the batter at the bottom of the bowl doesn't go unmixed. You need to be gentle when folding. If you mix too hard, the meringue will lose its structure. Once the meringue has been incorporated, add in another third. Fold in. And then the final third. At the end, you batter should be very light and airy, with the meringue only just incorporated to the point where there are not visible white streaks.
- If this is your first time making these, you may want to start with just one as a test, to determine the heat setting for your stove and how long to cook the pancakes. But the directions I am sharing is for how I would normally cook these. Add two ring molds to a large skillet. Spray the insides of the ring molds with cooking oil spray. I found that this is the best method to grease, as it completely greases the interior of the molds and also the bottom where the pancakes will be, but doesn't spread grease to the rest of the parts of the pan you won't be using.
- Bring your skillet to low heat. It may take a test one to figure out where exactly you want your heat setting. For me, I turned my dial to heat setting 4 (with 10 being the highest) on my gas stove top. Once the oil and pan are hot, fill each ring mold between 1/2 to 2/3 full with batter, allowing some room for them to rise. Add 1/2 tbsp of water to each side of the pan (preferably not touching the pancakes). Close the lid and allow to cook about 3-4 minutes.
- Your pancakes are ready to flip when the tops look almost completely cooked and you can move the bottom of the pancakes without batter spilling out. Use a spatula or turner to flip the pancakes (while still in their molds). I prefer to use a cookie spatula because they are thinner and slip under the molds easier.
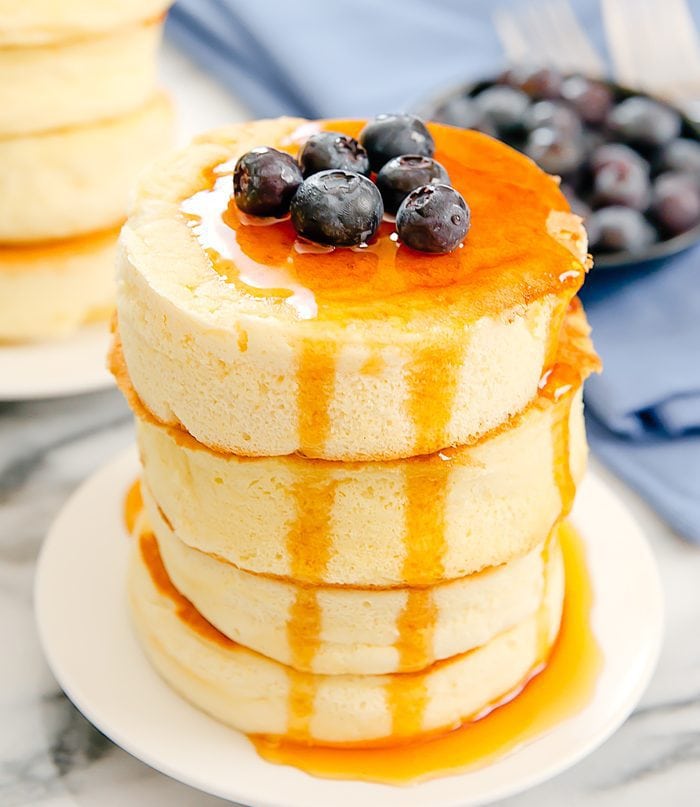
- Cover and cook for another 2-3 minutes until pancakes are completely cooked and golden brown on both top and bottom. Place pancakes onto plate. Gently push out of the molds to remove from molds. Repeat with remaining batter. Serve warm with syrup, powdered sugar, whipped cream, fruit, or other toppings of your choice.
Version 2
- In a medium bowl, add milk, melted butter, vanilla, and egg yolks. Sift in cake flour using a flour sifter or fine mesh strainer (make sure you don't skip this!). Mix with a whisk until batter is smooth and mixture is a pale yellow.
- In the bowl of a stand mixer, add chilled egg whites, sugar and cream of tartar. I don't recommend skipping the tartar as it really helps to keep the egg whites stable so that the souffles don't collapse. Make sure your mixing bowl and whisk attachment are completely clean and dry. If there is any oil, your egg whites won't turn into meringue. Whip on the highest speed your mixer allows, until stiff peaks form. (About 2-3 minutes.) Your meringue should be able to hold its form and if you turn the mixing bowl upside down, the meringue will not slide out.
- Using a spatula, scoop out one third of the meringue and add to your egg yolk batter. Gently fold the meringue into the batter until there are no more white streaks. Make sure you start your folds from the bottom, so that the batter at the bottom of the bowl doesn't go unmixed. You need to be gentle when folding. If you mix too hard, the meringue will lose its structure. Once the meringue has been incorporated, add in another third. Fold in. And then the final third. At the end, you batter should be very light and airy, with the meringue only just incorporated to the point where there are not visible white streaks.
- If this is your first time making these, you may want to start with just one as a test, to determine the heat setting for your stove and how long to cook the pancakes. But the directions I am sharing is for how I would normally cook these. Add two ring molds to a large skillet. Spray the insides of the ring molds with cooking oil spray. I found that this is the best method to grease, as it completely greases the interior of the molds and also the bottom where the pancakes will be, but doesn't spread grease to the rest of the parts of the pan you won't be using.
- Bring your skillet to low heat. It may take a test one to figure out where exactly you want your heat setting. For me, I turned my dial to heat setting 4 (with 10 being the highest) on my gas stove top. Once the oil and pan are hot, fill each ring mold between 1/2 to 2/3 full with batter, allowing some room for them to rise. Add 1/2 tbsp of water to each side of the pan (preferably not touching the pancakes). Close the lid and allow to cook about 4-5 minutes.
- Your pancakes are ready to flip when the surface looks completely cooked. The cakes will rise quite high (possible past the rim of the molds), but they will start to collapse slightly once you remove the lid and let out some of the heat. Be careful not to try to flip these too soon because they will collapse and will stay collapsed. Use a spatula or turner to flip the pancakes (while still in their molds). If you have batter spilling out when you flip these, then they are not ready to be flipped and will likely collapse. I prefer to use a cookie spatula because they are thinner and slip under the molds easier.
- Cover and cook for another 3-4 minutes until pancakes are completely cooked and golden brown on both top and bottom. Place pancakes onto plate. Gently push out of the molds to remove from molds. Repeat with remaining batter. Serve warm with syrup, powdered sugar, whipped cream, fruit, or other toppings of your choice.
Video
Notes
- I used these English Muffin Rings*
- *This is an affiliate link. Much like referral codes, this means I earn a small commission if you purchase a product I referred (at no extra charge to you).
- The nutrition estimate is for the pancakes only and does not include toppings.
Nutrition
The nutrition information provided are only estimates based on an online nutritional calculator. I am not a certified nutritionist. Please consult a professional nutritionist or doctor for accurate information and any dietary restrictions and concerns you may have.


Can a savory version be made more like a scallion pancake?
You can make a savory pancake but we haven’t tried it and don’t have good suggestions on ingredients you’d need.
First tried the New York Times recipe for Souffle pancakes, they did not turn out well. Tried this (1st version) and GREAT!
That’s great! We’re happy you love the recipe.
However the taste was amazing! I prefer these over butter
I’m glad you enjoyed!
Can I cook this without rings/molds?
The molds help make them uniform and also helps them achieve a better height as they rise up as they cook instead of spreading out. We have seen them cooked free form, they just likely won’t be as round and may not rise as high. If you do make them free-form, we suggest that you keep them small, so that the batter doesn’t spread out too much.
i was skeptical of these at first but i made bot recips and they were da bomb. 10/10 would make again
thank you for sharing!
HI, does the souffle pancake deflate after a few minutes for both recipes?
No it should hold its shape.
They’re so beautiful and I love the idea of this texture.
thank you!
These Japanese-style Souffle Pancakes are incredibly light and fluffy.
I’m glad you enjoyed!
I tried version one and the yellow mixture with yolks was really hard. The instructions didn’t say when to add in the butter. I couldn’t really mix it well with the white mixture. It’s chunky. Please help!
there is no butter in version 1. Your mixture should not be hard unless you did not sift in the flour
I’m so happy to see this recipe posted! It has always been my favorite.
I hope you enjoy!
So yummy. I will try it more times. My son love it much!
I’m glad you both enjoyed!
Can you make this with all purpose flour?
it will change the texture of the pancakes
I did version 1. Wow!!!
My very first and they were tha bomb!
Thank you 🙂
I’m so happy the recipe worked out well for you!
Made lovely, fluffy Japanese-style pancakes! I tried both recipes, with and without baking powder and I prefer without. If you have the ingredients I would go for the without-baking-powder recipe, it had a superior taste and texture. The egg flavor is more masked and it turned out more fluffy and less cake-y than the other recipe. 😀
I loved making them and enjoyed eating them even more! Thank you for both of the recipes!!
Thank you for sharing your experience and thoughts on both recipes. I’m glad they worked out for you!
Made the one with baking powder and turned out great! Wonderful with strawberry purée. Thanks
I’m glad it turned out well for you!
The best
thank you!!
I made a low carb version of the “Version 2” recipe by replacing 5 tbsp of flour with 5 tbsp almond flour + 1/2 tsp psyllium husk powder and substitute sugar with Xylitol. Followed the method to the letter and they were amazing!
Thanks for sharing! I will need to try making a low carb version
I tried this and it came out perfect. Fluffy, tasty and very satisfying. Thanks for the suggestion!
I’m so glad you liked it!
This looks amazing! I can’t wait to try it. Question about number two: Have you tried creaming softened butter with the egg yolks vs melted? Wondering if that would change the texture at all.
there is only 1 tbsp of butter, so I think you’ll find it quite difficult to cream with that small amount.
Could you make the batter ahead of time? Like making a great amount in the morning and use the batter throughout the day?
No you should use the batter right away otherwise the egg whites will start to deflate
Worked out great for us. This is the third recipe we’ve tried and the one that comes closest to what my boys remember from their trip to Japan.
Recipe 2, that is. 🙂
I’m so happy to hear that!
Thanks so much for sharing this recipe! I’m planning on making these tomorrow morning, but just noticed that version 2 (the one without baking powder) does not list mayonnaise as an ingredient. Do I not need the mayo if I go with version 2?
The mayo is not needed for version 2. Hope you enjoy!
I followed ur recipe but ur base without baking powder was very thick and not liquid at all ruined my batter what did I do wrong!!!?
Did you make sure to sift in the cake flour with a mesh strainer? Are there any substitutions or anything you left out? The batter should be thick but it is still liquid
Do you recommend a non-stick pan? What did you use?
yes I used a nonstick skillet
Anyone try these with gluten free flour?
I tried this recipe without the mold. It seems that keeping it small will do without the mold. It’s easier to flip as well. When I lose my patience and made it big, it didn’t flip as nice. Also like you said, making sure the heat is just right is extremely important. The big one didn’t cook as nice and I ended up finishing it in the oven. I love the easiness of the recipe though. My end product had a very nice fluffy texture. Thank you so much for sharing the recipe.
I’m glad you got the recipe to work for you!
SO. FRIGGIN. FLUFFY.
haha, yes!
Hm flour and me do not mix well! I sifted the flour into the eggs and milk, but the batter became very very sticky and lumpy 🙁 Is it because I am using regular all purpose flour? And would butter milk make a big difference?
Both buttermilk and using regular ap flour will make a huge difference. The recipe uses cake flour which is much finer and lighter. Regular flour will be too heavy and dense. Buttermilk is also thicker than milk.
Ohhhh I see! I will give it a go again with the cake flour and regular milk~!
I made these this morning (version 1) and they were the best pancakes I’ve ever made. Really brought back memories of a trip to Japan. Thank you so much for sharing! Can’t wait to try version 2.
I’m so thrilled these worked out well for you!
Hi, these look amazing.. I’m sorry if I missed it, but how are these different from the Japanese hot cakes also on your site? The hot cakes recipe looks a lot simpler.
there is a huge difference in texture. The hotcakes are like thick pancakes. These are like a cross between a souffle and a pancake. They are very light and airy.
I love this. My new favorite pancake. I am curious though. What happens when you skip the mold? I reckon it wouldnt be as tall but do they just deflate entirely or run off the griddle or explode? Im staying with a friend and she has no molds, thus the query.
It will still work but freeform cakes will flop over and won’t rise as high
Could you freeze theses and save them for later ?
I have not tried freezing them so I am not sure
Hi Kirbie,
I love your blog and this recipe so much and am so looking forward to making these pancakes however I don’t have any ring molds. Do you perhaps have a suggestion of another piece of equipment I could use instead of them or if I could perhaps bake them in the oven?
I’m sorry I don’t have any other suggestions for ring mold replacements. I have seen people get creative and make their own. I don’t recommend baking as this recipe is designed specifically for cooking on the stovetop.
I used rings made of parchment, worked great! Just cut a strip of parchment and tape one end to the other in a circle!
I’ve been seeing restaurants use the parchment paper rings too. I will need to try next time! glad it worked for you
With a little creativity, it’s easy! Cut a ring into an empty Coke can and wrap it in foil. There is your ring! 😉
homemade rings are definitely an easy solution. thanks for sharing!
This looks delicious! I found your blog through this recipe on Pinterest. I can’t wait to try this and also explore your site some more. Everything looks so good!!
I hope you enjoy!
Omg!I love this receptie!
thank you!
Hi! Your pancakes look really nice and decided to give it a go at the baking powder version one. However we found that the egg yolk mixture became really sticky and dense, nothing like the one shown in your photo. So we added more milk and other ingredients to make it into a smoother consistency. Do you mind sharing the amount of milk that was added in your mixture?
Love the outcome though after we tweak it but still not as fluffy as yours!
Thanks!
Hi Jan, the amount of milk I put in the recipe is how much I used. The egg yolk mixture actually is supposed to be very sticky and thick before you add in the egg whites. So I think you were probably fine before adding the extra ingredients and the extra milk and ingredients probably caused your pancakes to not come out as fluffy. The other thing is, you do need to make sure you sift in the flour as it will let you have a smooth egg yolk mixture much easier than if you just add in the flour directly. The sifting will prevent any lumps and allow you to easily incorporate the flour. Hope that helps!
Is it possible to make the batter ahead of time? and put it in the fridge before use?
Sorry I haven’t tried that so I’m not sure. Sometimes refrigerating the batter can change results, but I don’t know for this particular batter.
Very nice, just had them for breakfast. Though I find they have to be cooked quite slowly as to get them cooked through without burning as they’re so moist. I normally use stiff eggwhites for my pancakes anyway so I used my normal 4 eggs whites and a bit of extra milk.
I’m glad you liked them!
I absolutely love those ! Cant wait to try them!
hope you like them!
I freaking love this!!! They’re so beautiful and I love the idea of this texture.
thank you!!!
wow, those are stunning… and super generous to add two whole versions. they look like little geometric clouds *_*
thank you! I couldn’t decide which version to share so I thought I’d share them both
this looks sooooooo good. I will try for sure. thanks for share this recipe.
hope you enjoy!
Just finished making version 2 with no baking powder (also uses vanilla flavored almond milk instead of skim + vanilla extract) . I didn’t have a deep ring mold, just a silicone egg mold for breakfast sandwiches. Did the trick for keeping the shape. I did some free form ones as testers and they were very flat. I think my batter may have been too loose and the pan may have not been hot enough for the freeform pancakes but it’s ok. The other 2 that I made with the mold fluffed up nicely and didn’t deflate very much after taking them out the pan. this batter tastes great. Not too eggy at all. Very soft, nice subtle sweetness before adding powdered sugar and/or syrup. Will definitely be trying version 2 again now that I’ve learned from my mistakes. Will also try version 1 to see how the baking powder makes a difference with the fluff and texture.
thanks for sharing your experience! I’m glad they worked out for you