

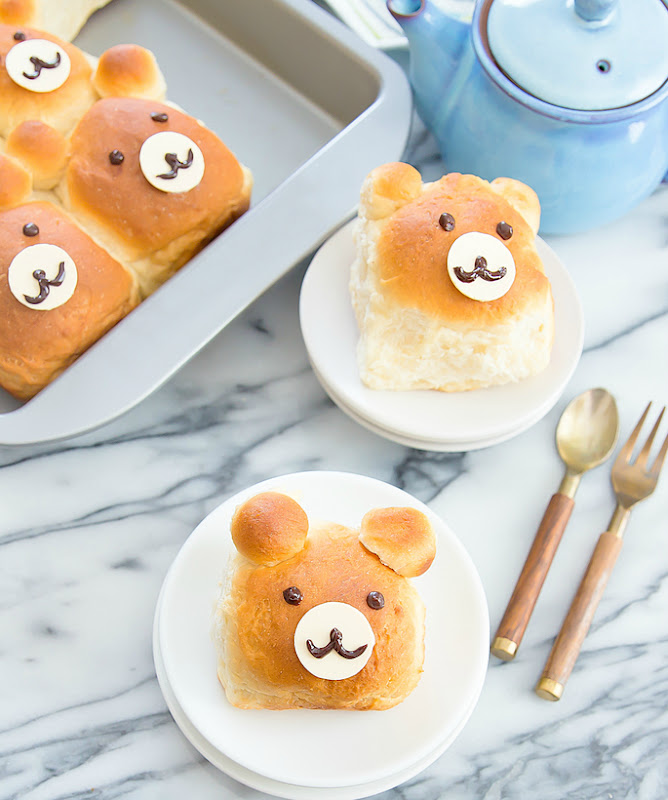
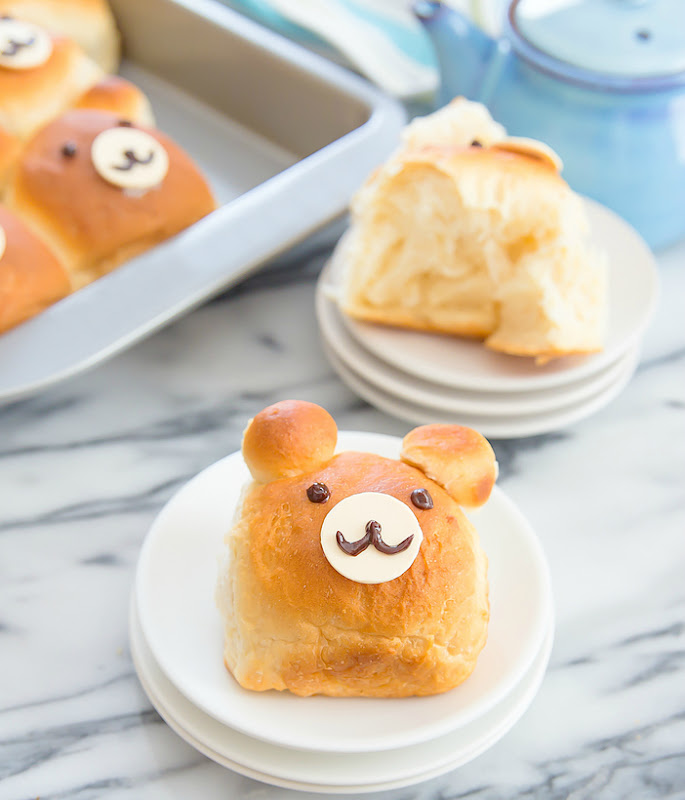
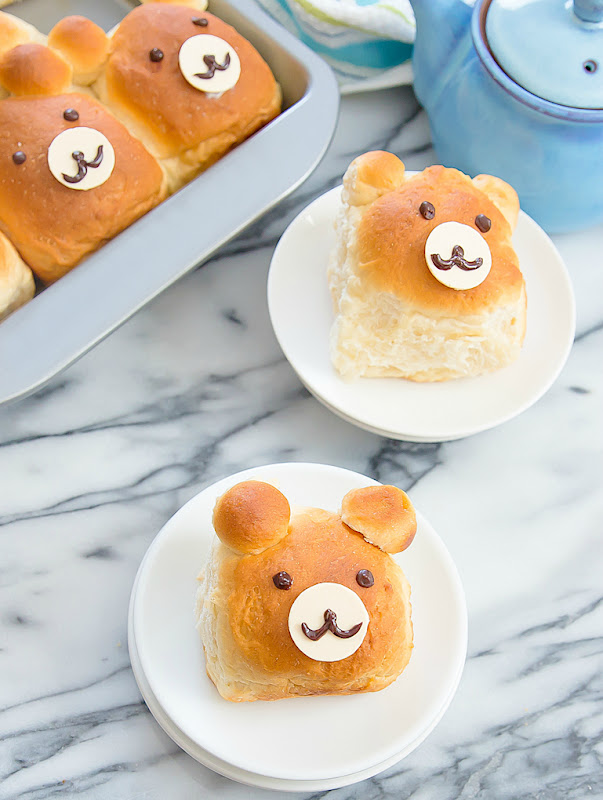
These milk bread rolls are super fluffy with just a hint of sweetness and stay soft for several days without the use of preservatives. I decorated them to look like cute bears, inspired by my recent trip to Japan.
I had such a fun time in Japan. I miss it already. I’ll be sharing more photos soon of my trip once I get over this jet lag and catch-up with work. Japan is such a fun place to visit, even with the language barrier. The people are polite, the food is amazing, the nightlife is full of energy, and of course there was so much cuteness. From stores, to bakeries, to character cafes. I dragged my husband through all the cuteness. And brought quite a bit of it home with me as well.
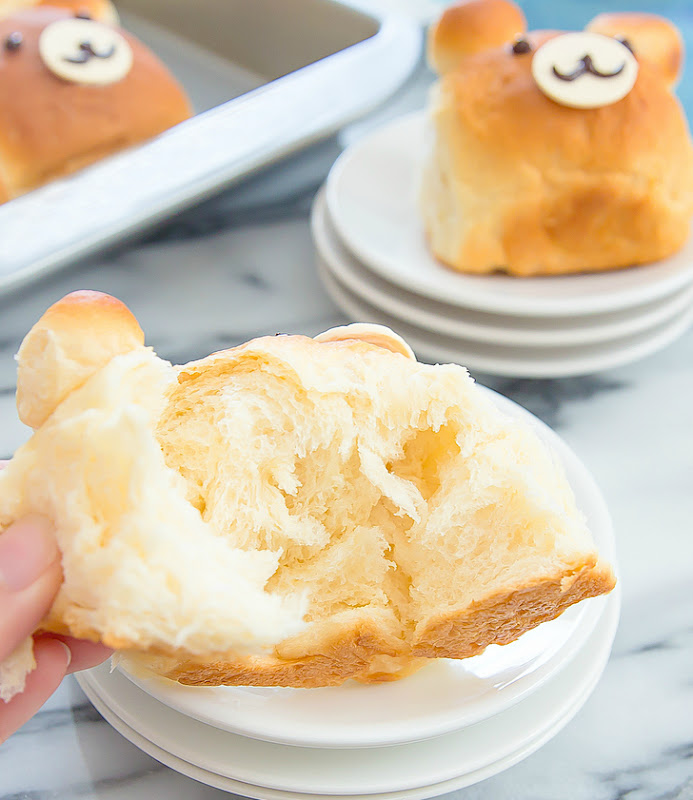
I didn’t actually see bear shaped rolls on my trip, though I’ve seen similar ones on some Japanese food blogs I follow. The bread rolls are also Chinese and Japanese-style, using the tangzhong method, resulting in super fluffy, light and fragrant rolls, that stay soft for days.
Six years ago, I was introduced to the tangzhong method of making Chinese and Japanese-style breads. I shared a few of my creations on the blog back then and while those posts badly need some updated photos (another thing on my never ending to-do list), it still remains my go-to method for making Asian-style bread. Since then, the method has only gotten more popular and I’ve even seen recipes shared by The New York Times, King Arthur Flour and more. I haven’t found anything else that makes breads as soft and fluffy, and that maintain the fresh-baked, pillowy texture for days.
How to Prepare the Dough for Bear-Shaped Rolls
All of the instructions are included in the recipe card, but I wanted to point out some key steps along with step-by-step photos to make it easier for you to make your bread.
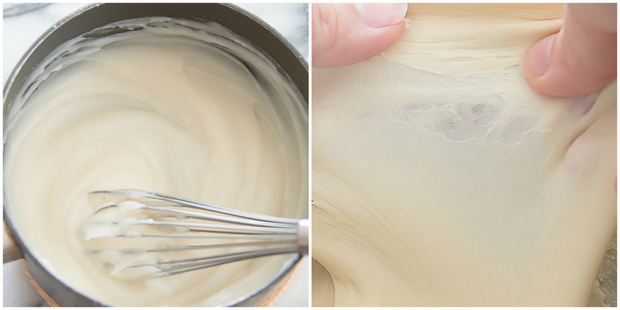
Step 1: Make the tangzhong. It must be made ahead of time so it has time to cool. You can make it up to three days in advance. It is a simple mixture of flour and water that is cooked on the stove to 65°C. Store it in the refrigerator until you are ready to use it. The tangzhong is how the bread soft and moist without preservatives.
Step 2: To make the bread dough, use a stand mixer to combine the ingredients for the dough. Once the dough comes together knead it for about 18 to 20 minutes or until the dough is smooth, not too sticky, and elastic. To be sure, you should be able to stretch the dough very thin before it breaks. The dough will need to rise for a while at this point.
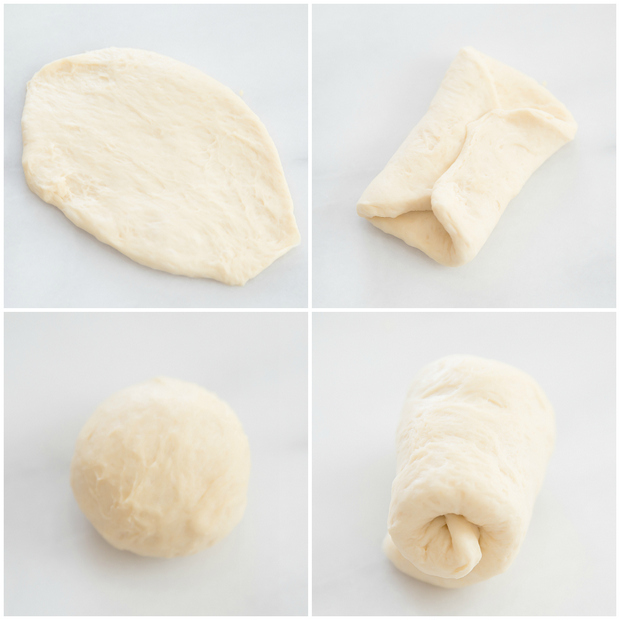
Step 3: Divide the dough into nine equal parts and roll each into a ball. Rest the balls for 15 minutes. Once the balls have rested, remove a little dough from each (enough to make two 1-inch balls) and roll them to make the ears for your bears. Set these small balls aside.
Step 4: Roll each large dough ball into an oval shape. Fold the ends into the middle so they are slightly overlapped. Using your rolling pin, roll the folded dough until it’s flat. Starting at one end, roll the dough into itself like a jelly roll. Place the dough rolls in a baking pan, place the smaller balls on each roll to make the ears, and let the dough rise before baking.
Step 5: After the rolls are baked you can decorate them to look like bear faces using chocolate chips and candy melts. All of the details are in the recipe card.
Making the bread does take a long time because the bread has to go through two stages of proofing. But the end result is worth it. And it’s not too much actual work on your part–just a lot of waiting. Making them bear-shaped does take a little effort. But when I saw how cute they turned out, it made it worth the time. As usual, I had a hard time actually eating these after making them look so cute. My method is to turn them over so that I can’t see their faces before I dig in. I had to do that a lot when I was in Japan!
More Bread Recipes
Bear Shaped Milk Bread Rolls
Ingredients
For the Tangzhong:
- 1/3 cup bread flour
- 1 cup water
For the Milk Bread:
- 2½ cups bread flour
- 3 tbsp +2 tsp sugar
- 1/2 tsp salt
- 2 tsp instant yeast this can be done with dry inactive yeast, but you'll have to activate it first
- 1 tbsp dry nonfat milk powder
- 1 large egg
- ½ cup skim milk
- 110 g tangzhong half the tangzhong you made
- 3 tbsp butter cut into small pieces, softened at room temperature
For the bear decorations:
- 1/4 cup semisweet chocolate chips
- 2 tbsp heavy cream
- 9 white candy melts or large white chocolate discs
Instructions
- First, make the tangzhong ahead of time and give it sufficient time to completely cool before using in the bread recipe. It can be made up to three days in advance and kept in the fridge. Of course you can also make it the same day and let it cool in the fridge until it is time to use.
- To make the tangzhong, whisk together flour and water until fully blended. Add to a small saucepan over low heat on the stove. Stirring frequently, bring to a simmer and measure temperature. When it reaches 65 degrees Celsius, it is done. If you don't have a thermometer, several people have successfully just "eyed" it. It will come together like a thick roux, and when you are stirring it, the roux will maintain its form creating "lines" as you stir (from where your spoon or whisk breaks into the surface). That is also an indication it is ready. (See photo in the post)
- Remove tangzhong from heat and place into a container and into the fridge to cool.
- To make the bread, add all the dry bread ingredients into your mixer. In a small bowl, whisk together egg, milk, and tangzhong. Make a well in the center of your dry ingredients and add in wet mixture. Add in butter. Using the dough hook attachment, mix on low speed until your dough comes together. Turn mixing speed up to medium high (I had it set at 7 out of 10 on my mixer). Let dough knead for about 20 minutes until the dough is no longer sticky and is elastic. To see if the dough is done, you perform a "windowpane" test. Take a piece of the dough and stretch it out. You should be able to stretch it quite a bit, so that the dough stretches to a very thin, almost translucent membrane without breaking. When it does finally break, it should break into an almost perfect circle. If your dough is breaking too easily, continue to knead it a few more minutes.
- Lightly oil a large mixing bowl. Gather the dough into a ball and place into the greased mixing bowl. Cover the surface of the bowl with plastic wrap or a damp towel. Place bowl in a warm place and let it proof, about 40 minutes, or until double in size.
- Remove dough and break into 9 equal sections. Roll into balls and then cover again with plastic wrap and let them rise for about 15 minutes.
- From each of the balls, remove a small chunk of dough, that when rolled up into a small ball, measures 1 inch in diameter. Set aside. This is for the bear ears.
- Take one of the nine big balls, and roll dough out into an oval. Take one end of the dough and fold to meet the middle of the oval. Take the other end and fold to meet on top. Turn the dough over, so that the folds face down and roll and flatten dough with pin. Flip dough again, so folded side faces up. Roll the dough up from top to bottom, so that it forms a roll. The surface of the roll should be fairly smooth and that is going to be the top of your ball. Take both ends and fold down until they meet at the bottom. Stretch and adjust as needed to completely smooth and round your ball. Repeat this with your remaining large balls. Make sure to work fairly quickly because you will see the finished balls already begin proofing again as soon as you set them down and you want them to end up around the same size. I've had several people ask me whether this rolling step is necessary. I've been tempted to try just making 9 equal sized balls without all the extra rolling, but I haven't yet tried it. I think the purpose is to help make the balls rise and bake evenly and also the rolling helps ensure the surface of the balls are smooth too.
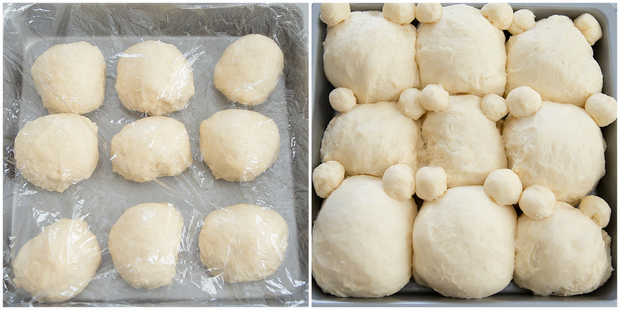
- Place the nine finished balls into a greased 9 x 9 inch baking pan, spacing them out evenly. Don't worry that they aren't filling the pan. After the second round of proofing, they will be touching and completely fill the pan. Cover with plastic wrap and set aside to proof for 45-60 minutes, or until dough is doubled in size.
- Take each of your 9 small balls and divide each one into 2, so you have 18 balls, which will form the ears of your bears. Roll and smooth them so they are perfectly round and approximately the same size. Cover with plastic wrap and let proof (until the bread rolls are done proofing).
- Preheat oven to 325°F. Once the bread rolls are doubled in size, add the ears on top (see photo above). You just need to place them where you want the ears to be and you don't need to connect the ears to the face. When the bread bakes, it will rise and the ears should fuse with the face. Place bread in lower half of the oven. Bake for about 25-30 minutes or until breads are done and tops are a dark golden brown. If you feel that your breads are browning too much, you can tent the top with foil to prevent too much browning.
- Let breads completely cool before decorating. In a medium glass bowl, melt heavy cream with chocolate chips either on the stove top or in the microwave. Whisk until it becomes smooth and glossy. Place into piping bag and pipe eyes on the bears. Place 2 candy melts on a glass plate or parchment paper, smooth side facing up. Microwave for a few seconds so the bottom tips become melted but the surface is still intact. You can glide the candy melts across your parchment paper or plate a few times, further thinning out your chocolate discs so that they align better with the bear faces and also creating a sticky bottom surface to stick onto the breads. Gently place onto breads. Pipe mouth and nose onto the discs. Repeat with remaining discs. I found that 2 was the ideal number to put into the microwave. When I tried three, one always heated unevenly. Let chocolate and piping set before serving.
Notes
- Bread recipe adapted from Yvonne Chen's cookbook, 65 degrees Tangzhong
- Nutrition estimate does not include the decorations.
Nutrition
The nutrition information provided are only estimates based on an online nutritional calculator. I am not a certified nutritionist. Please consult a professional nutritionist or doctor for accurate information and any dietary restrictions and concerns you may have.


Hi, these look so good! how long do they keep for?
They will keep at room temperature for several days. Just store them in an airtight container.
I’ve never made bread before, and I didn’t have a mixer so I did it by hand. I was very impressed when it actually worked! 🙂
I’m so glad it worked for you!
So cute!
thanks!
Hi, whats the difference in using skim milk compared to regular milk?
You should be able to use regular milk
I made this today and they turned out wonderfully! It’s a bit of a challenge to get them all to be uniform because the dough puffs up so much, but they still look adorable and taste amazing! I am relatively new to baking bread and I’ve never made milk bread before today, but I am very pleased with the results!
I’m so glad they turned out well for you!
Hi, what is the round gold that you use for bear decoration! ?thank you?
it is a white chocolate disc.
Hi, what is bread flour? Just normal all purpose flour? And can I make this without milk powder too by just adding milk?
bread flour is not the same as all purpose. It has a higher amount of proteins. If you live in the US, most grocery stores sell it, and it is labeled bread flour. I am not sure what the equivalent is in other countries. The milk powder should not be substituted with regular milk. Milk powder helps with the bread’s softness and fragrance. adding regular milk will not achieve the same effect.
Tangzhong makes the best bread! These look super cute 🙂
I agree! turns out delicious every time!