3 Ingredient Buttery Bread Rolls (No Yeast, Sugar, or Eggs)
These bread rolls are buttery and soft. They are very easy to make and don’t require any yeast or kneading. They also don’t need sugar or eggs. You can have fresh, homemade bread in about 30 minutes.
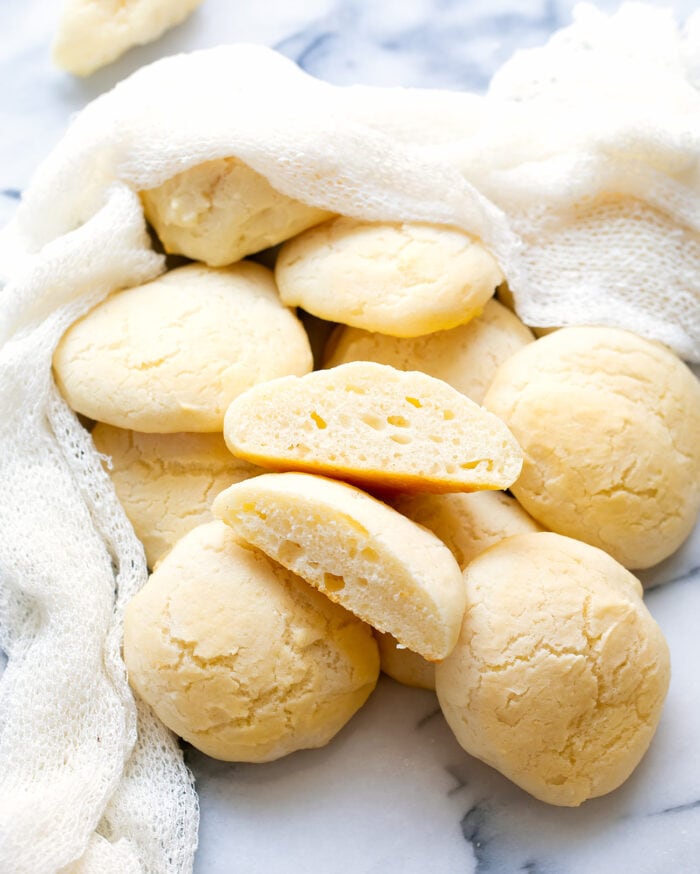
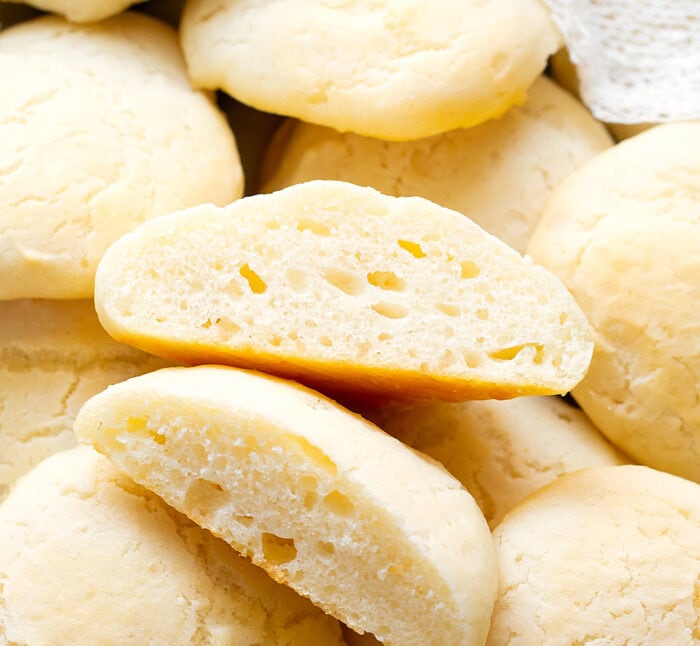
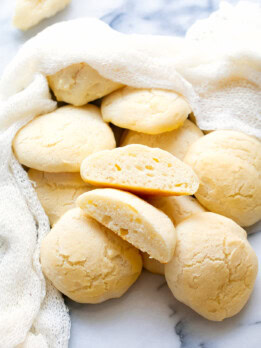
These bread rolls make a great side dish for a meal. They can also be used to make sandwiches. They have a buttery flavor, a chewy exterior and a soft interior.
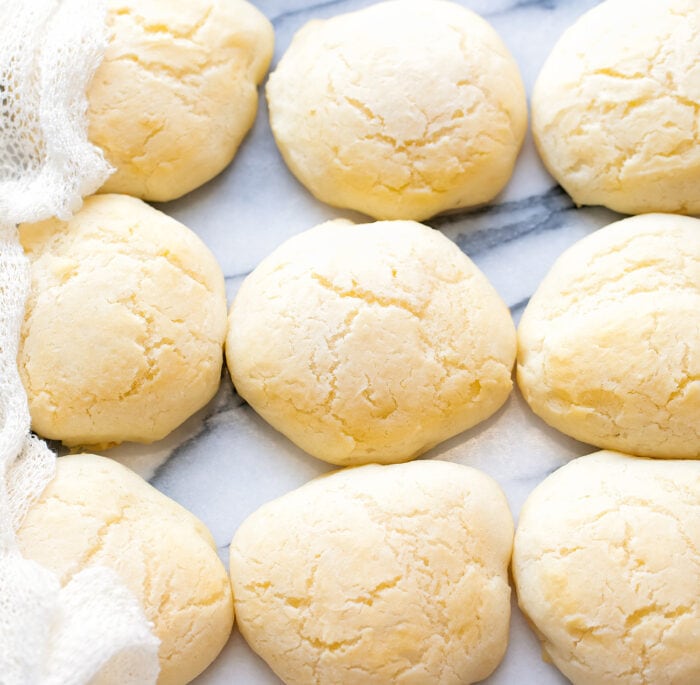
I know these rolls don’t look like your classic bread rolls. They don’t bake up as tall and they are very pale instead of a golden brown, but these breads were so delicious and easy that I had to share them. I did experiment with making them taller and browner but it changed the texture too much. And I grew to like this shape because it makes the breads easier to grip and bite into.
Ingredients
- Self-Rising Flour (you can also make your own with all purpose flour, baking powder and salt)
- Milk (or milk alternatives)
- Butter
Self-Rising Flour: Instead of yeast, the leavening agent for this bread is the baking powder in self-rising flour. If you don’t have self-rising flour, you can make your own using flour, baking powder and salt. I share the exact measurements in the recipe card notes at the end of the post.
Milk: This recipe can be made with milk (low-fat or whole), or milk alternatives like soy, almond, coconut or oat milk.
Butter: The breads are brushed with melted butter before baking to give them a buttery flavor. The butter is also used to add some necessary fat for the bread rolls, otherwise the tops will bake up very dry.
Bread Roll Texture, Shape and Storage
If the bread rolls are eaten soon after they are baked, the exterior will slightly crusty and chewy. The inside of the breads are soft and chewy. They do lose the crustiness the next day.
These bread rolls will not rise as high as classic bread rolls. They come out to be about the thickness of a hamburger bun sliced in half.
The bread rolls can be stored in an airtight container at room temperature. The breads are best consumed within 1-2 days.
More Easy Bread Recipes
- 3 Ingredient Parmesan Bread Rolls
- 3 Ingredient Peanut Butter Bread
- 2 Ingredient Banana Bread Rolls
- No Yeast Honey Bread Rolls
3 Ingredient Buttery Bread Rolls
Ingredients
- 2 cups (250 g) self-rising flour, see note regarding amount needed
- 1 cup (8 oz) milk, or milk alternatives
- 2 tbsp (28 g) butter, melted
Instructions
- Preheat oven to 350°F. Line a baking sheet with parchment paper.
- In a large mixing bowl, combine flour and milk. Use a spatula to stir until no flour chunks remain. You may need to press your spatula down on flour chunks to break up the flour. Your mixture should be a thick liquid. Let the mixture sit for 5 minutes. During this time you should see the mixture rise slightly and thicken.
- Use a cookie scoop (or ice cream scoop with release lever) to scoop out dough balls, placing them on your prepared baking sheet, spaced 2 inches apart. I was able to get 10 dough balls. I used a 1.5 tbsp cookie scoop but I heaped the amount in each scoop so that it was more than what the scoop holds. It's okay if the bread dough spreads out a little after they are placed onto the baking sheet. This is normal as these breads will not be as tall as typical bread rolls.
- Brush surfaces of bread generously with melted butter. Bake bread rolls for about 23 minutes or until done. Your finished breads will not change much in color. They will be stay pale but the bottoms should be a golden brown.
Notes
- This recipe was originally tested with White Lily self-rising flour which has a lower protein amount than some other brands of self-rising flour. The amount of protein affects the amount of liquids needed. If you are using a self-rising flour that has 2 grams of protein per 1/4 cup, then you can make the recipe as written.
- If you are using a self-rising flour brand that has 3 grams of protein per 1/4 cup, then remove 4 tbsp of flour from the amount stated in the recipe and replace with 4 tbsp of cornstarch.
- To properly measure flour, spoon the flour into the measuring cup and then level off with a knife. Do not directly dip the measuring cup into the flour because this results in too much flour. Use this method of measuring whether you are measuring self-rising flour or measuring all purpose flour to make your own self-rising flour.
- Homemade self-rising flour:
- If you are using all purpose flour with 2 grams of protein per 1/4 cup: Whisk together 2 cups all purpose flour + 3 tsp baking powder + 1/2 tsp salt.
- If you are using all purpose flour with 3 grams of protein per 1/4 cup: Whisk together 1 cup + 12 tbsp all purpose flour + 4 tbsp cornstarch + 3 tsp baking powder + 1/2 tsp salt.
- The dough will be very sticky and wetter than typical bread dough. The easiest way to scoop it is with a cookie scoop since it has a release lever to release the dough directly onto the baking sheet.
- I used low-fat milk but the recipe will also work with whole milk. You can also use milk alternatives like soy, almond, coconut or oat milk.
- I don't recommend leaving out the butter. The butter not only adds flavor to the bread, but it adds fat to the recipe, which keeps the tops of the breads from being too dry.
- I have not tested this recipe with gluten-free flour or whole wheat flour.
- I used White Lily Self Rising Flour.*
- *This product link is an affiliate link. This means I earn a small commission from qualifying purchases.
Tried this recipe out of desperation. Very happy with it! I made a 1.5x batch, but either needed to add milk to make it a liquid, or I miscounted something. Still tasted great! I want to try making other treats with it now too!
We’re so glad you enjoyed this recipe!!
OMG this bread was fabulous!!!!!
Thanks so much!
OMGosh!! Soo good!!! Every single time i make this, it is raved about! I added a banana…wow!
So glad it’s a hit!
The proportions of this recipe are all wrong. Two cups of flour to one cup of milk does not make a liquidy mixture. Gave up in the end. Disappointing that all the reviews were from people who didn’t try the recipe. Waste of time and flour.
If by liquidy, you are thinking of something with a drinkable consistency then no that is not how the dough should be. We describe the dough as a thick liquid because it is too wet to shape on its own but it is thick enough that you can scoop out dough balls.
Hi
Can all your bread recipes be frozen as soon as they have cooled
Many thanks in advance
It depends on the recipe, but these bread rolls should freeze fine.
Hi, Can this be done with wholemeal flour?
You can try it, but your rolls may be a little drier so you may need to adjust the other ingredients. We haven’t tested this so can’t give you exact amounts.
I have not tried any of your recipes yet,but just by reading some I’m getting excited to try.always interested in learning something new .In these trying time with limited incomes it’s great to learn and be able to share the extra things that can be made with limited ingredients ! Bravo,for teaching us can’t wait to get started ty!
We hope you give the recipe a try soon!
During these times stock up an learn america.
The author can call what they want…i will call it bread…..
Can’t wait to try.l signed up for your emails. I bet the recipe s are all great. Ty
Thanks for subscribing!
This is basically the same recipe for Australian damper! So quick to whip up and lovely with butter and jam and a cup of tea!
I haven’t tried Australian damper but thank you for sharing!
CAN BE MADE WITH GLUTEN FREE FLOUR . G F TAKES A BIT LONGER TO BAKE . I LIKE TO ADD 2 T. SUGAR . THANKS FOR THE RECIPE.
Thanks for sharing that – glad you enjoyed it!
Dear Kirbie, I enjoy reading through your recipe. I hope to try one soon. Thanks so much for making it simple and easy.
Thank you for the nice comment!
Haven’t tried yet but will be on next day off. Thank you. T
I hope you enjoy them!
Those are called biscuits not rolls. That’s all the same ingredients used to make homemade biscuits. Come-on people really.
Just because it’s the same ingredients doesn’t mean it will yield the same results. The quantities/ratios make a huge difference. I’ve made biscuits using these same ingredients, but this comes out as a bread, not as a biscuit. This recipe uses a lot more liquid which turns the dough into a bread.
Hey Brandy, what the heck do you care what the recipe author calls the breads??? If you write your own recipe, you can call it what you want. You come off as a querulous jerk who probably regularly flubs recipes and then blames the recipe authors.
I love this
Thank you!
I can’t wait to make these little breads. They look delicious!
Hope you love them!
I followed the recipe, but the dough was thick and shaggy, not a thick liquid as described. So I added more milk, just to incorporate all the flour and get closer to the description.
These came out terrible. They tasted like flour, and were tough around the edges from the butter pooling. They went into the trash.
If it was thick, you might have added too much flour.