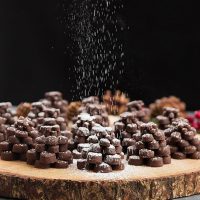
These chocolate shortbread cookies are cut and stacked to resemble pinecones with a light dusting of powdered sugar snow. They make for a fun holiday cookie.
For the past two years, I’ve made my Matcha Christmas Tree Shortbread Cookies. This year I decided to change it up with these pinecone cookies. They are pretty easy to make and are so pretty to look at.
The assembly does take a little time. I used three different sized flower cutters from this set, though you can use other brands. It’s not the best quality of cookie cutters, but it was the size and shapes I was looking for. I wanted round edges to resemble the pinecone shape. I actually used the pointier flower petals from this set to make my christmas tree cookies. Each pinecone is made up of two of each size and held together with chocolate frosting.
I think the main reason I wanted to make these was so that I could make it “snow” on them with powdered sugar. Wheeee!!!
More Recipes to Try
Chocolate Pinecone Shortbread Cookies
Ingredients
for the cookies
- 8 oz unsalted butter at room temperature
- 2/3 cup powdered sugar
- 1/2 tsp vanilla extract
- 2 cups all-purpose flour
- 3 1/2 tbsp dutch processed cocoa powder
for the frosting/glue
- 1/2 cup powdered sugar
- approx 1 tbsp water
- 3/4 tbsp dutch processed cocoa powder
Instructions
- In a stand mixer, beat butter and powdered sugar together on medium speed for about 3 minutes, until the mixture is very smooth. Beat in vanilla, then reduce mixer speed to low and add flour and cocoa powder, mixing just until dough is completely smooth and uniform.
- Gather dough and place in between two sheets of parchment paper. Roll the dough (putting your rolling pin on top of the parchment paper) into a rectangle shape that’s 1/4 inch thick. Refrigerate the dough for at least 2 hours
- After the dough is firm, preheat the oven to 325°F. Cut the dough with your 3 cookie cutters. For each pinecone, you will need two of each size. Place cut cookies onto three different baking sheets lined with silicone baking mats, one sheet for each size.
- Baking time will vary depending on the size of your cookies. You may want to do a test round of just one of each size first, but luckily, the shortbread is pretty forgiving on time. My largest cookies were about 1 3/4 inch wide and I baked them at 16-17 minutes. The medium ones were about 1 1/4 inch wide and I baked them 14 minutes. The smallest ones were 3/4 inch and I baked them for 9 minutes.
- Let cookies cool. While cookies are cooling, make your frosting. Pour sugar and cocoa powder into a bowl. Add water, a little at a time. 3 teaspoons equal 1 tbsp, so you can actually use a teaspoon to add water just a little at a time. Whisk after each water addition. It does not take a lot of water for the sugar to dissolve into a frosting. You want your frosting to be on the thick side, so that it will hold the pinecone layers together. Whisk until frosting is smooth.
- To construct your pinecones: Using the back of a spoon, dip it into your frosting and then spread a little at the center of the underside of one large cookie. Place that cookie on top of another large cookie, making sure to position it so that the petals overlap and are not stacked directly on top of each other. Add frosting to the underside center of one medium cookie. Now place that on top of the stack of two large cookies, again positioning the petals for overlap. Spread a little frosting to the underside center of another medium cookie. Place that on top of your stack, overlapping the petals. Repeat with two small cookies. Set aside and continue with the rest of your cookies. Dust with powdered sugar before serving.
The nutrition information provided are only estimates based on an online nutritional calculator. I am not a certified nutritionist. Please consult a professional nutritionist or doctor for accurate information and any dietary restrictions and concerns you may have.








These turned out great 😀 Love the shot of the sugar ‘snowing’ on the pinecones!!
Thanks! I’m pretty excited without how they came out!