
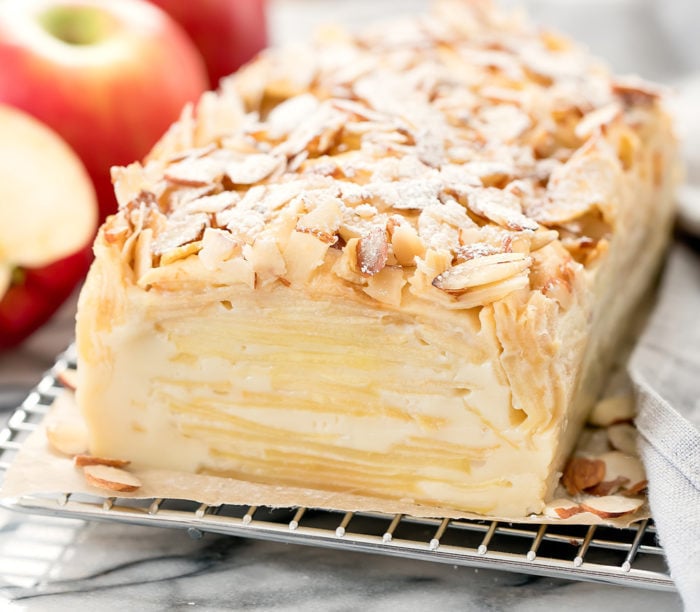
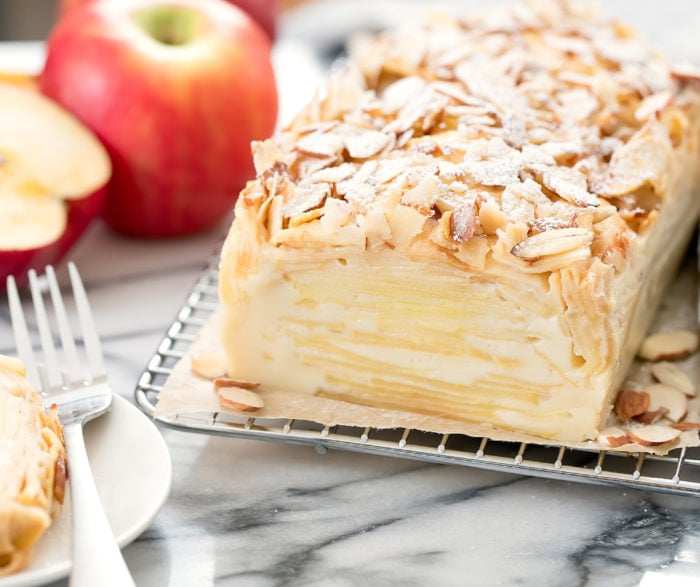
Invisible Apple Cake (Gâteau Invisible) features dozens of layers of thinly sliced apples held together with only a little bit of cake batter. This impressive looking dessert is French, but it has become immensely popular in Japan.
With apple season in full swing, I wanted to share this unique apple dessert. It is also something a little different you can bring to Thanksgiving this year.
The cake is called Gateau Invisible because the apples disappear into the cake once it is baked. I’m not sure this is the most accurate description. I’ve never had the cake in France, and perhaps the original version is made up of apples thin enough that they disappear into the cake but the Japanese versions I’ve found use thicker slices of apples so that the cake becomes dozens of apple layers.
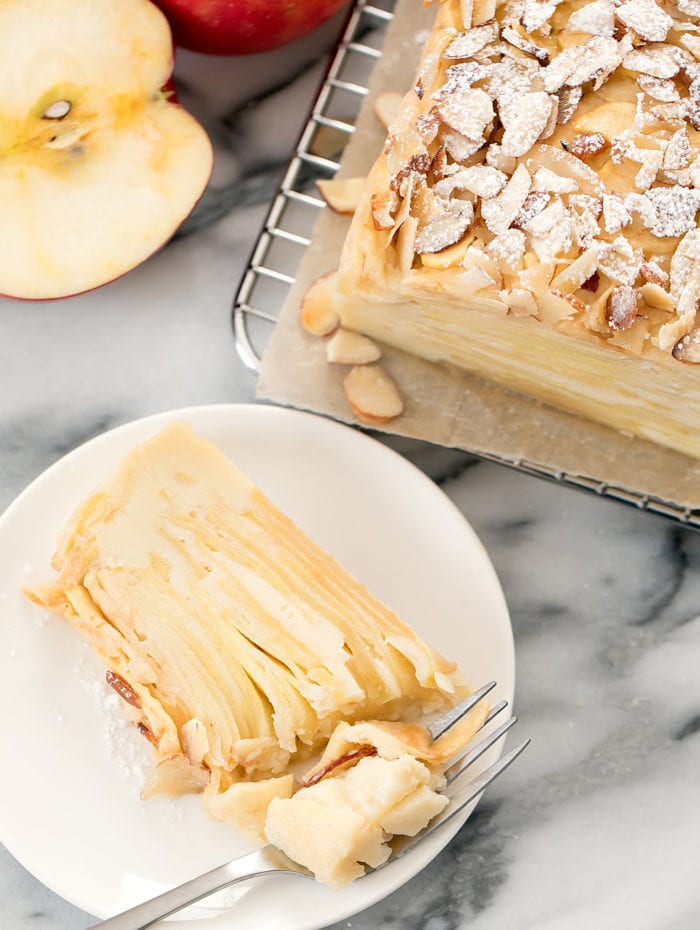
The cake is made up of sliced apples coated in a custard-like cake batter. When baked, it becomes dozens of soft thin layers of apples held together by a firm custard. It is quite impressive to look at and it’s not as sweet as most desserts.
How to Slice the Apples for Invisible Apple Cake
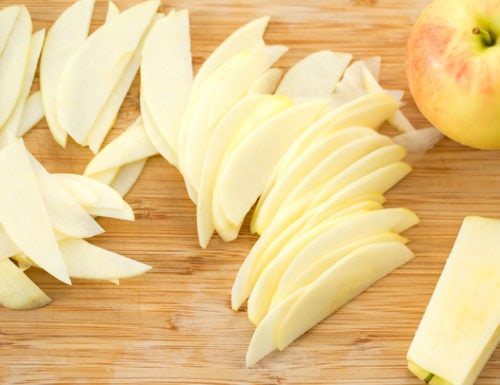
Since this cake is made up almost entirely of apples, the apple slices are the most important step. Here are some tips and photos.
- Choose a sweet apple variety, like fuji, honeycrisp, ambrosia or pink lady.
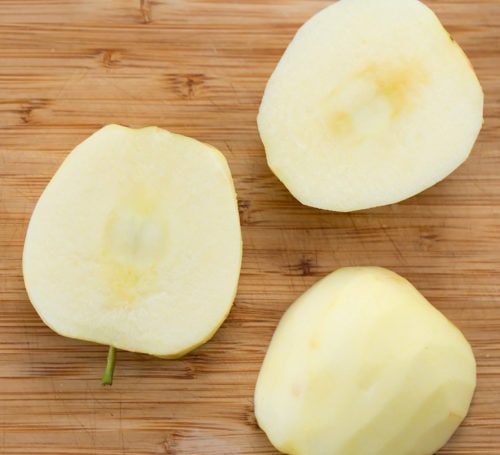
- Peel the apples completely.
- Using a sharp knife, slice one side of the apple as close to the core as possible. Do the same with the other side of the apple.

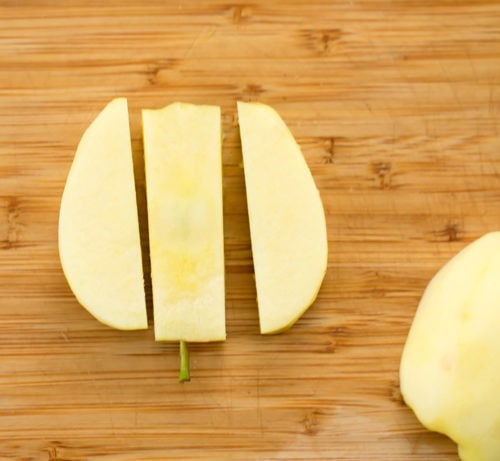
- Slice the two sides left, as close to the core as possible.

- Flip your apple slices so the flat side (the cut side) is facing down. Now evenly and thinly slices the apples. The apple slices should be able 2mm thick. If they are too thin, they slices will break off before your knife reaches the end of the apple. If they are too thick, your apple layers will look too thick in the cake.

- You don’t need a mandoline to slice your apples. You can achieve thinner slices with a mandoline but you don’t actually want the slices that thin for this recipe because the apple slices will break when mixed with the batter and the apple layers disappear too much into the cake. Cutting by hand as thinly as possible is the optimal width for these apple slices.
How to Make Invisible Apple Cake
- Once the apples are sliced, you make an easy cake batter which you can mix with a whisk and a bowl. No electric mixer needed.
- The apples are then added to the cake batter. Try your best to separate any apple slices stuck together before adding them into the batter.
- Use a spatula to stir around the apples until all the apples are thinly coated in batter.
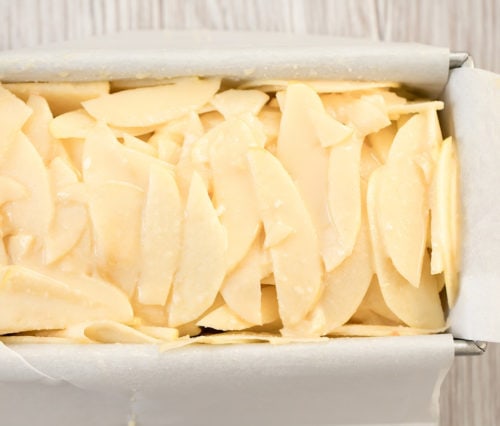
- Place the apples into a lined loaf pan. Try your best to place them in so they are all facing the same way. After all the apples have been added, pour remaining cake batter over the apples. Be sure to scrape your bowl to get every last bit of the cake batter.

- Top apple cake with some sliced almonds and place into oven to bake. Close to the end of baking time, you will need to place a foil tent over the cake so that the top of the cake and almonds don’t burn.
- Once the cake is done it needs to cool and set. The cake needs to be placed in the fridge for several hours, though ideally overnight is best. The custard needs to firm up or you will not be able to slice into the cake. The cake will shrink as it sets.
- When cake is ready for serving, remove from fridge. Dust the top with powdered sugar. Use a sharp knife to slice and serve.
More Creative Apple Desserts

Invisible Apple Cake
Ingredients
- 1 ½ lb apples choose sweet ones like fuji, honeycrisp, ambrosia, pink lady
- 3 large eggs
- 6 tbsp sugar
- 1/2 cup milk any kind
- 1 tbsp unsalted butter melted
- 3/4 cup all-purpose flour
- 1/3 cup sliced almonds
- powdered sugar for topping
Instructions
- Peel the apples and slice very thinly, about 2 mm thick. Please see notes above for method to slice the apples.
- Preheat the oven to 350F. Line an 8 inch by 4 inch baking loaf pan with parchment paper.
- In a large bowl, whisk the eggs and sugar until pale yellow. Add the milk and melted butter and mix until smooth.
- Sift in the flour. You want to sift it in to keep the batter light. If you do not have a flour sifter, this can easily be done with a mesh strainer. Add about third of the flour into the strainer. Place strainer directly above the bowl with the batter and tap the side of the strainer against your palm, letting the flour sift through into the bowl. Repeat with remaining flour. Whisk the batter until smooth.
- Add about half the sliced apples to the batter. Do your best to separate any slices stuck together before adding. Use a rubber spatula to stir apples until they are all coated with batter. Add in remaining apples and stir and coat until all apples are thinly coated in batter.
- Spoon the apples into parchment paper-lined loaf pan. Try your best to make the apples all face the same way. Pour leftover batter over cake. Use spatula to scrape bowl to get every last bit of the leftover cake batter into your loaf pan.
- Sprinkle almonds over top of cake.
- Place loaf pan into the middle section of your oven and bake for 40 minutes. Cover top of cake lightly with a foil tent and bake another 10-20 minutes or until cake is done. To check if cake is done, stick a toothpick into the cake batter and the batter should no longer be liquid. Baking time can vary depending on the amount of apples you used and how much moisture was in the apples.
- Let cake cool to room temperature. Place into fridge to set overnight.
- Right before serving, remove cake from fridge. Top with powdered sugar. Use a sharp knife to slice cake.
Notes
- Recipe adapted from Tasty
- You can play around with the amount of apples. The cake works with less apples but you will have less slices and layers and the cake will not bake up as high. For a very high and impressive cake, you can add one more small to medium apple. Do not go over 2 lb of apples as your cake will be too moist and will not set.
- Using a more narrow loaf pan will also give your cake more height.
- If you prefer sweeter desserts, use ½ cup in the recipe instead of 6 tbsp.
- You can also add a little cinnamon to the cake batter to give this cake more of an apple-pie feel to it.
The nutrition information provided are only estimates based on an online nutritional calculator. I am not a certified nutritionist. Please consult a professional nutritionist or doctor for accurate information and any dietary restrictions and concerns you may have.


To us this was a fail, it turned out nice and looks impressive but as the recipe is has no flavor. It begs for vanilla, a little more sugar and cinnamon. It’s too much work for what it is. Glad we tried though.
If it had no flavor, it might have been the apples you used. It works best with sweeter varieties (we list some in the recipe card). The cake is not supposed to be overly sweet so the apple flavor is the main flavor. Also the original doesn’t have any cinnamon
I decided not to peel the apples, but did use a mandolin to slice them very thin. It worked great and saved so much time. The peel wasn’t even visible after the cake was baked! I will definitely make this recipe again!
We’re glad it worked with leaving the skins on! Thanks for letting us know.
Says to cool overnight. Is there a minimum amount of time needed if I want to make it the same day?
We always let it cool overnight, but if you make it in the morning and let it chill all day (if you plan to serve it in the evening) that should work.
Made without almonds, as I didn’t have any. Served warm with good vanilla ice-cream and a homemade salted caramel sauce!
That sounds amazing!
Could I use another sweetener besides white sugar?
We’ve only tested with granulated sugar.
DDDeeellliiiccciiiooouuusss!!!
Thanks so much!
Can box cake mix be used?
Sorry, we haven’t tried cake mix.
Not really – the texture is meant to be more like a set custard rather than cake.
Will this work using only almond milk?
Almond milk should work fine.
Thank you
I only have ordinary loaf pans. Can I use them?
Do you know what size they are? If they are larger it will work, but your cake won’t be as tall and the baking time may need to be adjusted.
I read that you cool the cake in the pan. When you refrigerate the cake overnight, is it still in the pan or have you taken it out once completely cooled?
Refrigerate the cake in the pan – hope that helps!
I had a very similar apple pie like this that my Mom made once. I have asked her many times to make it again, but she doesn’t remember making it. It was the best apple pie I ever had. The apples almost combine together to make almost like an apple sauce consistency, and combined with the custard brings it to a much higher level in the apple pie world…in my opinion,. I have said for years now how this pie with apples and custard is truly amazing. I am going to try this pie recipe, and I am not afraid to try making it with granny smith apples. I have found that the granny smith has the flavor that you are looking for in the other apples, but for some reason is never used in apple pies, so I am going to give it a try.
I hope it works out for you
I made this gâteaux this week, and it turned out quite nice! I had some Mutsu apples my M-I-L dropped off from a ‘you pick’ orchard by her house in Michigan. She lives outside of Detroit. I was inspired by this Japanese Apple varietal to find a dessert recipe with Japanese influence. When I found this recipe, I was so excited. I LOVE custard!
I did change a few things. I did not add the slivered almonds on top, because I wanted to try the cake itself first. I also used a blend of milks. I was surprised that this didn’t completely ruin my custard, honestly. I used a 1/4 cup of almond milk (natural, unsweetened, Kirkland brand), and supplemented the other 1/4 cup split between whole milk and A2 heavy cream from my local farmer.
I also added allspice, Ceylon cinnamon, and fresh grated nutmeg to the custard mix. Really just a dash of each, as I wanted a nice warm spice flavour without it becoming a ‘cinnamon apple’ flavoured dish. The spices added a nice warmth. After removing from the oven after baking, it dropped quite a bit and became very shallow. Next time I will not shock it out of the oven. I would recommend treating this dessert carefully, as you would a soufflé. I really wish it had kept it’s volume. When I removed it from the loaf pan, it help it’s shape nicely. I am excited to make this again and work on perfecting my technique.
Thanks for sharing this lovely recipe! Cheers!
thank you for sharing your experience! I’m glad it worked out for you!
Do you cool it in the pan or do you remove it to cool and refrigerate?
I cool it in the pan
Can you store this in the refrigerator covered for at least 10 days?
I would not recommend leaving it in the fridge that long. It’s a custard and fruit which don’t last that long in the fridge
What an impressive desert! You made my day sharing a desert as elegant as this without using cream cheese. I love cream cheese, but it’s being over used in too many recipes these days. This cake will be my weekend project!
I hope it works out for you!
About how many apples did you use?
1 1/2 lbs worth of apples. apples vary a lot in size, so listing the number of apples won’t be very accurate
If this helps whatsoever — I used small Mutsu apples from a local orchard. I believe I used about 9 of them.
When you buy your apples for this recipe, I would purchase two pounds of apples, allowing for a potential half pound waste after peeling and coring the apples.
If you bought large apples like Jonathan or Macintosh, you may only need 5 or 6. So it does vary quite a bit!!
That looks really cool! Once I’m on winter break and have more time, I will try making this.
Hope you have fun! Mr. K helped me make one of them and he was so excited with how it turned out that he brought his into work.