I always look forward to the fortune cookies given at the end of a Chinese restaurant meal. Recently, I’ve seen a lot of recipes for fortune cookies, claiming they are quite easy to make.
I think fortune cookies would be a fun dessert for Chinese New Year or a fun personalized treat for your special someone on Valentine’s Day (especially dipped in some chocolate), so this weekend I thought I’d try making some.
The cookie batter was pretty simple to make. I had a hard time understanding how I was supposed to shape the fortune cookies. I finally found some great step by step pictures here.
You have to fold the fortune cookies while the cookies are still hot because as soon as they begin to cool they won’t be able to be shaped. It was a little painful working with the hot cookies.
My cookies didn’t come out exactly right. Even while hot, I couldn’t seem to get the dough to bend without cracking slightly in the middle. Also when the dough did finish cooling, it never completely turned as crispy as fortune cookies are supposed to, but instead remained a little chewy.
I’m not sure where I went wrong. I’m probably going to try again with another recipe. Since this was a test run, I actually didn’t put any messages in these fortune cookies.
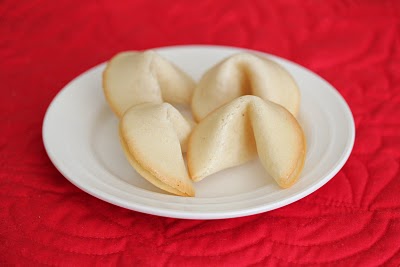
Fortune cookies
Ingredients
- 2 large egg whites
- 1/2 tsp pure vanilla extract
- 1/4 tsp pure almond extract
- 3 tbsp vegetable oil
- 8 tbsp all-purpose flour
- 1 1/2 tsp cornstarch
- 8 tbsp granulated sugar
- 3 tsp water
Instructions
- Write fortunes on pieces of paper that are 3 inches long and 1/2 inch wide. Preheat oven to 300°F. Line 2 baking sheets with parchment paper or silpat mats.
- In a medium bowl, lightly beat the egg white, vanilla extract, almond extract, and vegetable oil until frothy, but not stiff.
- Sift the flour, cornstarch, and sugar into a separate bowl. Stir the water into the flour mixture.
- Add the flour into the egg white mixture and stir until you have a smooth batter. The batter should not be runny, but should drop easily off a wooden spoon.
- Place level tablespoons of batter onto the cookie sheet, spacing them at least 3 inches apart. Gently use the back of the back of a spoon to make circular motions on the surface of the batter to form circles with about 3.5” diameters.
- Bake about 14-15 minutes until the outer 1/2-inch of each cookie turns golden brown and they are easy to remove from the baking sheet with a spatula.
- Working quickly, remove the cookie with a spatula and flip it over in your hand. Place a fortune in the middle of a cookie. To form the fortune cookie shape, fold the cookie in half, then gently pull the edges downward over the rim of a glass, wooden spoon or the edge of a muffin tin. Place the finished cookie in a muffin tin so that it keeps its shape while it cools. Continue with the rest of the cookies. View here for good step by step photos.
Notes
The nutrition information provided are only estimates based on an online nutritional calculator. I am not a certified nutritionist. Please consult a professional nutritionist or doctor for accurate information and any dietary restrictions and concerns you may have.




Looks really good! Is the almond extract necessary?
Well I’ve never tried it without. I think it makes it does affect the flavor, making it more like fortune cookie taste.
Making homemade fortune cookies sounds like it would be intimidating, but you make it sound so easy and fun. They turned out so beautiful! Your photos are amazing.
I thought they would be hard, but they really aren’t. And homemade ones are a fun thing to make and fill with your own fortunes or messages. =)
Well my sis makes amazing Fortune Cookies, and they end up crisp and sweet. If I’m not mistaken she found the recipe on Food Network 🙂 Maybe you can give them more time in the oven to avoid getting them chewy.
I’ll look around for the food network recipe and I’ll try putting them in the oven next time. They were already a golden brown so I didn’t want to overbake.
What a perfect timed post for Chinese New Year! I was looking for an easy recipe to make with my Kindergarten class. Thanks!
It does sound like something fun to make with a class. Though the dough is very hot to work with so you won’t want the kids doing that part.
the first 2 cookies i did were a little thicker and chewy too, i think you just need to spread them into bigger and thinner circles
Thanks for the advice!
I got all happy when I saw this recipe! It always seems so daunting to make so I’m hoping your recipe/method will be easier.
The pics look beautiful thou! I think dunking those suckers in chocolate will fix any imperfections (which is exactly what I’m going to do w/ my first batch!)
Nice job 🙂
I actually dipped a few of the ends in chocolate, but my chocolate was too thin so it didn’t look so pretty. I’m definitely going to attempt again till I get this right!