

Honey Castella Cake Mastered!
Castella cake is a popular Japanese sponge cake. The key to making it at home is in preparing the eggs which are whisked over warm water until they hold soft peaks. This is what gives the cake its tight and spongy crumb.
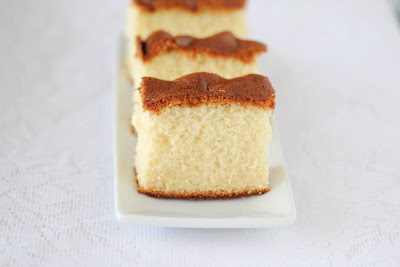
They say the third time’s the charm… About a month ago, I posted that I was going to give up trying to bake a successful castella cake.
I’d had two failed attempts and the only recipe that seemed promising also seemed very complicated. I had just bought some castella cake at my local Japanese market and it tasted good and only cost me $4. Why waste my time trying to bake my own?
But I got a rush of comments and encouragement, and I decided to give it just one more try…and this time it worked! I was so thrilled. I put off checking on my cake for the longest time. I was so afraid it had collapsed like my previous attempts. But when I finally took a peek, it was perfect.
Okay so it didn’t look as picture-perfect as the ones I buy because the top did shrink a little like it is supposed to, but it tasted just like it should. And in some ways, it tasted so much better because I had made it myself. The one on the left is the one I bought from the store. The one on the right is the one I made.
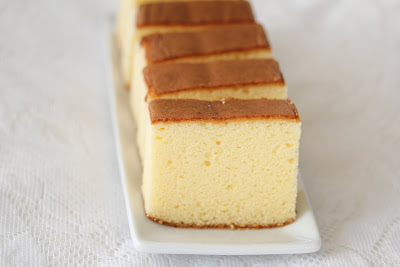
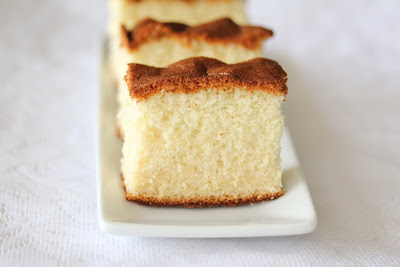
What is a Castella Cake?
For those of you who have never heard of castella cake (also called Kasutera cake), it is a popular Japanese sponge cake that has a texture that is quite different from typical Asian sponge cakes.
There are a couple of things that make castella cake unique:
- It doesn’t use any oil. No oil at all! You would think the cake would come out dry, but it doesn’t. You don’t miss the oil at all.
- The other thing that is different is the texture. Most Asian sponge cakes have a light airy texture achieved by mixing egg whites into the batter. Castella cake actually is not light or full of air. Instead, the crumbs on the cake are actually compact and tight. The texture actually creates a little bit of a bounce. It’s hard to describe if you haven’t eaten it before, but if you have, you probably know what I am talking about.
Ingredients
- Large eggs
- Granulated sugar
- All-purpose or bread flour
- Milk
- Honey
Tips for Making It
The key to baking a successful castella cake is in the eggs. The eggs must be beaten for a very long time over a pot of warm water which keeps the eggs warm.
The warm eggs are then able to achieve a meringue-like state which makes delicious castella cake that doesn’t collapse. When I first read about having to stand over a stove with a mixer for 15 or more minutes, I thought there was no way I was going to go to all that trouble.
However, the Boyfriend made a rare appearance in the kitchen and decided to do that part for me. It really helps to have a baking assistant. I did realize though that even if he wasn’t around, I could do this myself next time and not feel like it is too complicated.
Yes, the eggs take a while. But once you finish the eggs you are almost done. There are so few ingredients in a castella cake that the hardest part of the preparation is the eggs. Then you whisk in some sugar, milk, honey and flour and it’s ready to go in the oven. So overall, the time to prepare is about the same time to prepare other dessert recipes.
What I learned about the eggs is that you want to beat them until they reach a stage where you could draw a letter on the top of the batter with your mixer and the letter would stay on the surface for a few moments before eventually sinking back down.
I also noticed that the color of the eggs changes from a pale yellow to almost a white color. I think we ended up beating the eggs on low speed for about 15 minutes before we achieved what we were looking for.
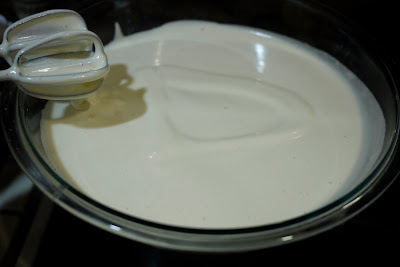
We used a hand mixer and put the bowl of eggs on top of a pot of water. I had previously boiled the water, turned it off, then while the pot still had some steam coming out, I placed my bowl of eggs on top. You don’t want it to be too hot because you don’t want your eggs to cook.
About halfway into the mixing, I felt like the pot had cooled down too much, so then I turned the pot on very low, so it didn’t actually boil but began to create some steam again to keep the egg mixture warm.
Once you’ve prepared the eggs you can make the batter and bake the cake. I got my successful baking tips from The Little Teochew.
Cooling and Slicing the Cake
Another thing you must do with this cake is refrigerating it right away so that it does not dry out. This is one of the reasons it’s hard to prevent collapsing.
Normally a trick to preventing collapsing is allowing the cake to cool gradually by opening the oven door for about 10 minutes before taking the cake out. However, you don’t want the castella cake to cool at room temperature. You want to refrigerate it almost immediately.
I took mine out and immediately it began to collapse. Within two minutes, or as soon as I could kind of handle the cake, I put it in a Tupperware container, sealed it, and put it in the fridge and didn’t touch it until the next morning.
The next day I did encounter a problem cutting this cake. The cake is a little bit sticky because of the honey. I wanted my cake to slice perfectly so perhaps I should have used a very big sharp knife. I was tempted to use my brother’s sashimi knife. Instead, I used a small sharp knife.
I cut very very slowly. Sort of like slowly peeling off a bandage. So, with my knife, I only cut into the cake a little at a time. I kept running my knife back and forth into the cake, but doing it almost like a saw motion and only digging in a little more at a time.
I also wiped down the blade after each slice was completely cut. This seems to help create the effect I was looking for and my cake did not come out looking all ragged and uneven, but it’s still not perfect.
Usually, the sides of the cake are cut off and the part that is served is the inside. The sides of the cake are actually a dark brown and have an almost dry/burned taste, so it doesn’t taste very good.
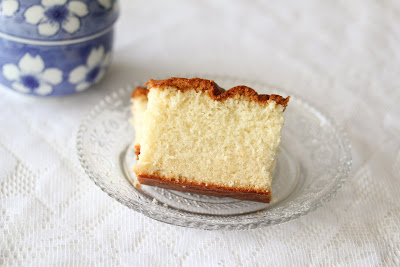
Although it’s not absolutely perfect, I am so pleased with how this castella cake turned out. I’ve learned so much and after almost giving it feels so great to have success. I’m going to make this again for my parents. I also want to try a matcha version which is a popular flavor I often see.
More Asian-Style Desserts
- Chinese Sponge Cakes
- Cherry Blossom Raindrop Cake
- Japanese Milk Pudding
- Mochi Ice Cream
- Chinese Pineapple Cakes
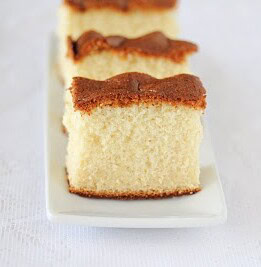
Honey Castella Cake
Ingredients
- 8 large eggs
- 10.5 oz (300 g) granulated sugar
- 7 oz 200 g all-purpose or bread flour
- 3.5 fl oz (100 cc) milk
- 4 tbsp honey, plus 1 tbsp for the top of the cake, warmed
Instructions
- Preheat oven to 340°F (170°C). Lightly butter a 8x8-inch cake pan and line it with enough parchment paper so some hangs over the sides. The butter will help keep the parchment paper in place. Sprinkle some sugar in the bottom of the pan (on top of the parchment paper).
- Bring a large pan (big enough to cover the bottom of your large mixing bowl) of water to a boil and then turn off the heat.
- In a small bowl, combine the milk and 4 tablespoons of honey. In a separate bowl, measure the flour and sugar and sift them twice using a fine mesh sieve or sifter.
- In a large bowl, whisk the eggs. Place the bowl over the pan of hot water that you boiled. Add the sugar and whisk, holding the bowl on top of the pan, until the mixture warms to a lukewarm temperature. Remove the bowl from the pan and continue whisking. If the mixture cools, place it over the pan of hot water to warm it back to lukewarm. Continue whisking until the mixture holds soft peaks, about 15 minutes if you are using an electric whisk. It will take much longer if you are whisking by hand. See the notes in my post about how I completed this step for more details.
- Once the mixture holds soft peaks, whisk in the milk and honey. Add the flour, one tablespoon at a time, and beat the batter until no dry lumps of flour remain.
- Pour the batter into the prepared baking pan filling it all the way to the top. Bake the cake for 50 minutes or until an inserted toothpick or skewer comes out clean.
- While the cake is baking make the glaze by mixing 1 tablespoon of honey with a little hot water. Once the cake is out of the oven, brush the top with the glaze.
- Once the cake is cool enough to handle, but still warm, lift it out of the pan using the parchment paper hanging over the edges like handles. Place the cake (with the paper) in a plastic bag and seal the bag. Chill the cake for several hours in the refrigerator. This will ensure the cake maintains it’s moist texture, so be sure you place it in the refrigerator while it’s still warm.
- To serve, slice the cake into pieces using a sharp knife. Cut the sides off the sides of the pieces leaving a crust on the top and the bottom of the slice.
Notes
You’re likely not going to get to this, but here goes: I haven’t tried each method yet, but they might logically work for your shrinkage problem. A) try cooking the cake in a bain marie, a water bath. The gentle insulation of the batter might prevent your cake from shrinking due to temperature. B) possibly try it without the oil on the other side of the parchment and see how it goes. Even though it isn’t touching the cake it might be interacting with other somehow. C) Try cooking it slowly by cracking the oven and letting it fall in temp. The air bubbles in the cake may not shrink as quickly. Possibly put a towel or wrap over it while it does this, to reduce moisture loss.
thanks for sharing your tips. I’ve definitely come across or used them for other types of cakes but don’t see them used for castella cake.
hello i really want to try this recipe but do we really need a wooden moul or pan
no you just need an 8 inch rectangular baking pan like the recipe states
hi there…I’d like to introduce you to your new favorite castella recipe….https://www.japanesecooking101.com/kasutera/ … its much much easier — no heating required with great results….(the only things I recommend is to reduce the sugar to just one cup and bake it at a constant 325 for 55 minutes)…give it a try!
thanks i will try this!
Hey, would you recommend this recipe for a relatively newish baker? This recipe looks so nice but I don’t want to try it if I know I wouldn’t do it enough justice. Thanks!
I would say no. This took me quite a while to get right, so I don’t think it’s a good recipe to start off with for a newish baker.
Hello hello! Reporting after my first attempt at castella cake!
Thank you so much for the link to the recipe and all of the tips. I think that I beat my eggs too fast, so the cake wasn’t as picture perfect as the store bought ones. Of course, my inadequate cutting skills didn’t help. But still a success! Mmmmmm,so yummy. My goal is to make a perfect castella, just like the ones in your other photos.
I’m glad your castella cake was a success! Homemade is definitely better. I was just thinking the other day that I want to make this again.
I had been wanting to make castella for decades; I had clipped a recipe from a Time-life series cookbook and it had been sitting idly on the shelves; now with your recipe and guidance I will be attempting this!
I hope you succeed! It was so thrilling to bake this cake and have it come out right!
This looks so delicious! I had my first attempt at making a Kasutera cake this weekend and it was a bit of a disaster (tasty but utterly collapsed and heavy), you’ve inspired me to give it another go!
That happened to my first two attempts. It’s definitely all about the eggs. You have to beat the eggs until they basically turn white and you can take your mixer and draw something using the egg mixture left on the beater and it won’t disappear right away. Good luck! You should definitely try again.
Nice to know it works! I love your castella cake, beautiful!:)
Commercial castella cake, or any sponge cake actually uses “Sponge emulsifier”(or SP)which stabilize the eggs and make them easy to whip, hold their volume for a long time, and the product never collapse. SP is easy to get in Asian countries but not so much here. (but it’s the idea about homemade, you don’t want chemicals anyway! )
Thanks for sharing!
I’ve heard of this sponge emulsifier, but yes, I don’t believe it is available in the US. I guess it is better to be able to do it without the chemicals. Thanks for your tips from the previous post!
Well done, congrats, kudos! The cake is beautiful and the texture is perfect. Good things come to those who persist. 😉
Thanks Ju! And thanks so much for your post. It was both helpful and inspiring!
Congrats on your successful castella! I have yet to experiment with it : D
Castella cake is really delicious, you should definitely give it a try.
Yay! They look delicious!